
Connectors
Set up a connector
Install a connector for your organisation, fill in its configuration, register an OAuth app or store an API key, and decide who may use it. With every screen, the provider guides, the network allowlist and the fix for each connection error.
Every connector is set up the same way, whatever it connects to: you install it for the organisation, fill in what the connector needs to know, prepare the sign-in at the provider, and decide who may use it. After that, each person connects their own account with one click, or works with a shared account you connected for everyone.
This guide follows Jana Brandt, admin at Brandt & Söhne, through two typical cases. Outlook Mail signs in with OAuth, so Jana registers an app in Microsoft Entra once, and every employee then signs in with their own Microsoft account. Paperboi, the company’s archive, runs on a server in the office network and uses API keys, so Jana enters the API address, releases the server in the network allowlist and stores one shared key. Most other connectors are a variation of one of these two.
Before you start
Section titled “Before you start”- You need the right
ai.plugin.admin. Administrators have it. - Look up how the connector signs in. The catalog lists it per connector, and the connector page shows it in its Setup section.
- For OAuth connectors: you need admin access to the provider’s developer console (Microsoft Entra admin center, Google Cloud Console, Atlassian developer console and so on) to register an app.
- For API key connectors: decide whether each person brings their own key or one shared key covers everyone.
- For systems in your own network: the system must be reachable from the nexxus server. You release its address under Network allowlist, see below.
Install the connector
Section titled “Install the connector”-
Open AISet up AIConnectors.
The catalog shows Installed connectors first, then Popular ones (by number of people connected in your tenant), then every category. As an admin you see the whole catalog. Everyone else only sees what is installed.
-
Find the connector with Search connectors, or narrow the list with the tabs All, Integrations, Skills, Tools.
-
Click + (Install) on the connector’s card.
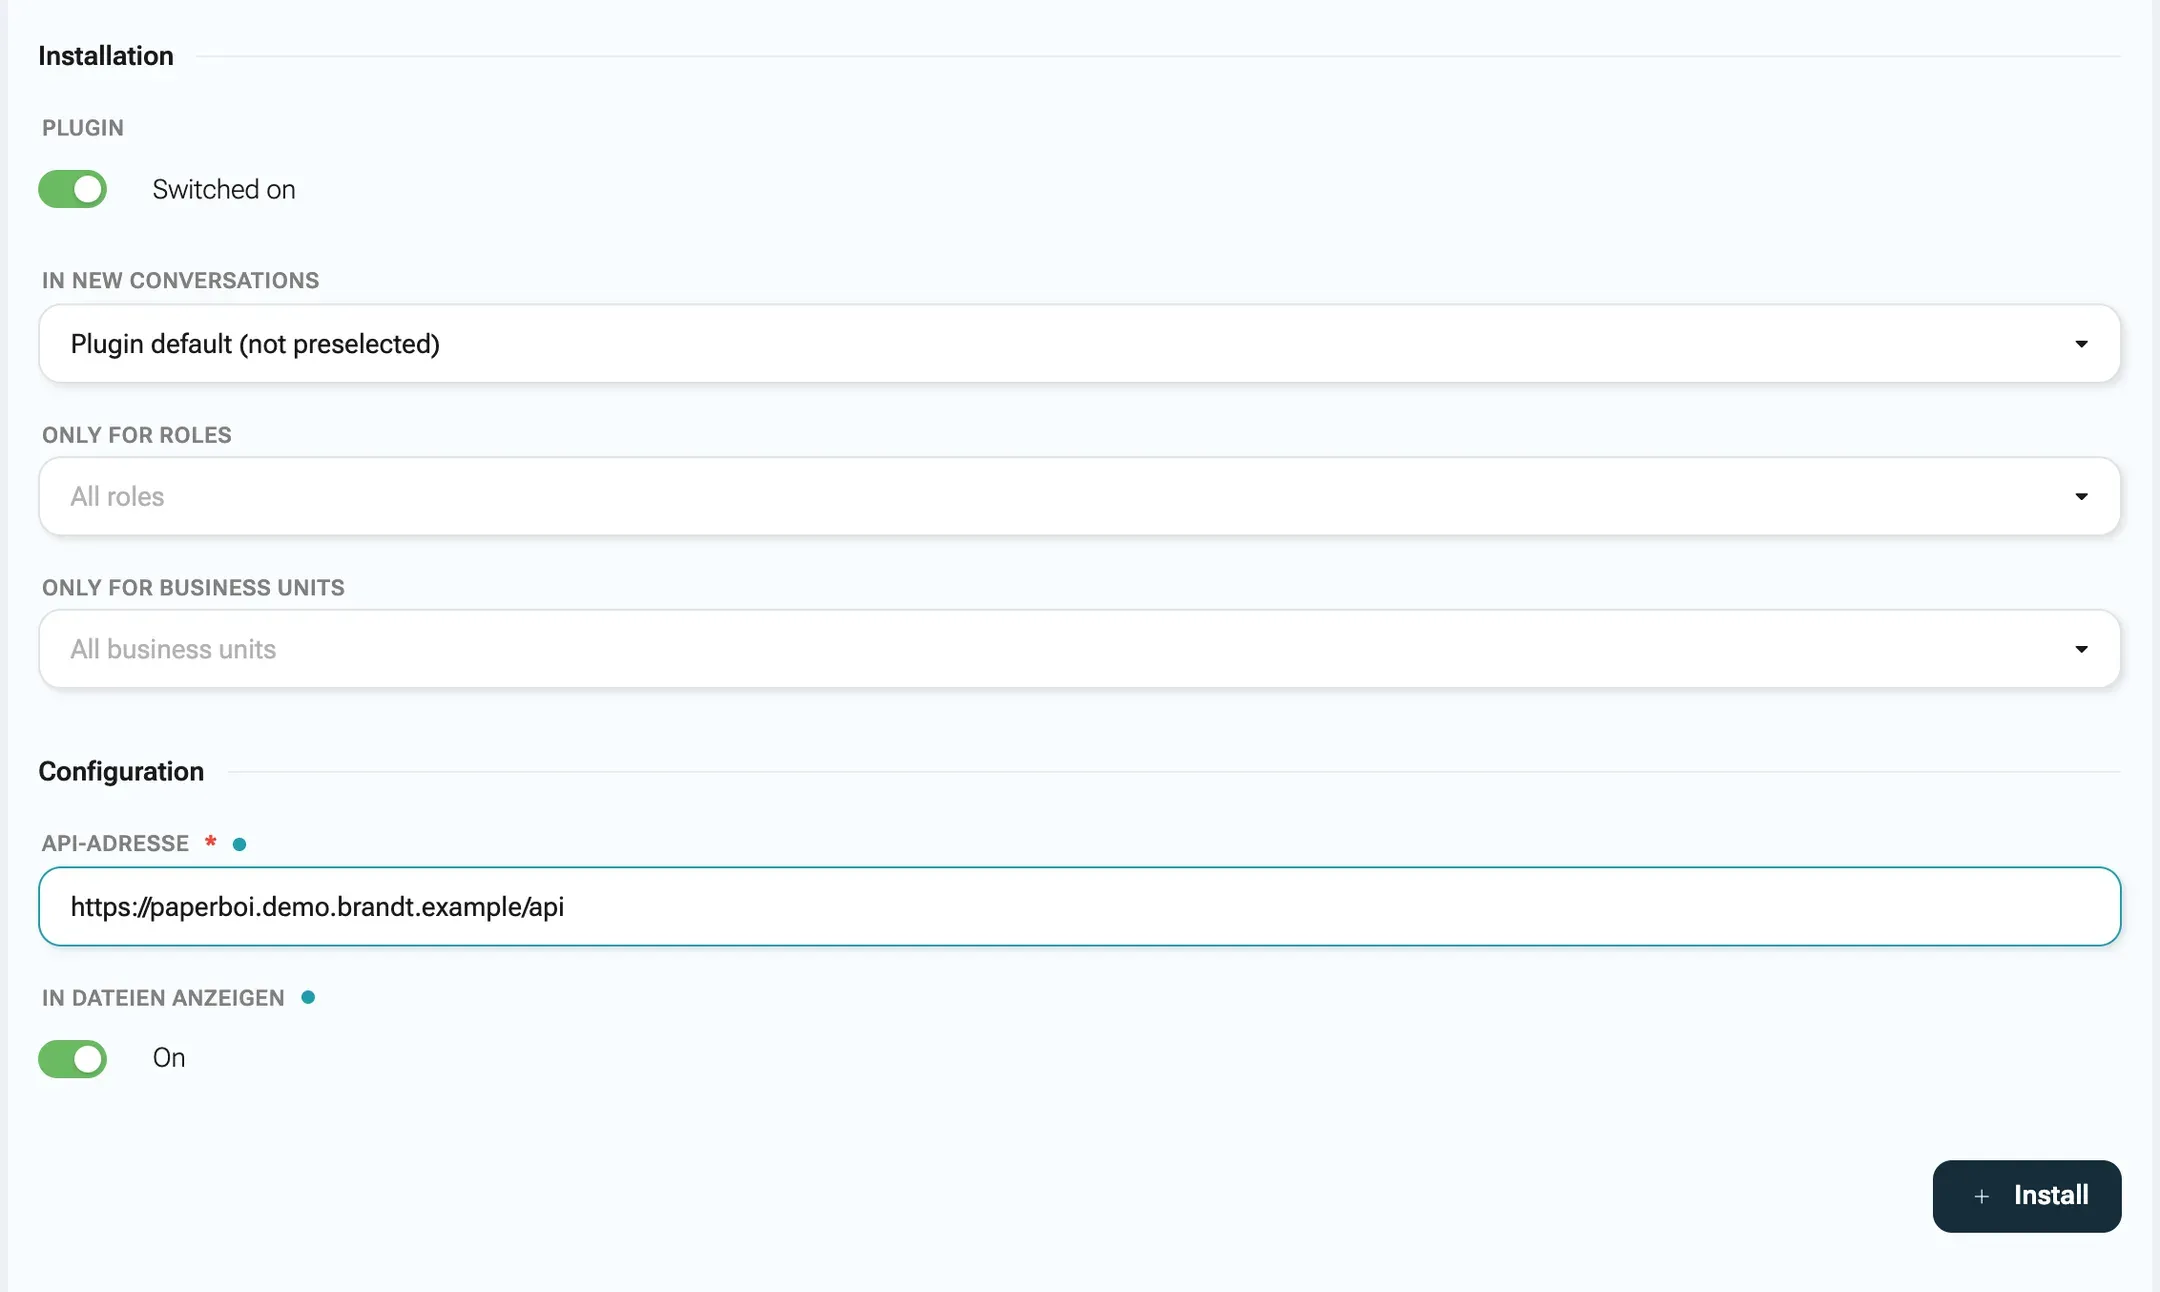
If the connector needs a value before it can work, for example Paperboi’s API address, nexxus opens the connector page at Configuration and puts the cursor into the first empty required field. Otherwise you see {name} is installed.
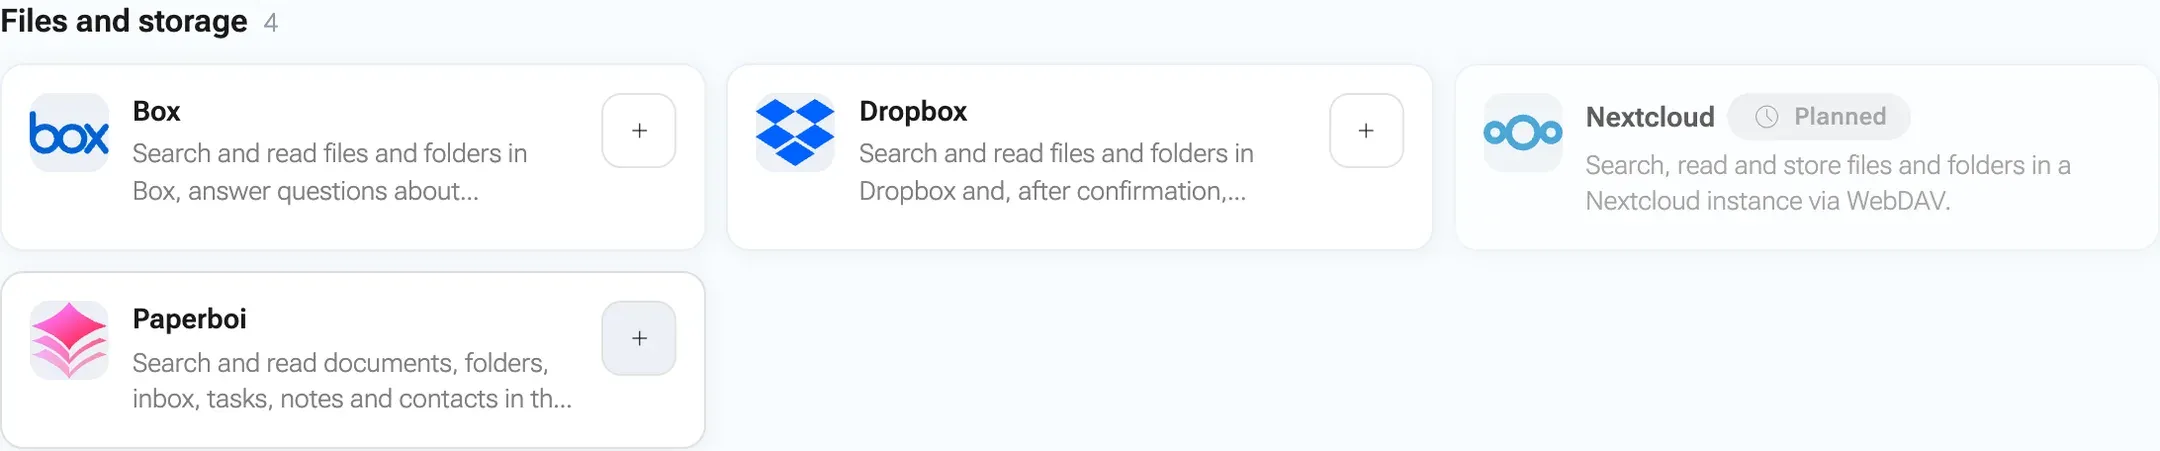
"+" installs the connector, or opens its configuration first if it needs a value. -
Click the connector’s name to open its page.
You can also open a connector first and click Install at the top of its page. The page starts with the description and one sentence on where the data goes, for Paperboi for example that requests go with the person’s key straight to the configured Paperboi instance. Below come the sections that apply to this connector:
| Section | Who sees it | What it is for |
|---|---|---|
| Setup | Everyone, admins in more detail | What to set up at the provider and what each person needs before connecting |
| My connection | Everyone, for connectors with a personal sign-in | Connect, reconnect, add permissions, disconnect |
| Connection for everyone | Admins, for connectors with a shared sign-in | Connect one account for the whole organisation |
| Permissions | Everyone, for connectors with permission groups | Which groups the organisation allows and the person grants |
| Requires | Skills | The connectors this skill switches on with it |
| Actions | Everyone, checkboxes for admins | Every action, reading or writing, allowed or not |
| Triggers | Connectors with triggers | Start one of your AI schedules when something new arrives |
| Installation | Admins | On or off, preselected or not, limited to roles or business units |
| Configuration | Admins | Values for everyone: API address, OAuth app, regional server |
| Recent calls | Admins | Who called which action when, without content |

Fill in the configuration
Section titled “Fill in the configuration”Configuration holds the values that apply to the whole organisation: the address of a self-hosted system, the region of the provider, or your own OAuth app. The labels of these fields come from the connector itself and are in German, for example API-Adresse (API address) for Paperboi.
| Field type | Shown as | Notes |
|---|---|---|
| Address (URL) | Text field | Must start with http:// or https://, otherwise Please enter an address starting with http:// or https://. |
| Number | Number field | Whole numbers where the connector asks for one, such as a port |
| Yes or no | Switch On / Off | For example Paperboi’s In Dateien anzeigen (show in Files) |
| Choice | Drop-down | For example the region of DeepL, Intercom, Make, Pylon or Wrike |
| Secret | Password field, never filled in | After saving it shows Stored. Leave empty to keep it. |
| Text | Text field or text area | Anything else |
Required fields are marked Required. Click Save (or Install if the connector is not installed yet). nexxus encrypts the configuration as a whole and never shows a secret again.
OAuth connectors always offer Client-ID and Client-Secret here. Connectors that sign in at Microsoft also have Entra-Mandant (Domain oder ID) (Entra tenant, domain or ID). An empty field takes the connector’s default, which is why many connectors install without opening the form at all.
Decide who gets it
Section titled “Decide who gets it”Installation
Section titled “Installation”Installation decides, for this tenant, whether the connector is on, whether it is preselected in new conversations and who may use it.
- Connector: Switched on or Switched off. Switched off, it disappears from everyone’s selection and the settings stay.
- In new conversations: the connector’s own default, shown as Connector default (preselected) or Connector default (not preselected), or your choice Preselected or Not preselected.
- Only for roles: empty means everyone allowed to use connectors.
- Only for business units: empty means all business units. A unit includes the units below it.
People who are not covered do not see the connector anywhere: not in the catalog, not in the chat.
Actions
Section titled “Actions”Actions lists every action with a Read or Write chip. Two checkboxes per action:
- Allowed: untick an action and the AI Assistant no longer gets it, for anyone in the tenant. Brandt & Söhne unticks Archive inbox document in Paperboi until the archive team has agreed on document types.
- Always confirm: make an action ask before every call, even a reading one. Where the connector already requires a confirmation, the checkbox is locked: This action always asks; that cannot be switched off.
Permissions
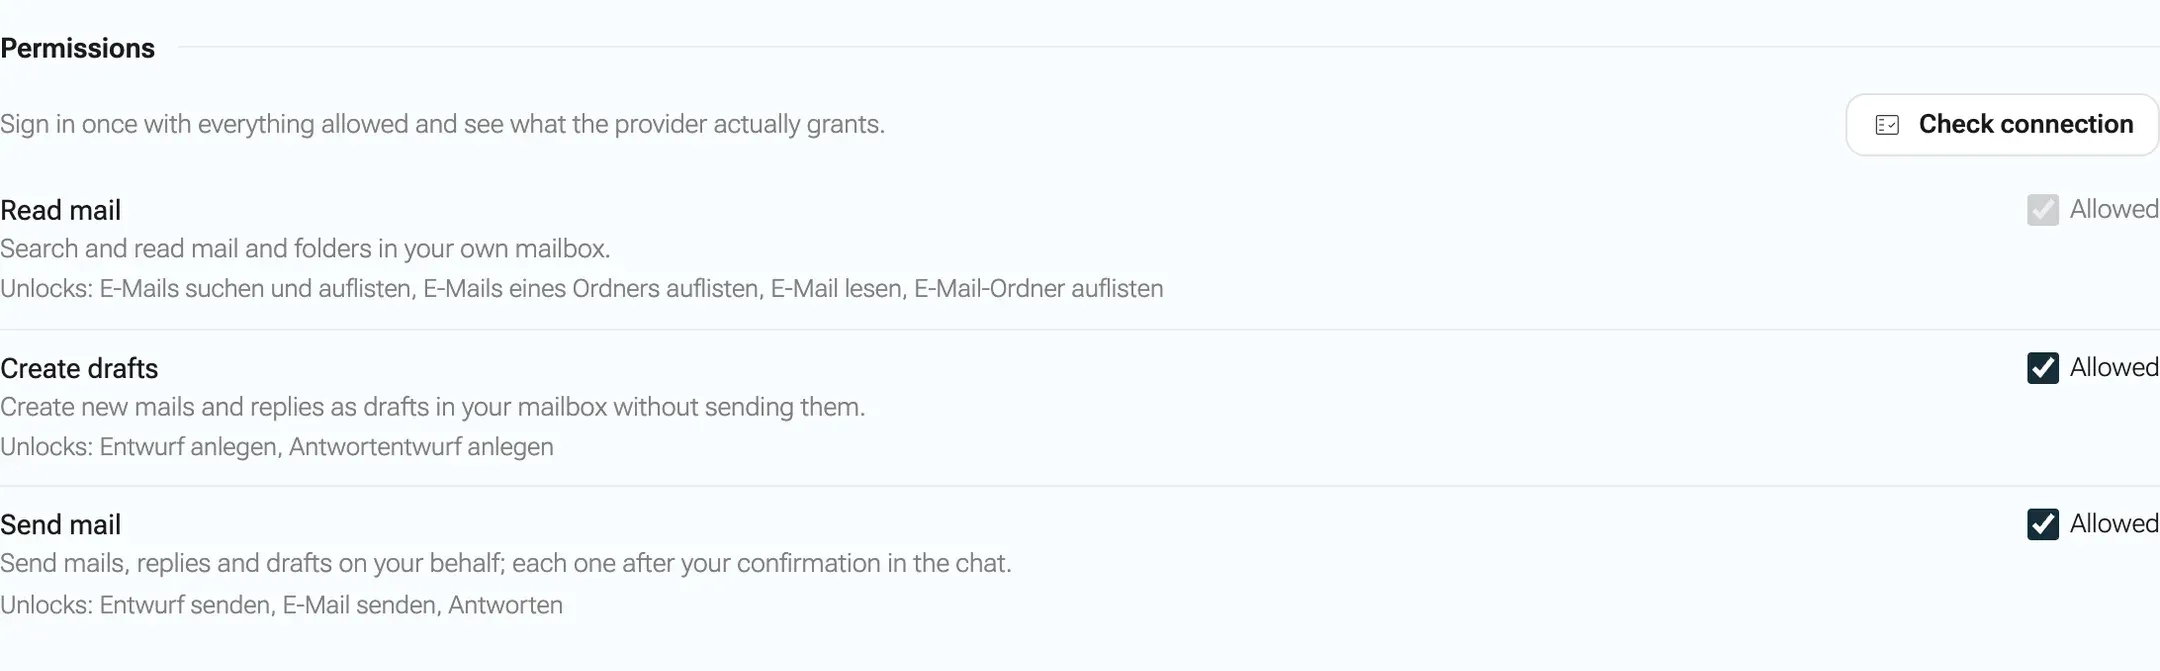
Section titled “Permissions”For connectors with permission groups, Permissions shows each group with what it unlocks. The checkbox Allowed decides whether the organisation offers the group at all. Groups switched off are not requested from the provider and not offered in the chat. Required groups are locked: The connector does not work without this permission.
Check connection signs you in once with everything allowed and shows what the provider actually grants, group by group: Granted, Not granted or Switched off.
Connect with an API key
Section titled “Connect with an API key”Connectors with an API key or a login need no app at the provider. Each person creates their own key there, or you store one key for everyone.
-
On the connector page, choose who the key belongs to.
- Your own: under My connection, click Connect.
- Everyone’s: under Connection for everyone, click Connect for everyone. This is only offered for connectors that allow a shared connection.
-
Enter the fields the connector asks for in the dialog Connect to {name} or Connect {name} for everyone. For Paperboi this is one field, Paperboi-API-Schlüssel (Paperboi API key): the secret key of a Paperboi API key with the scope “api”.
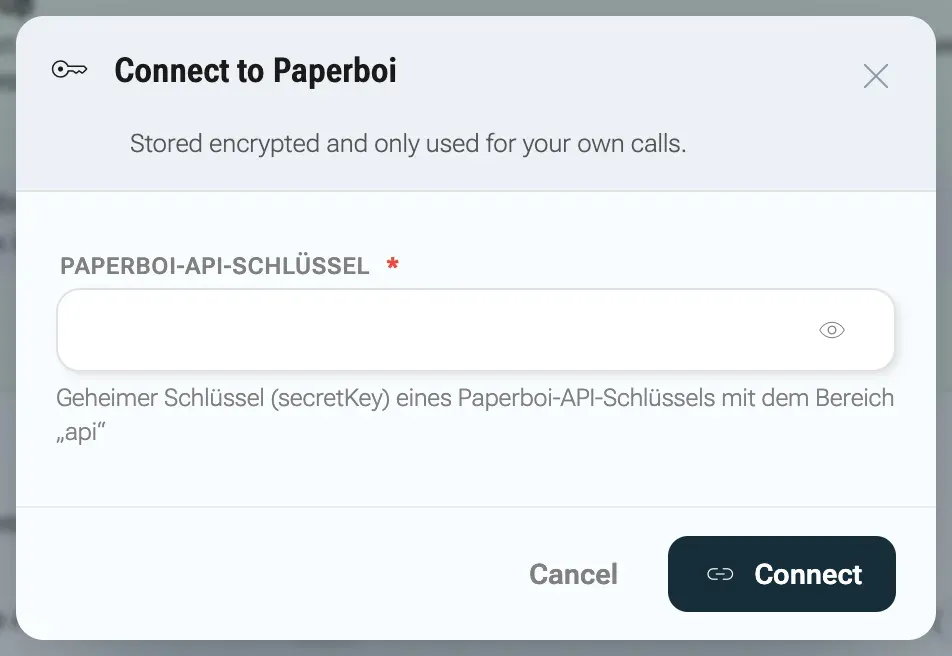
Keys are stored encrypted and used only for your own calls. -
Click Connect. You see {name} is connected.
The values are stored encrypted. A personal key is used only for your own calls. A shared key is used by everyone who has not connected their own. If a connector allows both, a person’s own key always wins.
Connect with OAuth
Section titled “Connect with OAuth”OAuth means each person signs in at the provider with their own account, and nexxus receives a token for that account. For this the provider needs to know nexxus: you register an app there once. The app has a client ID and a client secret, lists the redirect URI the provider may send people back to, and allows the permissions (scopes) the connector asks for.
You register an app
In the provider console, with the redirect URI and permissions from the connector page.
You store the app in nexxus
Client-ID and Client-Secret in the connector configuration.
Each person signs in
In a pop-up at the provider, with their own account.
The AI Assistant works with that account
Tokens stay on the server and refresh by themselves.
-
Open the connector page and look at Setup.
The head says At {name} with the chip No app set up yet, a button to the provider’s console and the provider’s guide. Below are numbered steps. The step that mentions the redirect URI carries a copy box Redirect URI (enter it in the provider’s app) with Copy, and the step about permissions lists Permissions the app has to allow. Steps that only this connector needs are marked Only for {name}.
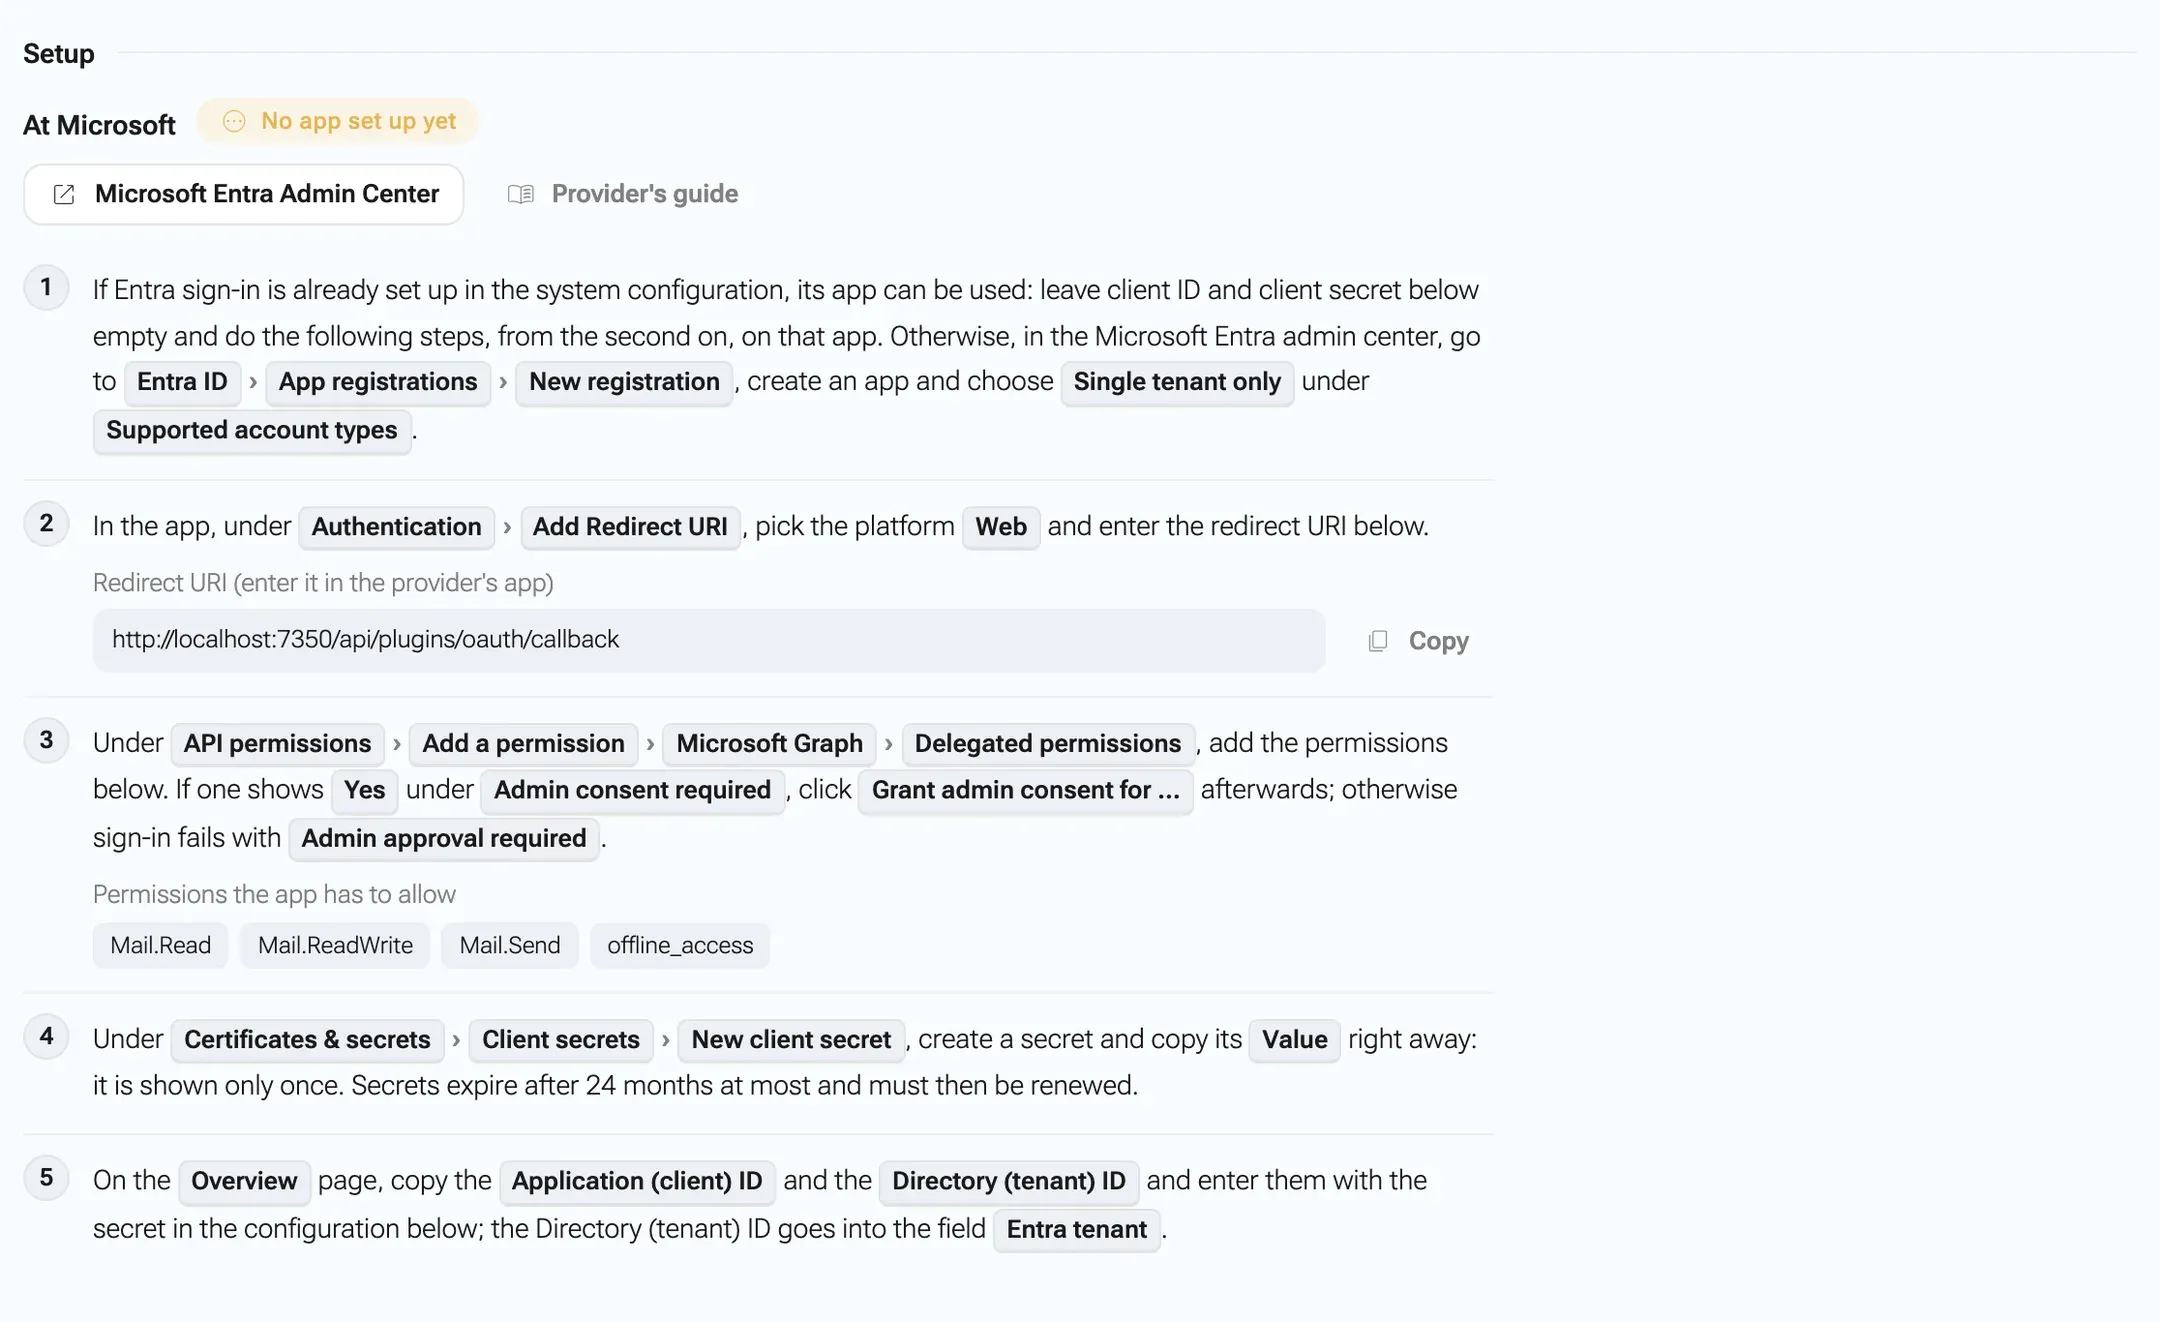
Setup shows the provider's steps with the redirect URI and the permissions built in. -
Register the app in the provider’s console and follow the steps. The guides for the main providers are summarised below.
-
Back in nexxus, enter Client-ID and Client-Secret under Configuration and click Save.
-
Setup now shows {name} is all set up. Copy the Message to your users and send it to your team. It tells them where to click and that the assistant only sees what their own account may see. The guide folds away, Show guide opens it again.
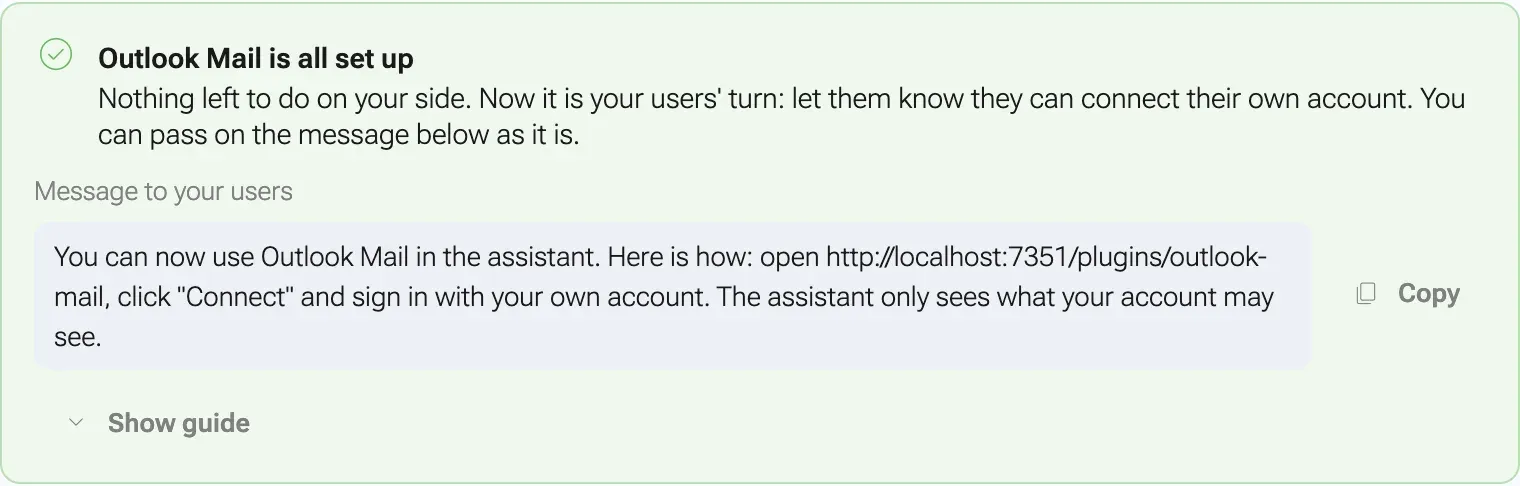
When setup is done, the page hands you a message to send to your users. -
Try it yourself: under My connection click Connect, tick the permission groups you want to grant, and sign in in the pop-up. After a moment you see {name} is connected.
The redirect URI
Section titled “The redirect URI”nexxus has exactly one redirect URI, the same for every connector and every provider:
https://<your nexxus address>/api/plugins/oauth/callbackThe connector page always shows the exact value for your installation, so copy it from there. On a self-hosted installation, nexxus builds it from the public address in the setting sso.issuer (environment variable NEXXUS_SSO_ISSUER). Set that to the public HTTPS address of your backend, otherwise the address is taken from the incoming request and may not match what the provider expects.
Provider guides
Section titled “Provider guides”nexxus ships setup guides for 25 OAuth providers. The connector page shows the one that fits, with the redirect URI and the permissions built in. Here is what they ask for.
Microsoft
Section titled “Microsoft”One Entra app covers every connector that signs in at Microsoft: Outlook Mail, Outlook Calendar, Microsoft Teams, SharePoint, OneDrive, Excel, Microsoft Planner, Microsoft Entra ID, Azure DevOps, Dynamics 365, Power BI, Microsoft Fabric, Azure Data Explorer, Azure Databricks and Azure Data Factory. A Microsoft connector without its own client ID uses the app of another installed Microsoft connector. If there is none, it uses the Entra app that your sign-in with Microsoft already uses. In that case, leave Client-ID and Client-Secret empty and only add the redirect URI and the permissions to that app.
- In the Microsoft Entra admin center, go to “Entra ID” › “App registrations” › “New registration”, create an app and choose “Single tenant only” under “Supported account types”. Skip this if you use the app of your Microsoft sign-in.
- Under “Authentication” › “Add Redirect URI”, pick the platform “Web” and enter the redirect URI.
- Under “API permissions” › “Add a permission” › “Microsoft Graph” › “Delegated permissions”, add the permissions shown on the connector page. If one shows “Yes” under “Admin consent required”, click “Grant admin consent for …” afterwards, otherwise sign-in fails with “Admin approval required”.
- Under “Certificates & secrets” › “Client secrets” › “New client secret”, create a secret and copy its “Value” right away. It is shown only once, and it expires after 24 months at most.
- On “Overview”, copy the “Application (client) ID” and the “Directory (tenant) ID”. Enter them with the secret in Configuration. The directory ID goes into Entra-Mandant (Domain oder ID).
Azure DevOps adds its own step: under “API permissions”, pick the API “Azure DevOps” instead of Microsoft Graph and add vso.project, vso.work_write, vso.code, vso.build_execute and vso.wiki. It accepts work and school accounts only.
Microsoft Fabric, Azure Data Explorer, Azure Databricks and Azure Data Factory add one step each as well: under “API permissions”, pick their API instead of Microsoft Graph. That is “Power BI Service” for Microsoft Fabric, “Azure Data Explorer”, “AzureDatabricks” and “Azure Service Management” for Azure Data Factory. The connector page names the permissions to add.
One Google app covers Gmail, Google Calendar, Google Drive, Google Docs, Google Sheets and BigQuery. Each connector adds one step: enable its API in the library.
- In the Google Cloud Console, create a project or pick an existing one.
- Under “APIs & Services” › “Library”, enable the API the connector needs (for Google Docs, the “Google Docs API”).
- Under “Google Auth Platform” › “Branding”, click “Get started” and enter an app name and support email. Under “Audience”, choose “Internal” if only accounts of your Google Workspace organisation connect. “External” is for all other accounts. While the app is in testing, add everyone who should connect under “Audience” › “Test users”.
- For “External” only: under “Google Auth Platform” › “Data Access” › “Add or Remove Scopes”, add the permissions from the connector page and save.
- Under “Google Auth Platform” › “Clients”, create a client of type “Web application” and enter the redirect URI under “Authorized redirect URIs”.
- Copy client ID and client secret right away. Google shows the full secret only when it is created.
- Enter both values in Configuration and save.
Atlassian
Section titled “Atlassian”One app covers Jira Cloud and Confluence Cloud.
- In the Atlassian developer console, choose “Create” › “OAuth 2.0 integration” and give it a name.
- Under “Authorization”, click “Configure” next to “OAuth 2.0 (3LO)”, enter the redirect URI as the “Callback URL” and save.
- Under “Permissions”, add the API of the connector (Jira or Confluence) and its permissions via “Configure”. Use the same app for both and add both APIs.
- Under “Distribution”, switch on “Enable sharing”. Without it, only the person who created the app can use it.
- Under “Settings”, copy the “Client ID” and the “Secret” and enter them in Configuration.
Other providers
Section titled “Other providers”These providers have a guide on the connector page as well. Each follows the same pattern: create the app in the console, enter the redirect URI, add the permissions, copy client ID and secret into Configuration.
| Provider | Where you register the app | Connectors |
|---|---|---|
| Airtable | Airtable, OAuth integrations | Airtable |
| Asana | Asana Developer Console | Asana |
| Box | Box Developer Console | Box |
| Calendly | Calendly Developer | Calendly |
| Canva | Canva Developer Portal, Your apps | Canva |
| ClickUp | ClickUp, Settings, Apps | ClickUp |
| Close | Close, OAuth Apps | Close |
| Cloudflare | Cloudflare Dashboard, OAuth clients | Cloudflare |
| Dropbox | Dropbox App Console | Dropbox |
| GitHub | GitHub, Developer settings | GitHub |
| HubSpot | HubSpot, Development | HubSpot |
| Linear | Linear, Settings, API | Linear |
| Miro | Miro, Settings, Your apps | Miro |
| monday.com | monday.com Developer Center | monday.com |
| Notion | Notion Developer portal | Notion |
| Pipedrive | Pipedrive Developer Hub | Pipedrive |
| Salesforce | Salesforce Setup, App Manager | Salesforce |
| Slack | Slack API, Your Apps | Slack |
| Todoist | Todoist App Management Console | Todoist |
| Webex | Webex for Developers, My Webex Apps | Webex |
| Wrike | Wrike, Apps & Integrations | Wrike |
| Zoom | Zoom App Marketplace | Zoom |
GitLab has no guide of its own. Its page shows general OAuth steps: create an OAuth application in your GitLab instance, enter the redirect URI, allow the permissions, and enter the application ID and secret together with the address of your GitLab instance in Configuration.
OAuth without an app
Section titled “OAuth without an app”Zapier signs in with automatic registration: at the first connection, nexxus registers itself as an app with the provider. Setup says Nothing to set up: on the first connection this application registers itself as an app at the provider. Everyone just clicks “Connect”.
Client ID and secret for the organisation
Section titled “Client ID and secret for the organisation”Personio and PayPal sign in as the organisation’s app, not as a person. Enter the client ID and secret from the provider’s API credentials in Configuration. Connection for everyone then says Connects by itself with the client ID and client secret from the configuration, on the first call. No person connects anything. For PayPal, the connector page adds its own steps: turn on “Transaction Search” for the REST app in the PayPal Developer Dashboard, otherwise PayPal refuses to list transactions.
How your users connect
Section titled “How your users connect”After setup, people connect in one of four places. All of them run the same sign-in.
- The connector page under My connection, the link in your Message to your users.
- The chat: the card Connection missing when the AI Assistant needs the account, the Connect button in the connector menu, or the row Connect accounts under the input of a new conversation.
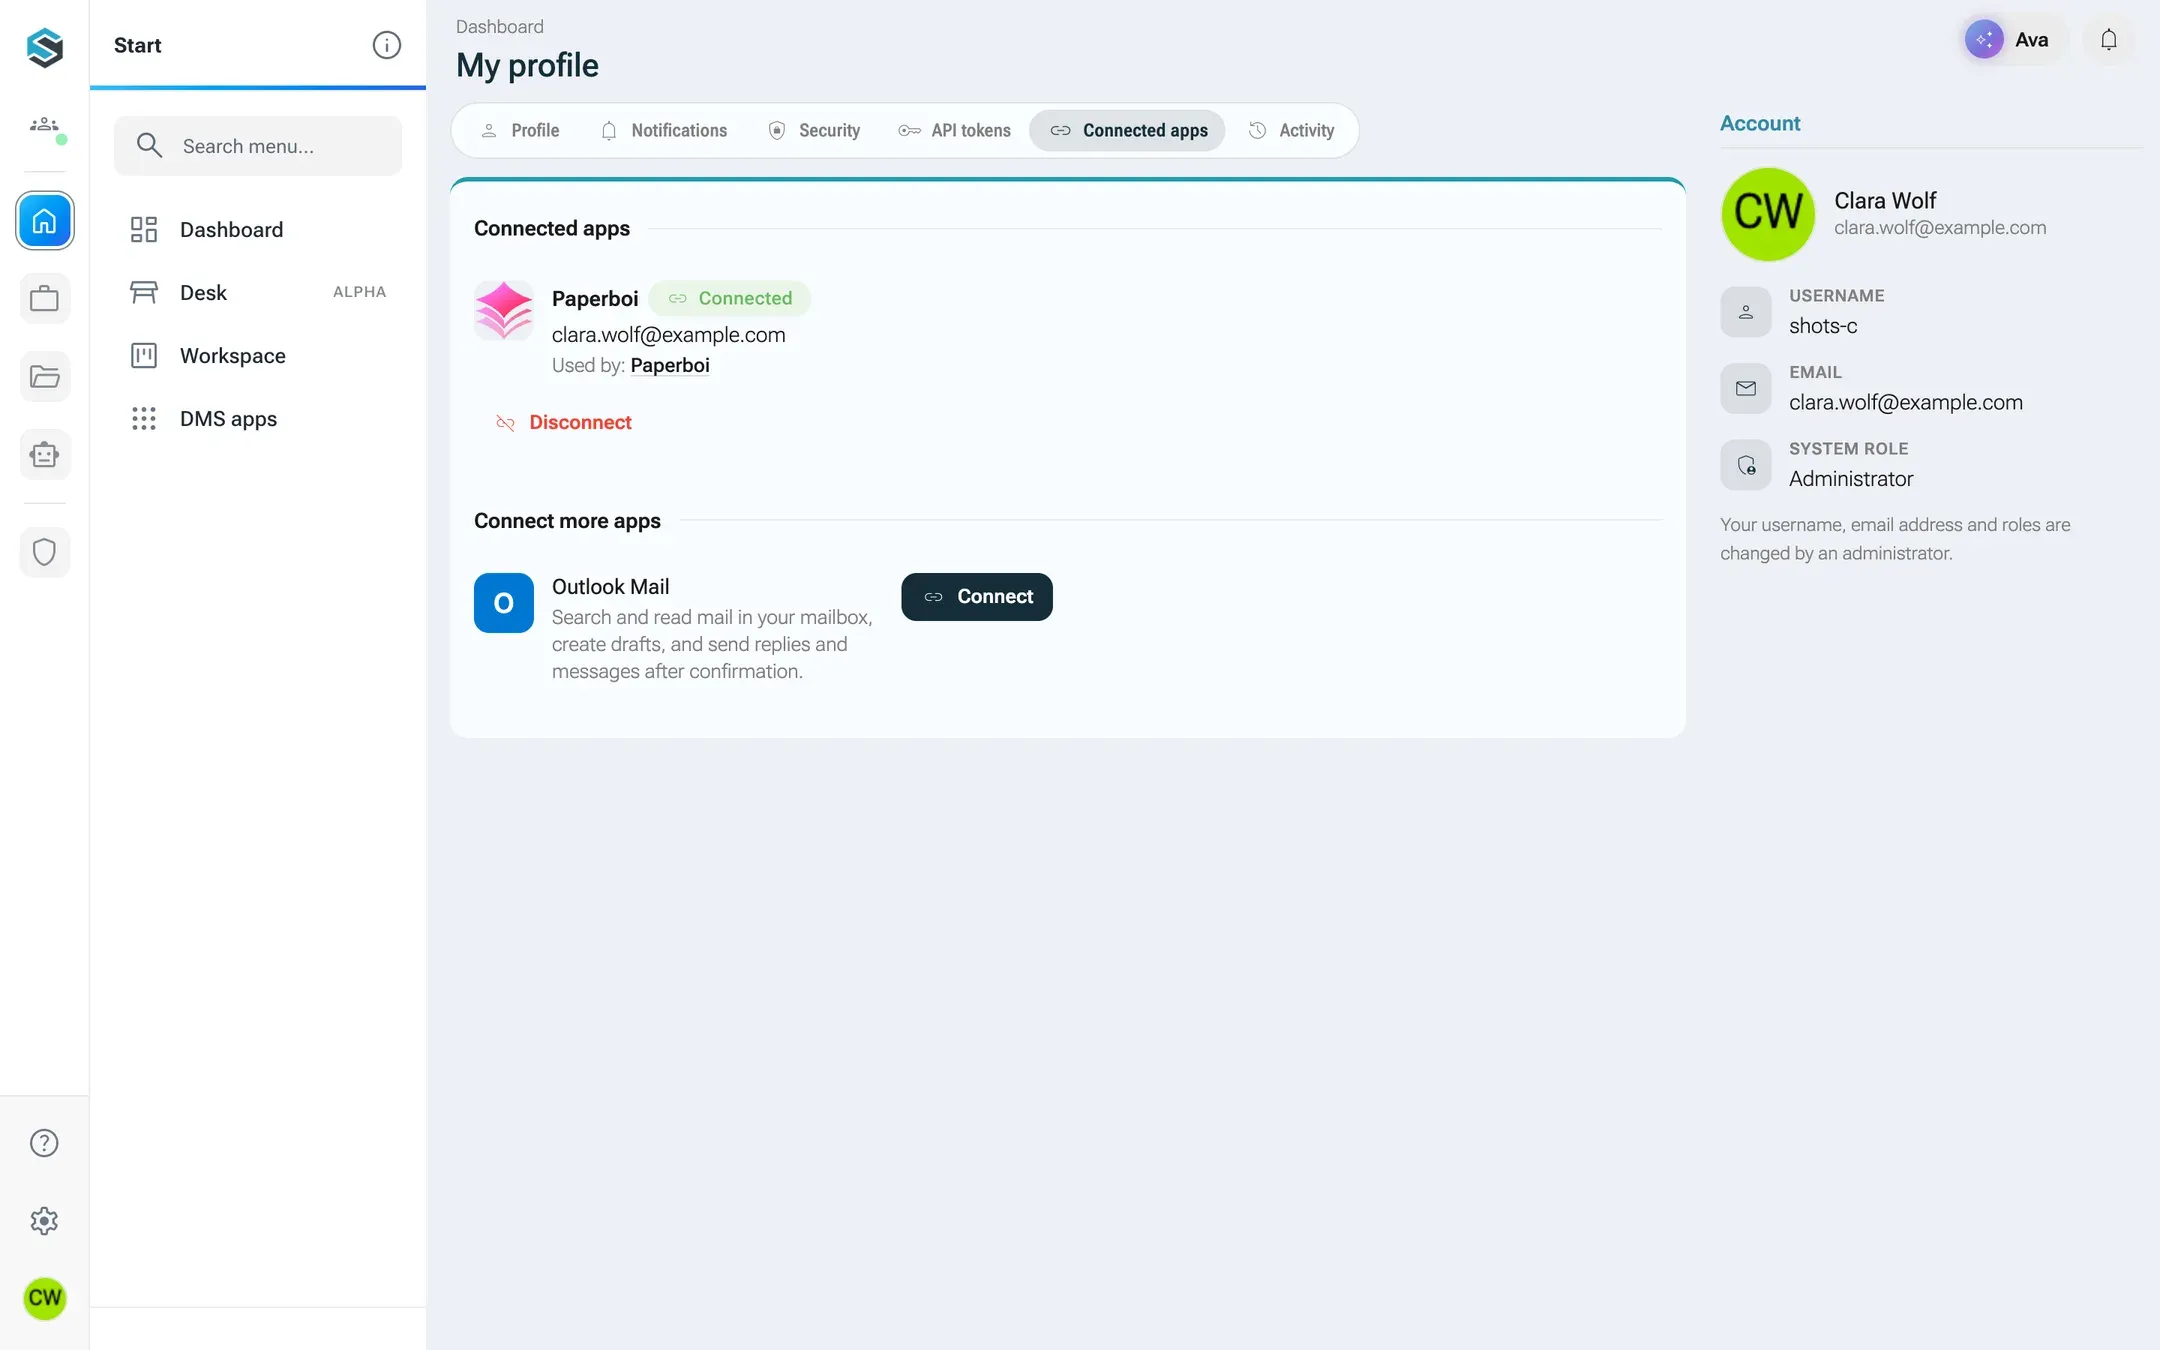
- My profileConnected accounts, section Connect more accounts: one row per provider with the connectors it covers.
- The desk, which lists the connectors the organisation set up for the person, one click per provider.
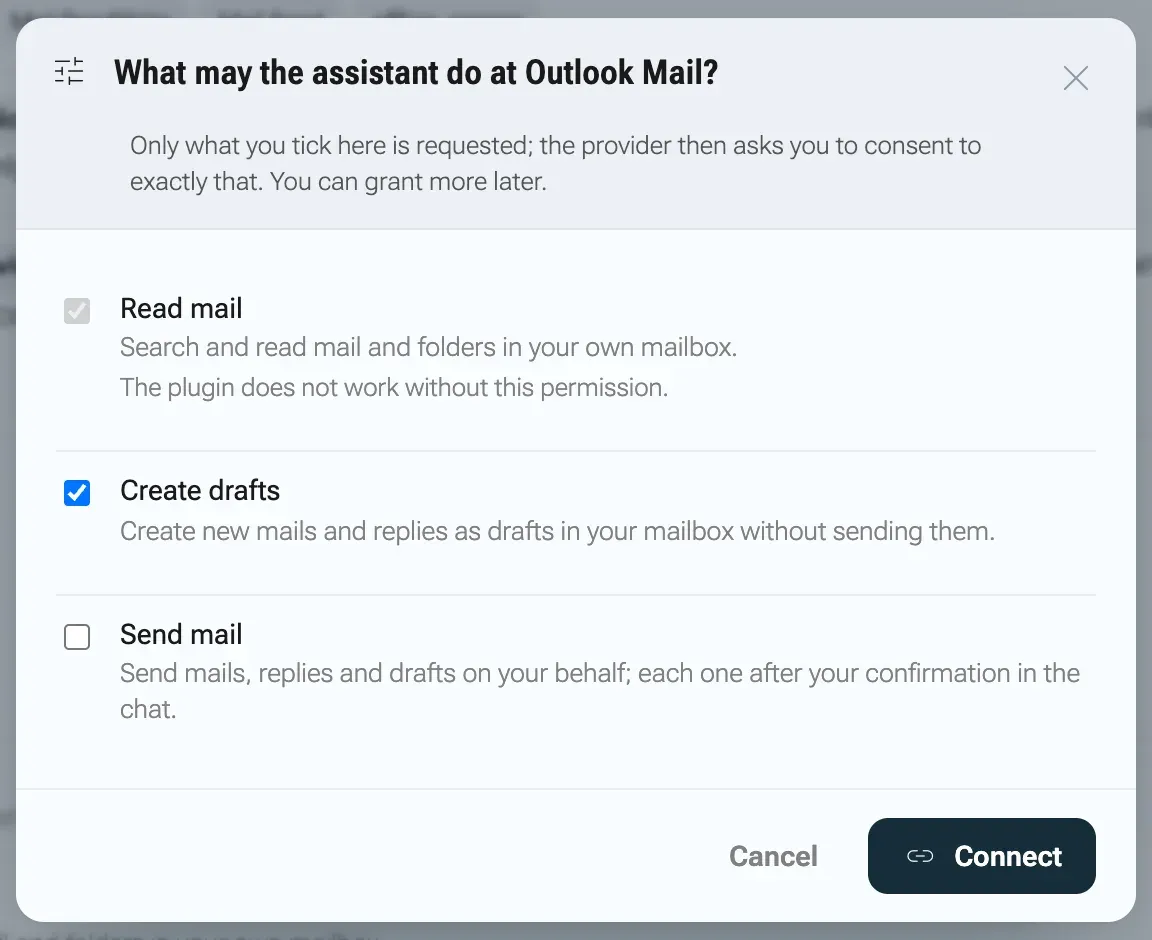
For OAuth connectors with permission groups, the person first sees What may the assistant do at {name}? and ticks what to grant. Then the provider’s sign-in opens in a pop-up. After signing in, the pop-up closes by itself.
My profileConnected accounts lists every account a person has connected: the provider, the status (Connected, Expired, Revoked, Error), which connectors use it, which permissions it holds and Valid until {at}. Shared connections appear with Connection for everyone in this tenant and who connected them.
When someone asks for a connector
Section titled “When someone asks for a connector”People who miss a connector do not need to know who the admin is. On the desk they click Missing a connector? Ask an admin, type what they need (for example “Jira for our tickets”) and click Ask. Everyone with the right to manage connectors gets an entry in the bell and, unless they switched it off, an e-mail. A person can ask for the same connector once a day.
Each admin decides in My profileNotifications whether the e-mail comes: E-mail when someone asks for a connector.
Reach systems in your own network
Section titled “Reach systems in your own network”By default, connectors may only call public addresses over HTTPS. That protects your network: anyone who builds a connector types in an address, and without this rule the nexxus server could be pointed at internal systems. When a connector should reach an internal system on purpose, such as Paperboi on a server in the office network, you release it.
-
On the catalog page, click Settings in the action bar. Connector settings opens.
-
Under Network allowlist, enter what to release:
- Address ranges (CIDR): one per line, for example
10.39.0.0/16. - Host names: one per line, exact (
paperboi.intern.brandt.example) or with*.in front for all subdomains (*.intern.brandt.example). - Allow unencrypted http:// for these targets: internal servers often have no certificate. Public addresses always need HTTPS.
- Address ranges (CIDR): one per line, for example
-
Click Save.
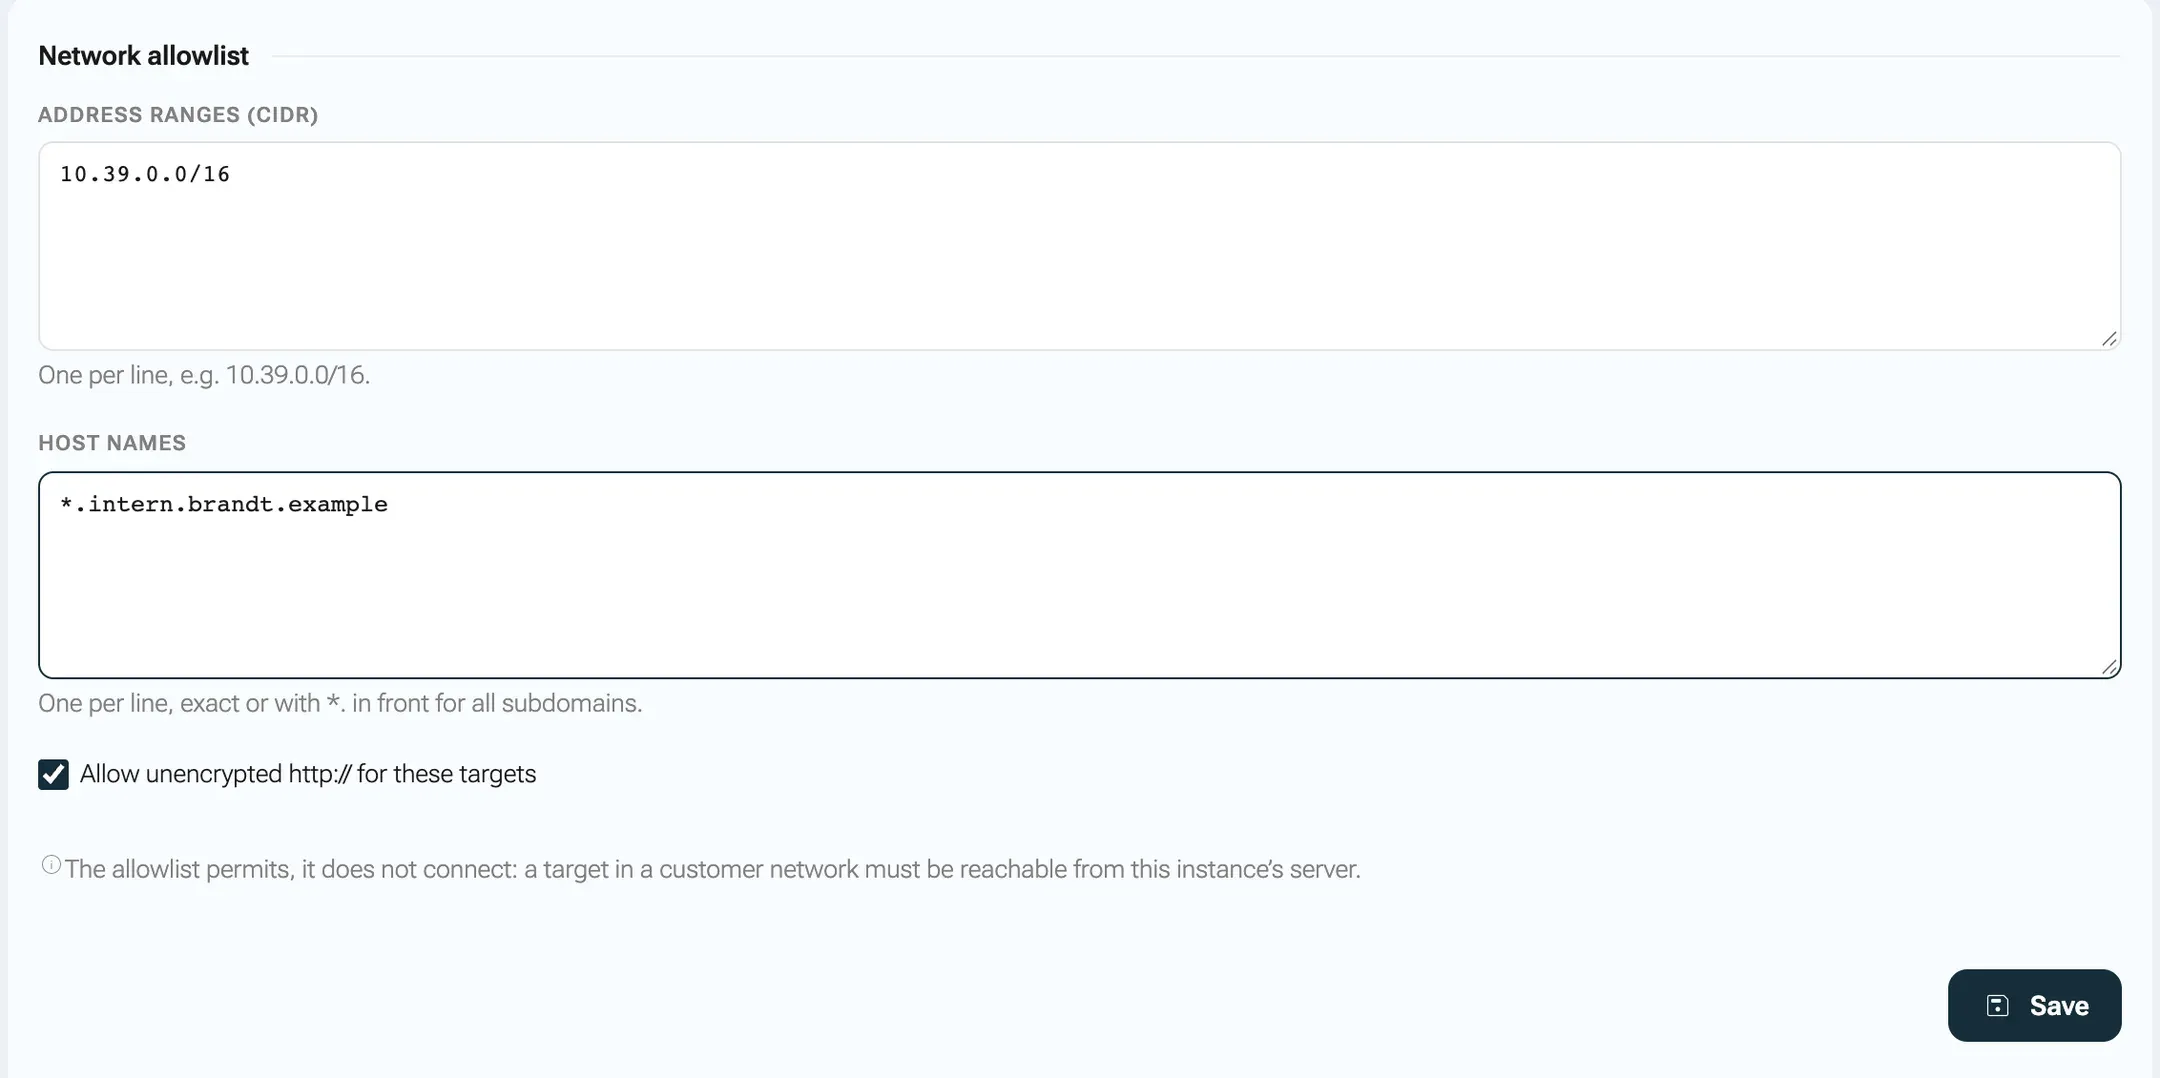
The allowlist permits, it does not connect. The target must still be reachable from the nexxus server, through your firewall or VPN. Two rules cannot be switched off: cloud metadata addresses stay blocked, and redirects are checked again at every hop, so a public address cannot bounce a request into your network.
Check that it works
Section titled “Check that it works”There is no single test button for catalog connectors, because a connector only works with a real account. Check it this way:
- Setup shows {name} is all set up.
- Connect your own account, switch the connector on in a chat, and ask the AI Assistant something that only reads, for example “List my five newest mails”.
- For connectors with permission groups, Check connection under Permissions shows which groups the provider granted.
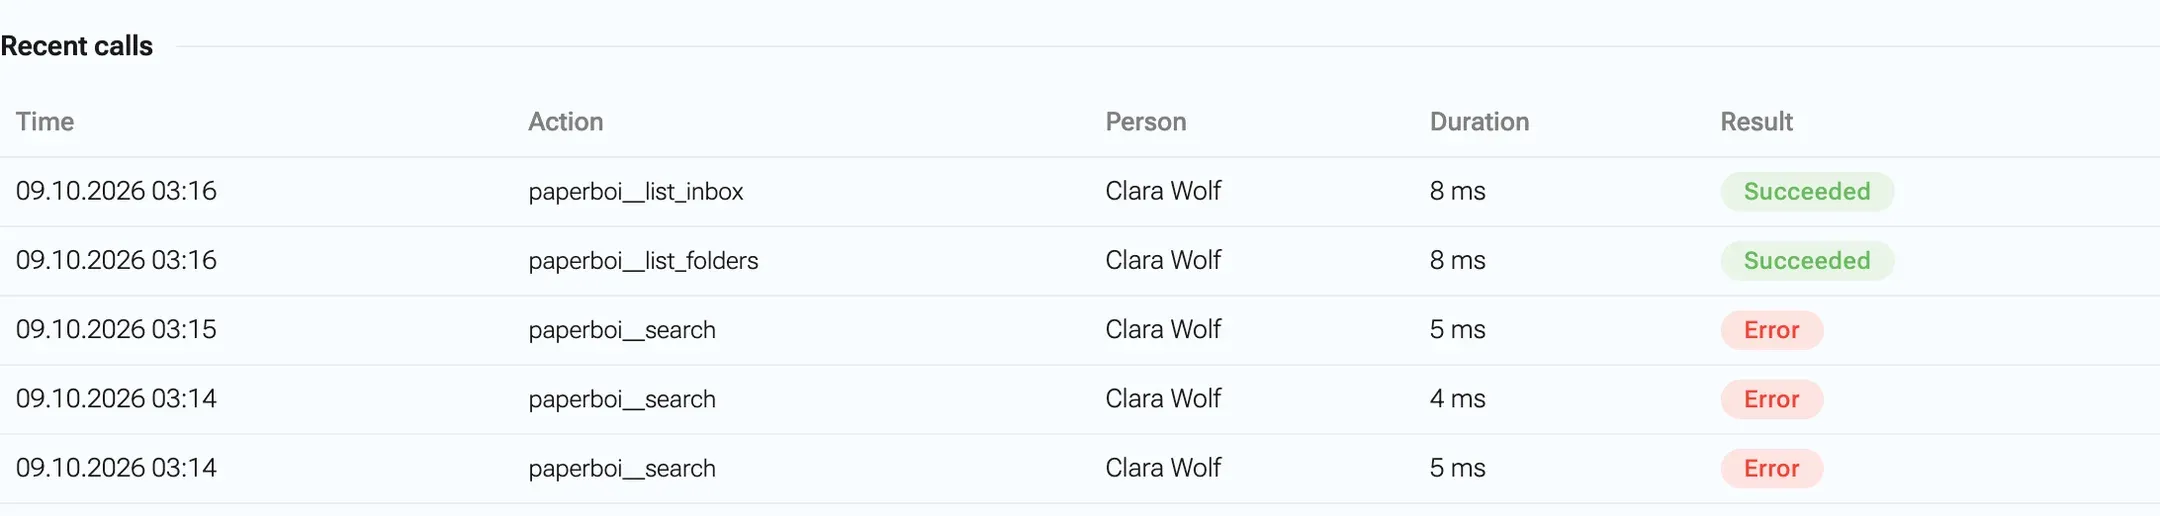
- Recent calls lists every call with Time, Action, Person, Duration and Result (Succeeded or Error, with the error message on hover). The head of the page shows the number of calls in the last 30 days.
Your own MCP connectors do have a test, see Build your own connector.
What happens behind the scenes
Section titled “What happens behind the scenes”- One connection per provider and app. nexxus stores a connection for the provider and the client ID the tokens were issued to. Connectors of the same provider that use the same app share it. A connector with a different app gets a connection of its own and never overwrites another app’s tokens.
- Asking only for what is missing. When a person connects a second connector of the same provider, the sign-in asks for what is already granted plus what the new connector needs. The provider’s consent screen shows only the new part.
- Tokens stay on the server. Tokens and keys are stored encrypted with the installation’s secret key and are never sent to the AI gateway, the model or the browser. OAuth tokens refresh a minute before they expire, and a background job refreshes them ahead of time every 10 minutes.
- The sign-in is single-use. Each sign-in carries a random value that is valid for 10 minutes and used once, and only the person who started it can finish it.
- Disconnecting revokes. Disconnect asks the provider to revoke the access where the provider offers that, then deletes the tokens.
- Uninstalling keeps connections. People’s connections stay and are used again after a new installation.
- Rights take effect within seconds. nexxus checks connector rights on every call and remembers the answer for 5 seconds per person.
When something goes wrong
Section titled “When something goes wrong”The connection error dialog
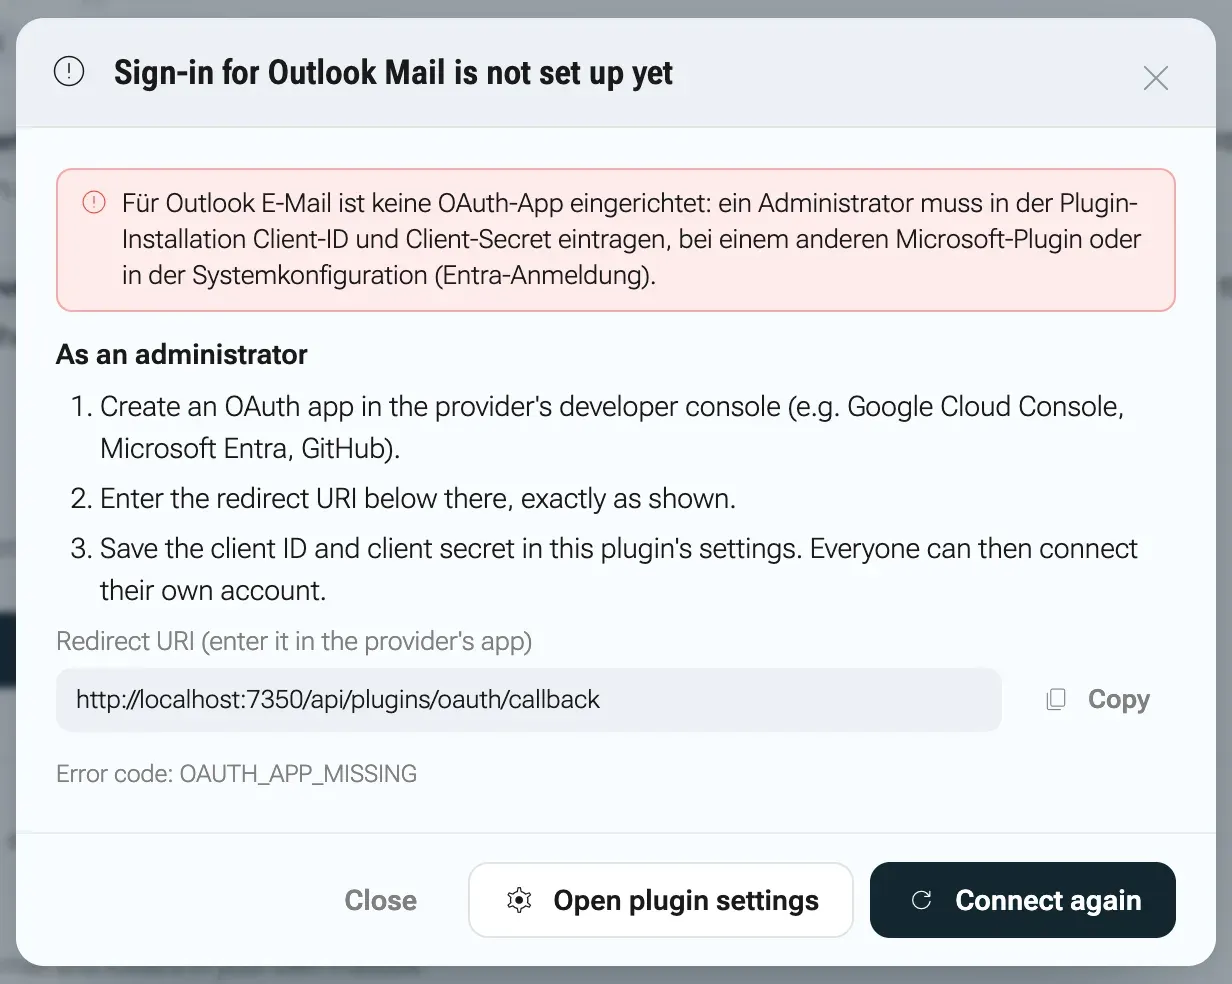
Section titled “The connection error dialog”When a connection fails, nexxus opens a dialog instead of a short error message. It shows the reason as the title, the provider’s own message in a red box, the steps under How to fix it and, for people who manage the connector, the steps under As an administrator with the redirect URI to copy. Everyone else reads Only an administrator can fix this. Send them this message and try again afterwards. At the bottom are the Error code, Close, Connect again and, where it helps, Open connector settings.
| Title in the dialog | Error code | What to do |
|---|---|---|
| Sign-in for {name} is not set up yet | OAUTH_APP_MISSING | Admin: create an OAuth app in the provider’s developer console, enter the redirect URI exactly as shown, save client ID and secret in the connector’s Configuration. For Microsoft connectors, the app of another Microsoft connector or of the Microsoft sign-in is used when one exists. |
| The Entra tenant for {name} is invalid | OAUTH_TENANT_INVALID | Admin: check Entra-Mandant (Domain oder ID). It expects a domain like company.onmicrosoft.com or the directory ID. Save and connect again. |
| {name} does not allow automatic sign-in | OAUTH_NO_REGISTRATION | Admin: if the server also accepts an API key or token, switch the connector to custom headers. Otherwise ask the operator to enable dynamic client registration. |
| The sign-in to {name} expired | OAUTH_STATE_EXPIRED | Click Connect again and finish the sign-in in the new window within ten minutes. |
| The sign-in to {name} belongs to another session | OAUTH_OTHER_SESSION | Make sure you are still signed in to nexxus and the sign-in window opened in the same browser. Then connect again. |
| The sign-in to {name} was declined | OAUTH_ACCESS_DENIED | Connect again and accept the requested permissions. If the provider says “Admin approval required”, an administrator of your organisation approves the app there: in Microsoft Entra under Enterprise applications, in the Google Admin console under API controls. |
| {name} cancelled the sign-in | OAUTH_PROVIDER_ERROR | Read the provider’s message. Admin: check that the redirect URI is entered exactly as shown and that the app may request the connector’s permissions. |
| The provider does not recognise the app for {name} | OAUTH_CLIENT_INVALID | Admin: compare client ID and secret with the app at the provider. Client secrets expire, at Microsoft after two years at most. Check the redirect URI. |
| The server cannot reach {name} | OAUTH_UNREACHABLE | Connect again in a few minutes. If it persists, check the network allowlist and the server’s firewall. |
| {name} did not confirm the sign-in | OAUTH_TOKEN_FAILED | Connect again. Admin: check the app at the provider and the connector configuration. The message in the dialog contains the provider’s answer. |
| The sign-in window for {name} was blocked | POPUP_BLOCKED | Click the blocked pop-up icon in the address bar, allow pop-ups for nexxus and connect again. |
| {name} could not be disconnected | DISCONNECT_FAILED | Reload the page and disconnect again. If it persists, send the message to an administrator. |
| Connecting to {name} did not work | UNKNOWN | Try again. If it persists, send the message to an administrator. |
If the pop-up could not report back, for example because the provider’s page cut the link to nexxus, nexxus asks the server what became of the sign-in and shows the same dialog.
Other messages
Section titled “Other messages”Some messages come from the server and are in German in every language of the app:
| Message | Meaning and fix |
|---|---|
Pflichtfelder fehlen: ... | Required fields are missing. Fill in the fields named in the message. |
Client-Secret und Client-ID sind gleich. Beim Anbieter steht das Secret in einem eigenen Feld; bitte dieses eintragen. | Client secret and client ID are identical, usually because a password manager filled in the wrong value. Copy the secret from its own field at the provider. |
... ist für den Mandanten noch nicht verbunden; das richtet ein Administrator auf der Connector-Seite ein. | The connector works only with a shared connection and nobody has connected it. Connect it under Connection for everyone. |
... steht Ihnen nicht zur Verfügung. | The person may not use the connector: check Only for roles, Only for business units and the right ai.plugin.use. |
Keine Berechtigung (ai.plugin.connect). | The person lacks the right to connect an account. Add ai.plugin.connect to their role. |
Die Anmeldung ist abgelaufen. Bitte neu verbinden. | The provider no longer accepts the token. The person clicks Reconnect. |
...: Ziel gesperrt: ... | A call was blocked by the network rules. Release the target under Network allowlist, or use HTTPS. |
Verbindung fehlgeschlagen in the pop-up | The sign-in failed and the pop-up could not tell nexxus. The pop-up shows the reason. Close it with “Fenster schließen” and connect again. |