
Start here
Quickstart
The shortest path for a new admin, from the first sign-in to a first answer from the AI Assistant about one of your own documents. About fifteen minutes, with links to the detailed guides for everything you skip.
This page takes you from an empty installation to the moment the AI Assistant answers a question about a real document of yours. You name your workspace, connect one language model, invite one colleague and ask the AI Assistant something. Everything else can wait: the setup remembers what you skipped and reminds you on the dashboard.
Create your account
The first administrator, at /setup.
Connect a model
One provider, one key, one test run.
Invite a colleague
One address is enough to start.
Ask the AI Assistant
About a document you just uploaded.
Before you start
Section titled “Before you start”- An API key from an AI provider, for example IONOS, Scaleway or OpenAI, or the address of a model server you run yourself. Connect your AI helps you choose.
- The details of your outgoing mail server, if you want the invitation to go out today. Without them the invitation waits in a queue.
- A PDF or Word file you know well, so you can judge the AI Assistant’s answer. A two-page offer or a policy works fine.
1. Create your account
Section titled “1. Create your account”-
Open the address of your installation. A new installation sends you to
/setup. -
Fill in Username, Email address, Password (at least 12 characters) and Repeat password. If there is a field Setup code, enter the code from whoever runs the server.
-
Click Create account and continue. nexxus signs you in and opens the setup wizard.
2. Name your workspace
Section titled “2. Name your workspace”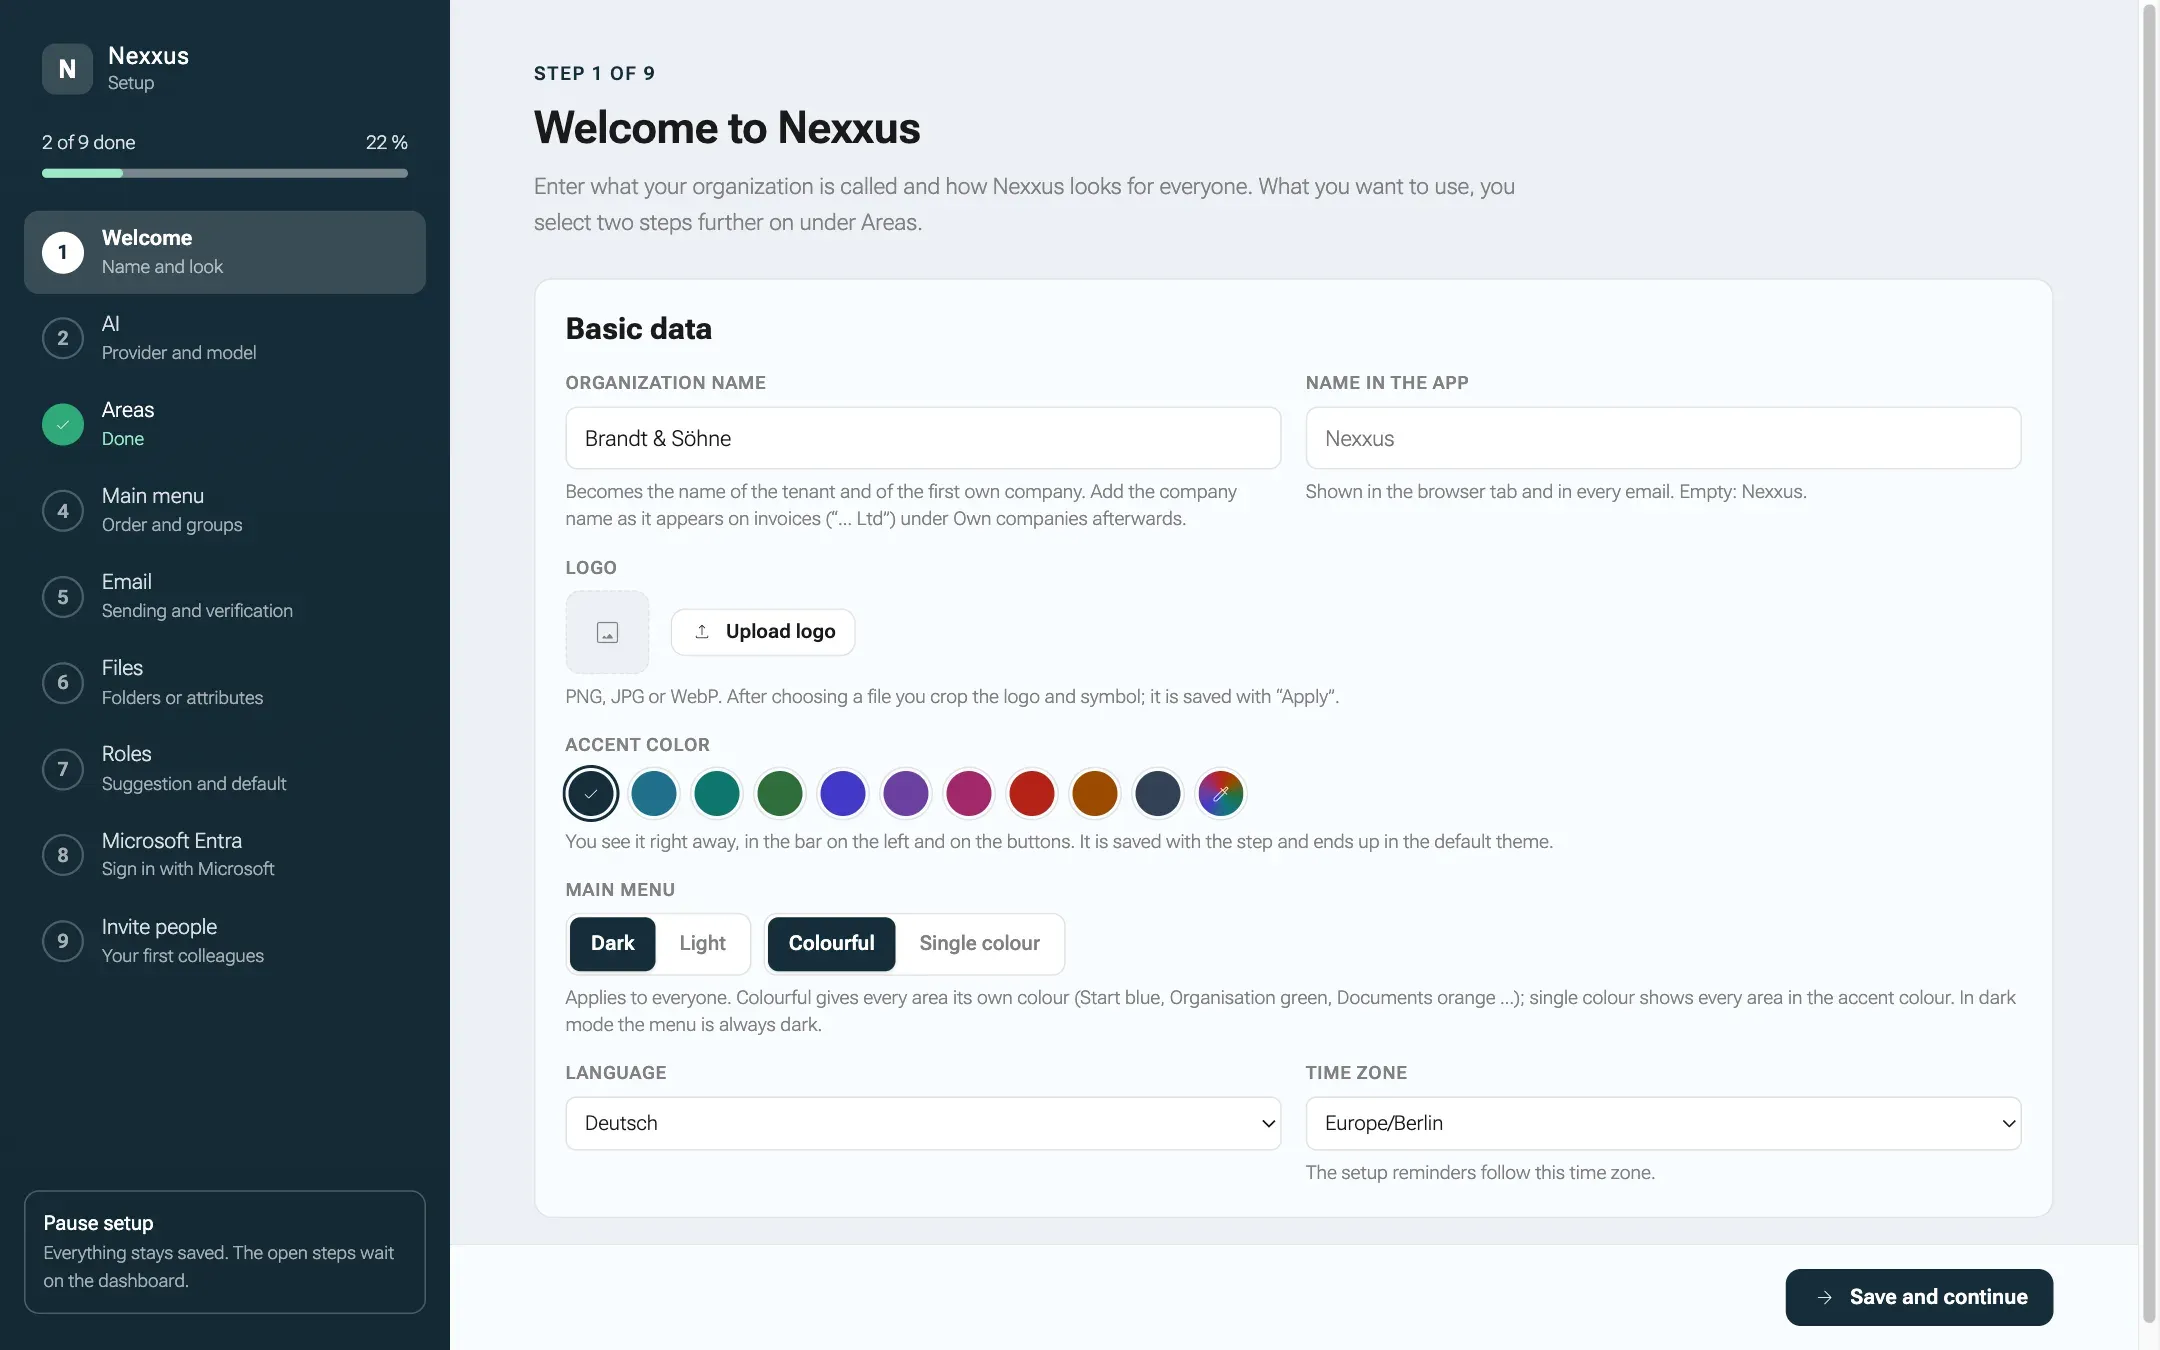
-
Enter the Organization name, for example “Brandt & Söhne”. Logo, colour and app name can wait.
-
Click Save and continue.
3. Connect a model
Section titled “3. Connect a model”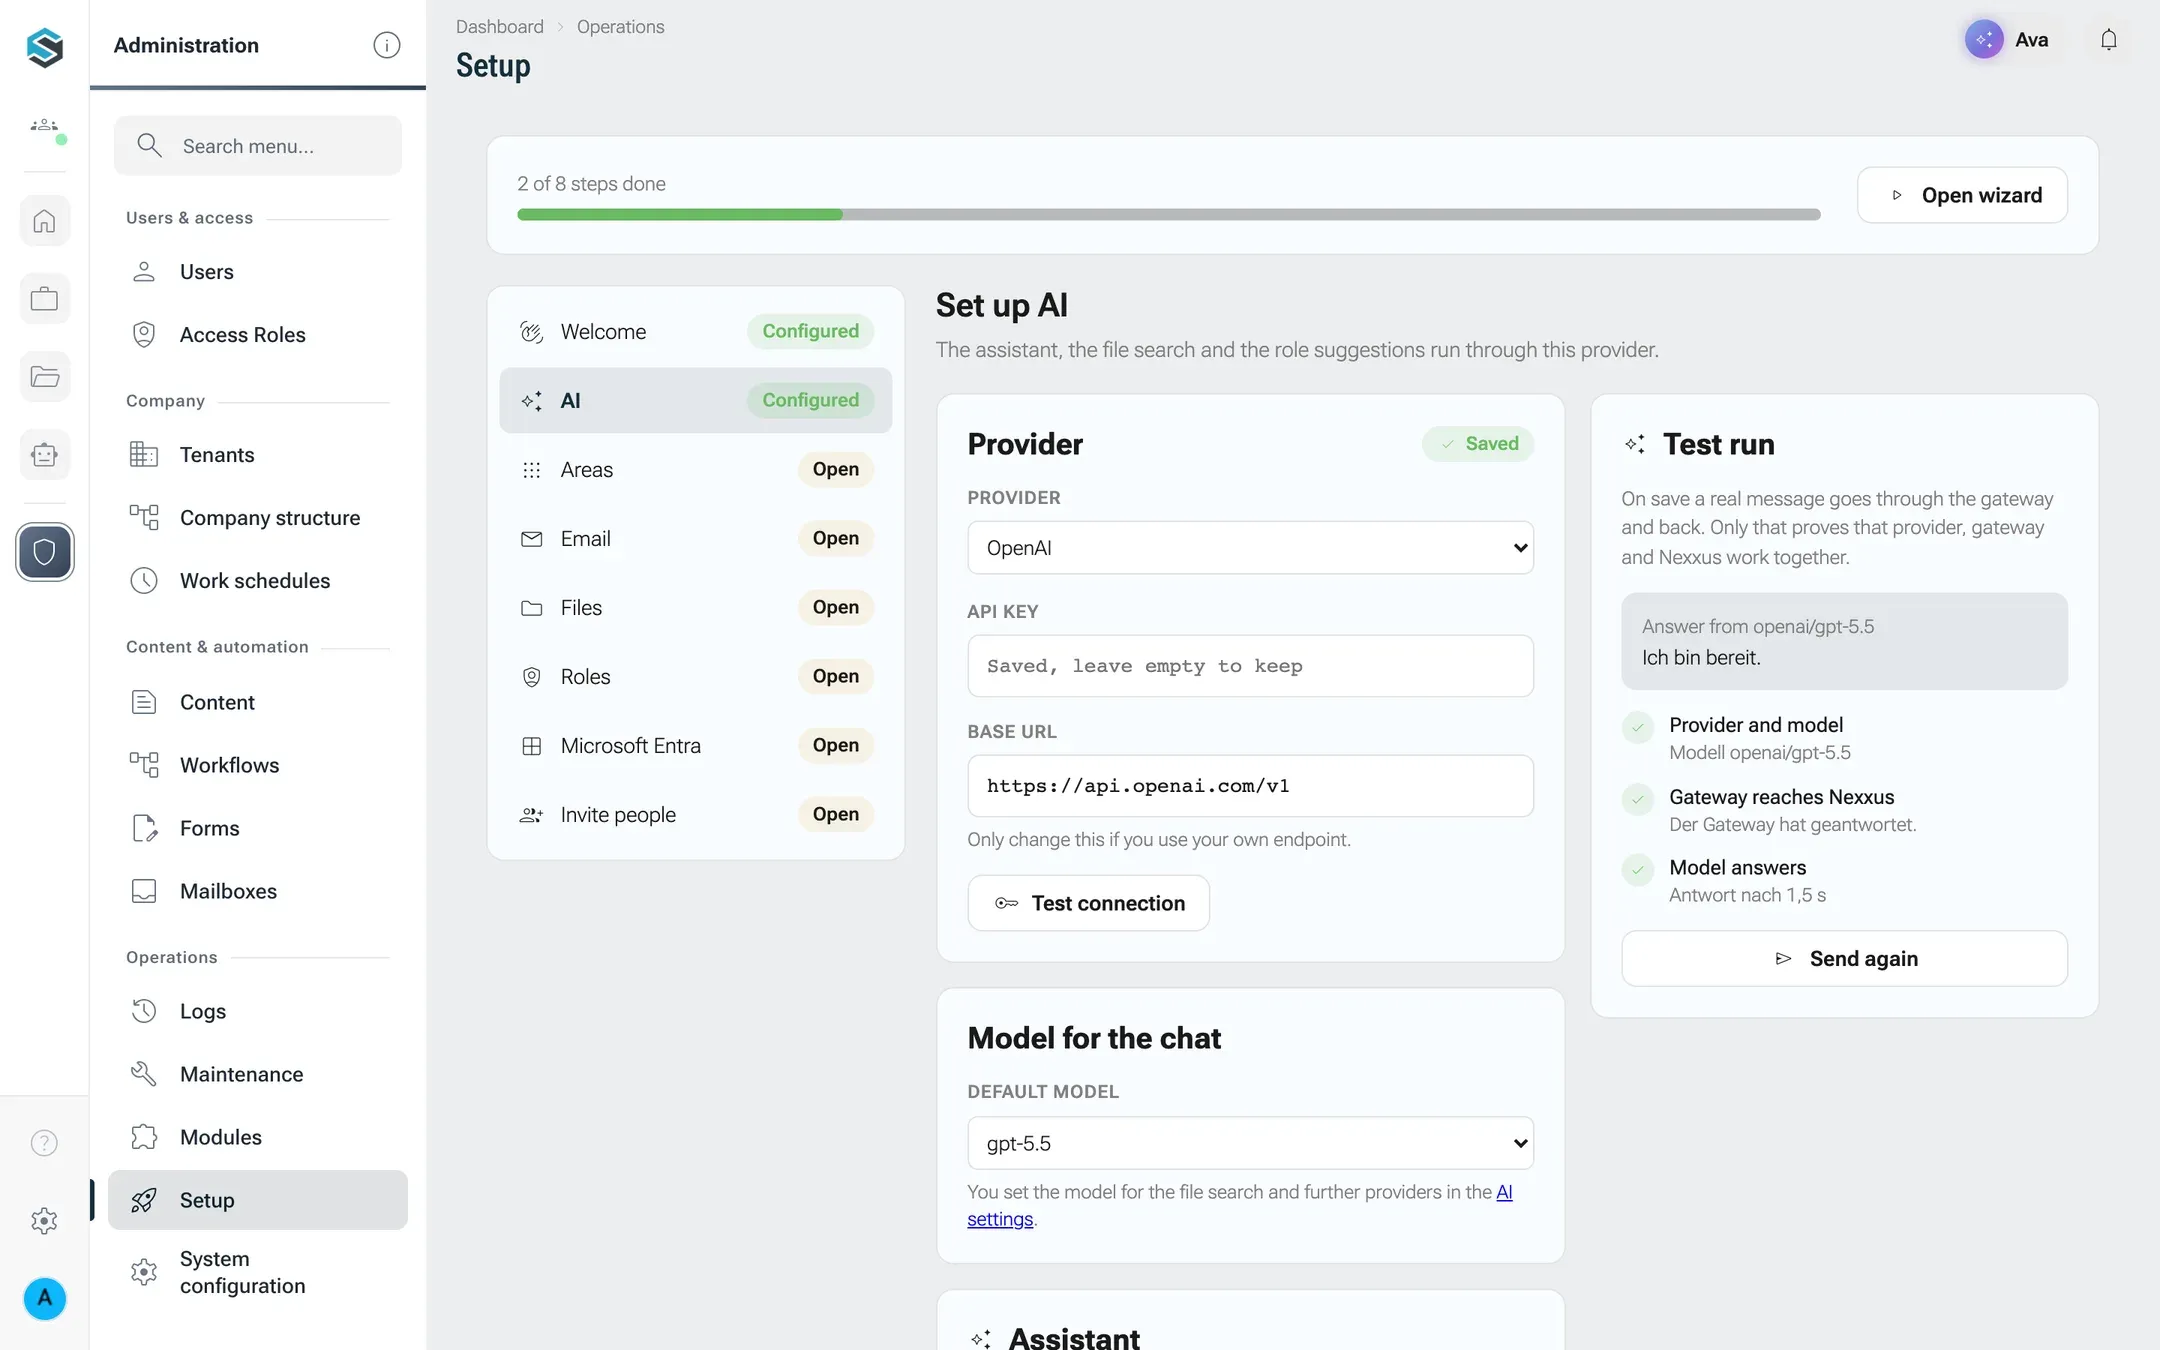
-
Choose your provider under Provider and paste the API key.
-
Click Test connection. You should see how many models nexxus found.
-
Pick a Default model under Model for the chat.
-
Click Save and continue. nexxus sends a test message through the AI gateway and shows the model’s answer under Test run. When all three checks are green, the wizard moves on.
If the test run fails, the three checks tell you where: key and model, the gateway, or the model itself. First run lists the messages and their fixes.
4. Skip ahead to the invitation
Section titled “4. Skip ahead to the invitation”For the next steps, this is enough for now:
- Areas: Files is already on; step 7 needs it. Select what your team uses as well, for example Projects, then click Save and continue.
- Email: if you have the mail server details, enter them, send the test email and type in the code. Otherwise click Remind me later and choose Tomorrow morning.
- Files: keep Folders and attributes and click Save and continue.
- Roles: describe your team in one sentence and click Suggest, then Save and continue. Or postpone it. Until you apply roles there is no default role, and people you invite get no access role: they see the dashboard and their own profile, little else.
- Microsoft Entra: click Remind me later and choose In a week, or Not needed if you don’t use Microsoft 365.
5. Invite one colleague
Section titled “5. Invite one colleague”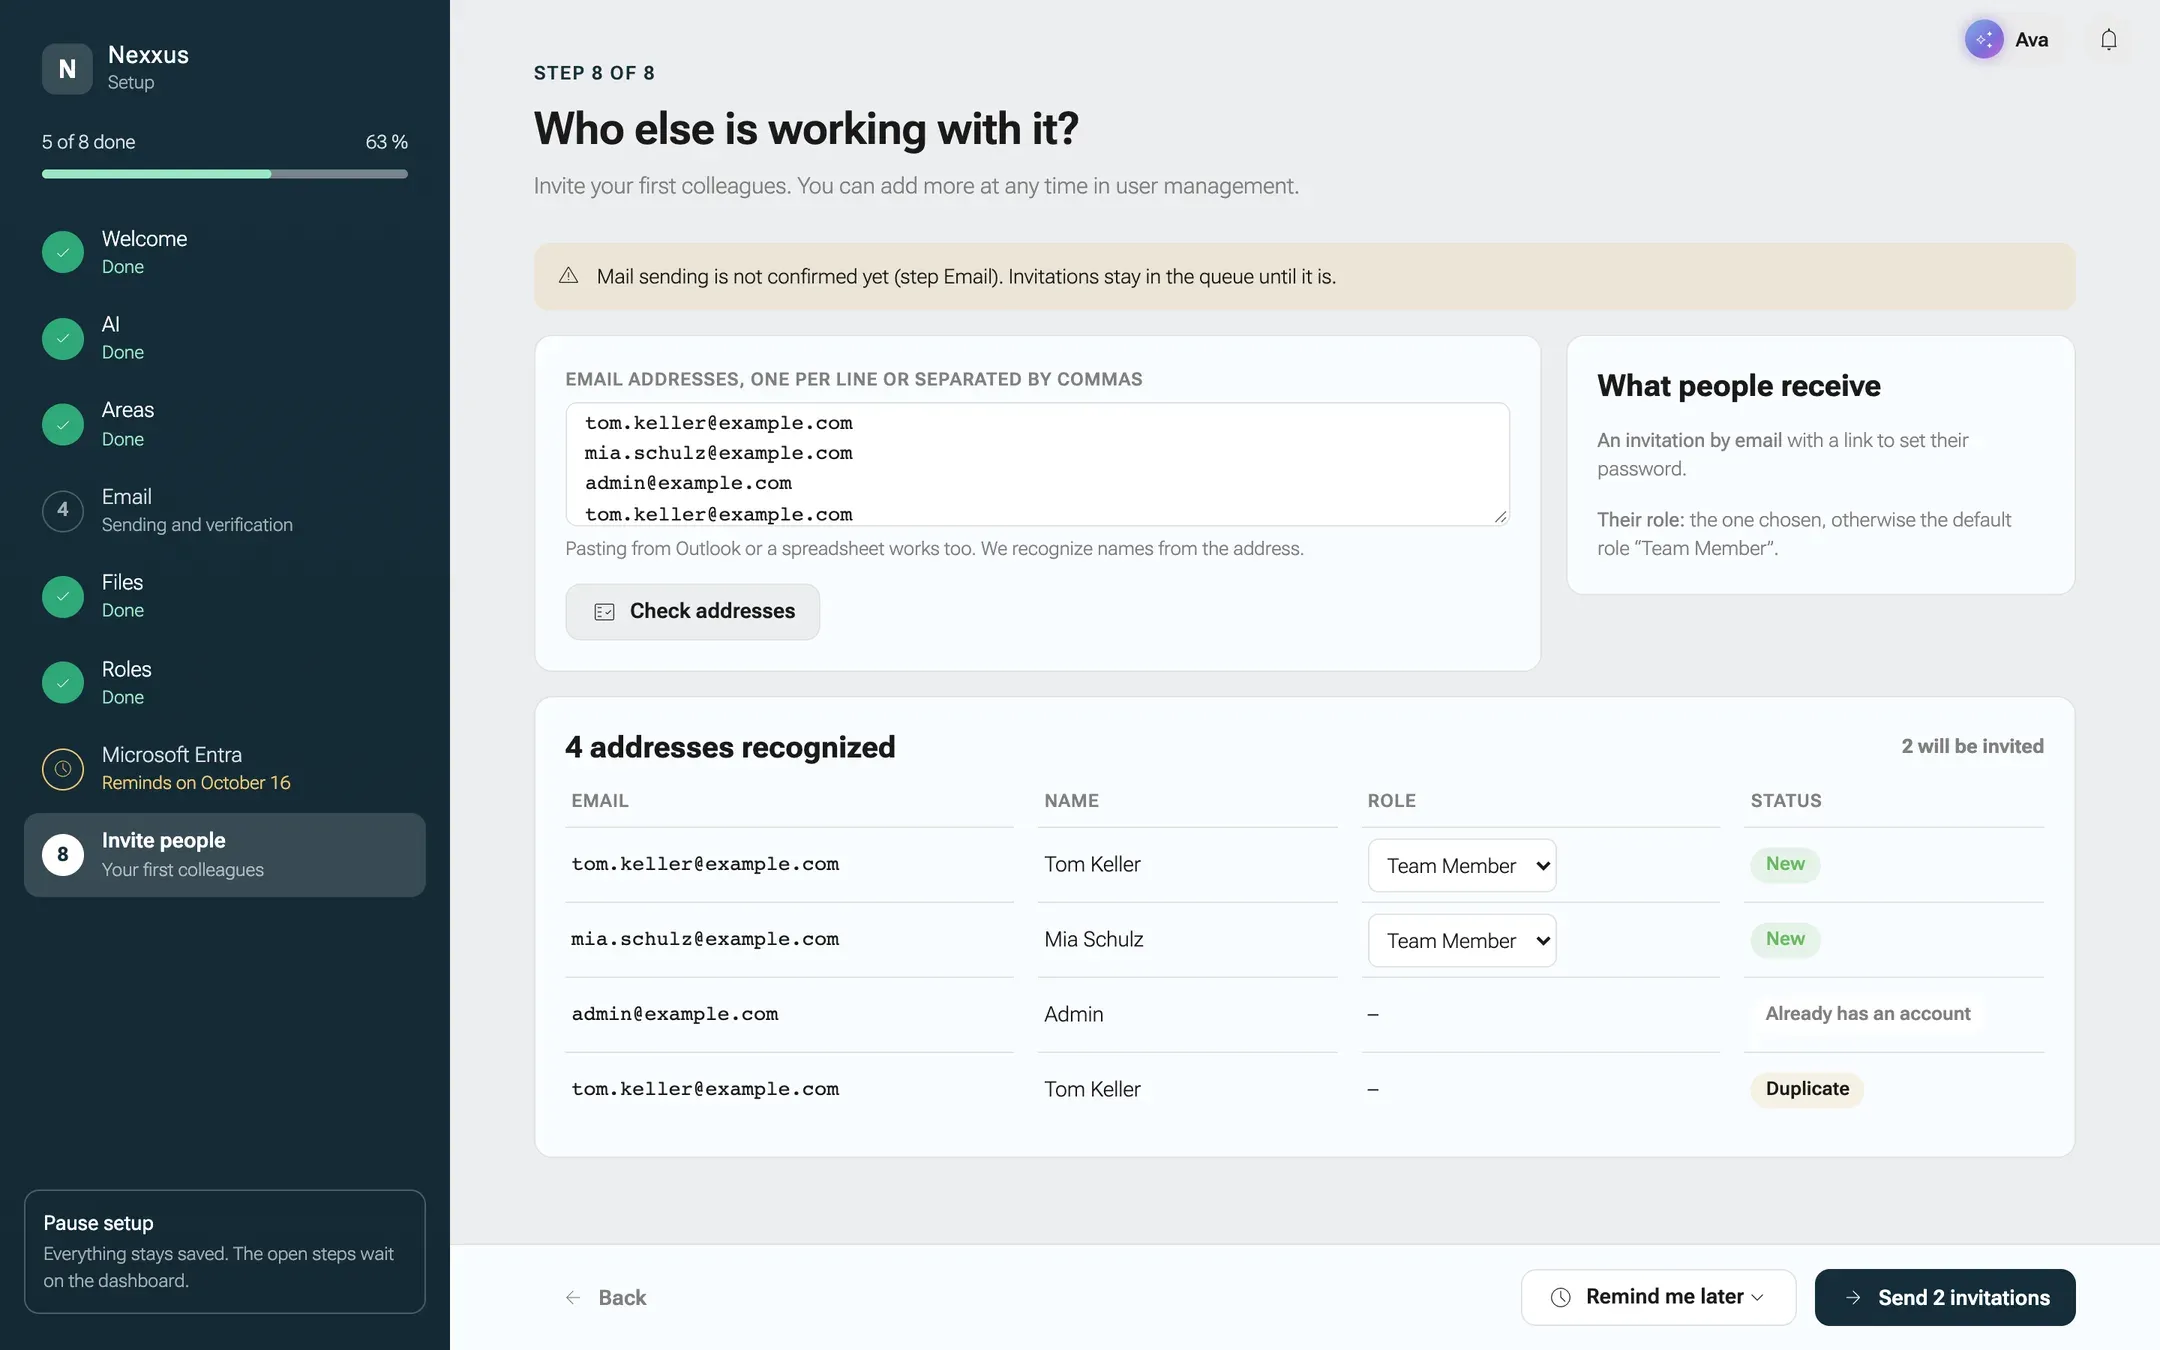
-
In Invite people, paste one address, for example
tom.keller@brandt-soehne.example. -
Click Check addresses. The row shows New and the role your colleague will get.
-
Click Send 1 invitation. Tom receives an email with a link to set his password. If the mail server is not confirmed yet, the invitation waits until it is.
-
On the last screen, click Go to dashboard.
6. Ask the AI Assistant about a real document
Section titled “6. Ask the AI Assistant about a real document”The AI Assistant answers best where it can see what you see. So instead of a blank chat, open a document and ask about it.
-
Open DocumentsDocumentsFiles and click My files in the tree on the left.
-
Drag your PDF onto the list. The dialog Upload files opens with the file already chosen. Click Upload (1). When the dialog says 1 document uploaded, close it with Done. In the background the AI already proposes attributes for the file.
-
Double-click the document. Its page opens with a preview.
-
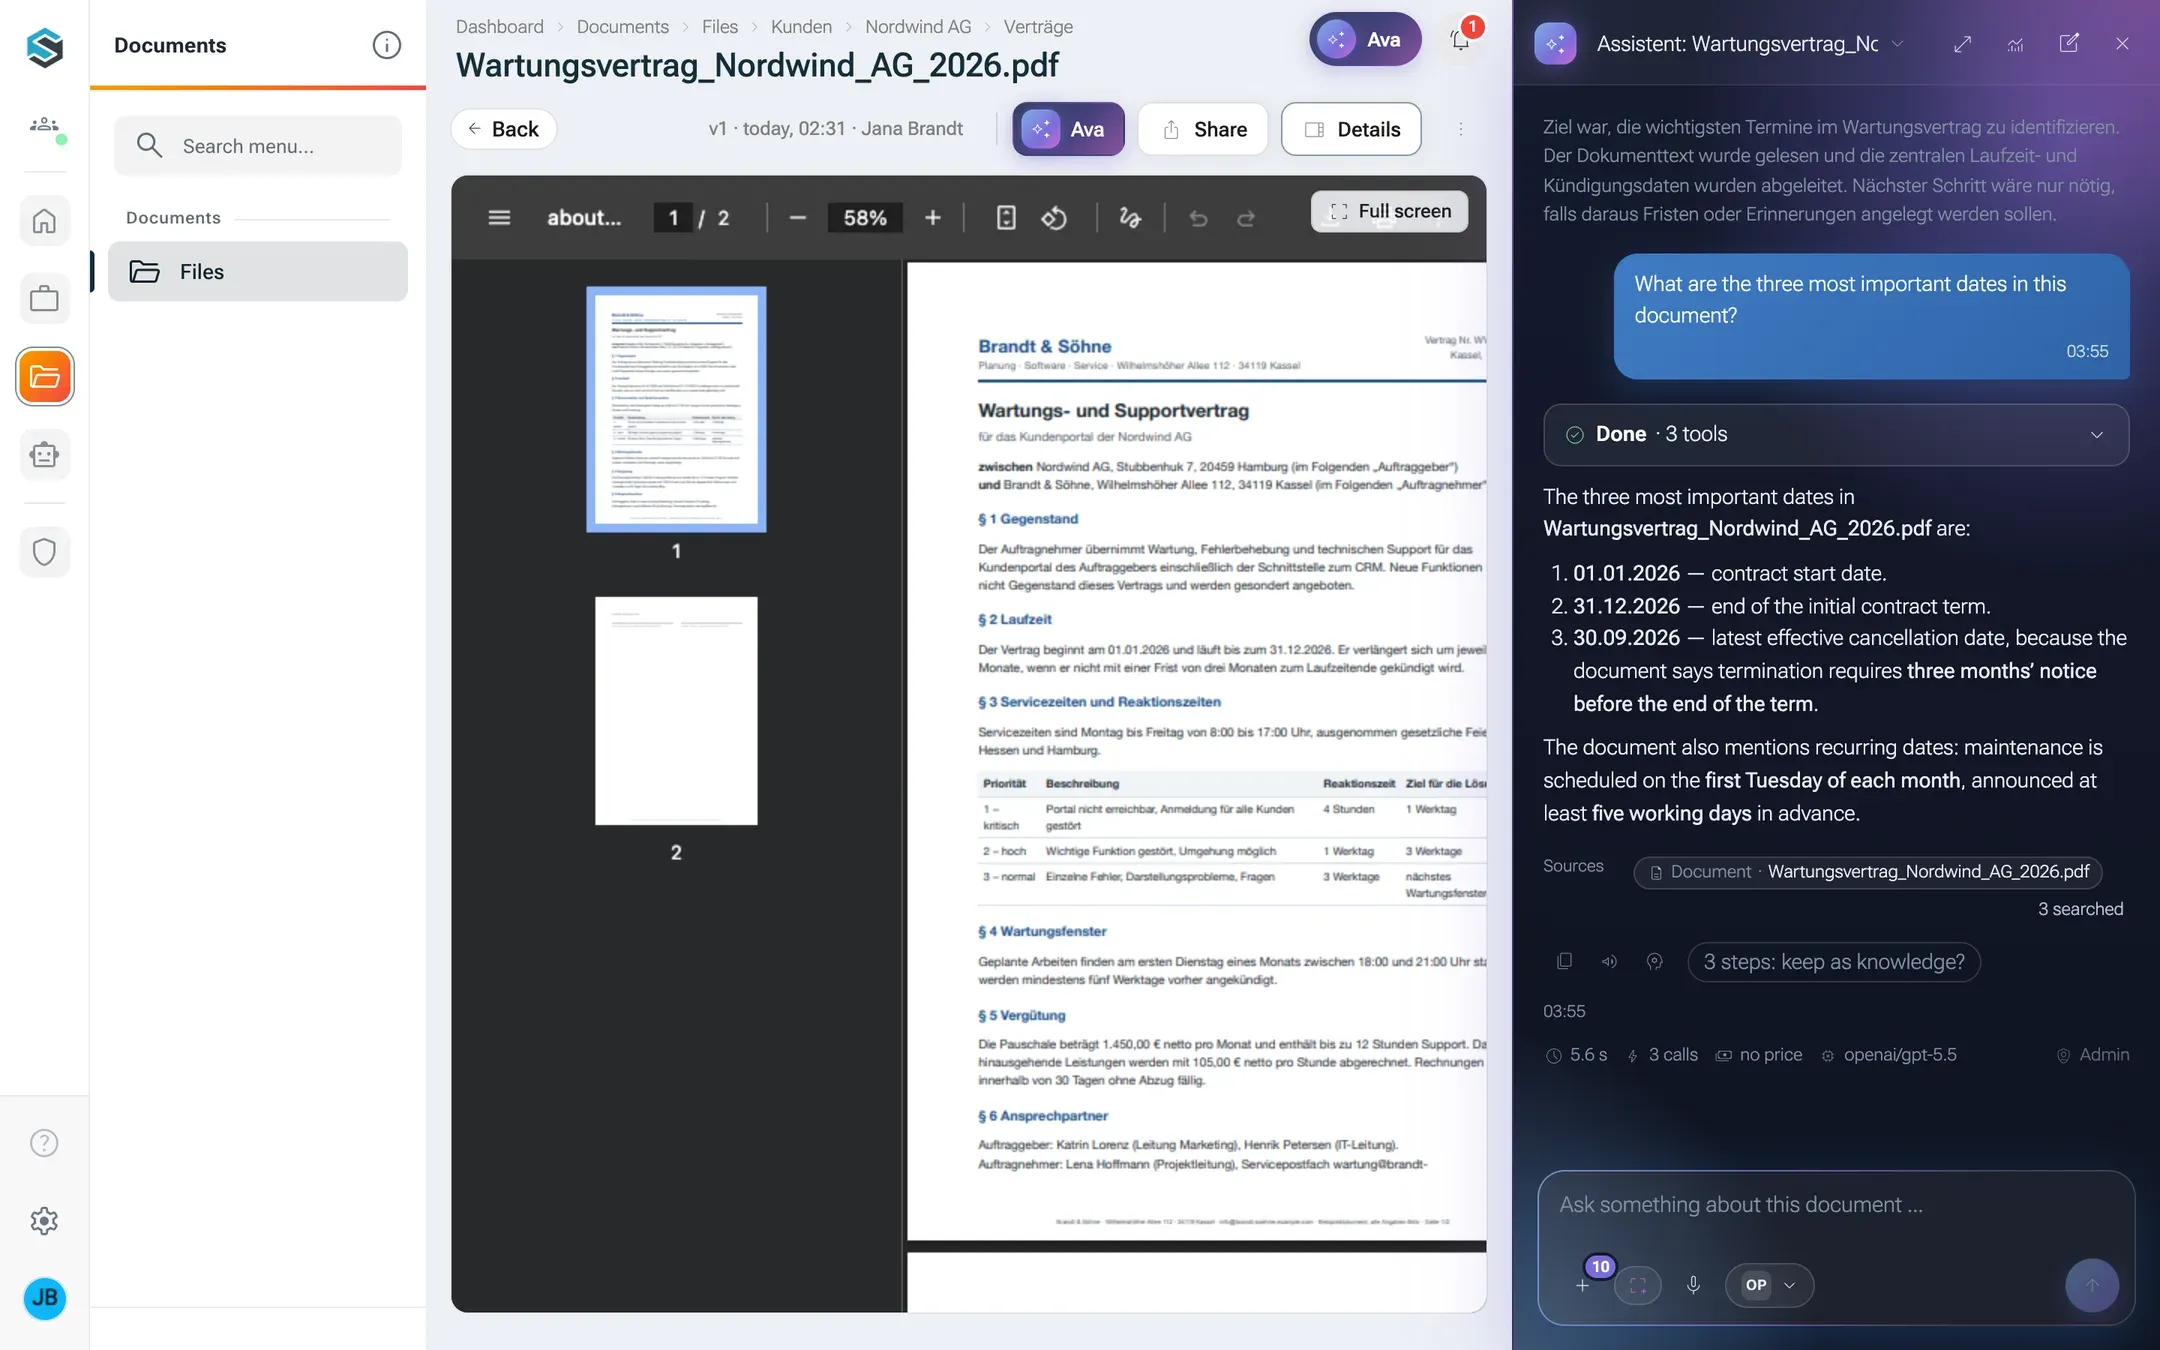
In the toolbar of the document page, click the button with the assistant’s name, AI Assistant (tooltip Work on this document with AI Assistant). The assistant column opens on the right, bound to this document.
-
Type a question, for example “What are the three most important dates in this document?”, and press Enter.
The AI Assistant knows which document is open and reads its text, from PDF and Word files too. The conversation stays attached to the document: open it again tomorrow and the same conversation is there.
The same column is available on every page. Click AI Assistant at the top right of any screen, or use the tile Ask the assistant on the dashboard.
What you have now
Section titled “What you have now”- A named workspace with an AI provider that answered a test message.
- An admin account and one invitation on its way.
- A document in Files that the AI Assistant has read.
- Reminders on the dashboard for every step you postponed. The card Setup takes you back to them.