
Set up your workspace
First run
A new nexxus installation starts empty. You create the first administrator account, then a setup wizard walks you through ten steps, from your name and logo to the first invitations. This page covers every step and how to come back to it later.
A fresh nexxus has no accounts, no settings and no default password. The first person who opens it creates the administrator account, and nexxus then leads that person through a setup wizard: what your organisation is called, which AI provider answers, which areas your team needs, how the menu should look, how mail goes out, how files are filed, who may do what, whether people sign in with Microsoft, and who gets an invitation.
None of the steps locks you in. You can postpone any step except the first, and every step stays available as a form on the page Setup, so you can change your mind a month later without starting over.
Take Brandt & Söhne, an installation company with 60 people. Their office manager creates the account on Monday morning, uploads the logo, connects an AI provider, switches on time tracking and absences and confirms the mail server. Sign-in with Microsoft is the IT department’s job, so she postpones that step by a week. By lunch her first colleagues have their invitations.
How the first run works
Section titled “How the first run works”Create the admin
At /setup, as long as no administrator exists.
Run the wizard
Ten steps. Each one saves on its own.
Postpone what can wait
Postponed steps come back as reminders on the dashboard.
Change it later
Every step stays available on the page Setup.
Before you start
Section titled “Before you start”The wizard goes fastest when you have these at hand. You can postpone any of them except the organisation name.
- The name of your organisation, and if you like a different name for the app (it appears in the browser tab and in every email).
- Your logo as PNG, JPG or WebP. You crop it in the browser into a wide logo and a square symbol.
- An API key for an AI provider, or the address of a model server you run yourself. See Connect your AI.
- Your outgoing mail server: host, port, user, password and sender address. nexxus sends invitations and sign-in links through it.
- For sign-in with Microsoft: the directory ID, the application ID and a client secret from an app registration in Microsoft Entra. Usually your IT department provides them.
- A few email addresses of colleagues you want to invite first.
If someone else runs the server for you, ask them for the setup code as well. The operator can protect the account page with one (see For operators).
Create the first administrator
Section titled “Create the first administrator”-
Open the address of your installation. As long as no administrator exists, nexxus sends you from the sign-in page to
/setup. The page has no menu yet. On the left you see the steps ahead: Account, then the ten steps of the wizard. -
In the card Your account, enter a Username and your Email address.
-
Enter a Password and repeat it in Repeat password. The checklist under the fields turns green as you type: At least 12 characters and Both passwords match. When you create the account, nexxus also checks the password against known data breaches.
-
If the page shows a field Setup code, enter the code you got from whoever runs the server. The hint reads This installation is publicly reachable. Whoever runs it has the code.
-
Look at the card What comes next on the right. If it lists entries under Still open in the server configuration, pass them on to your operator. They do not stop you from continuing (see Server settings the page warns about).
-
Click Create account and continue. nexxus signs you in and opens the setup wizard.
The setup wizard at a glance
Section titled “The setup wizard at a glance”The wizard runs full screen at /onboarding, without the menu. On the left is the list of steps (on a narrow screen behind Show steps), in the middle the current step, and at the bottom the buttons Back, Remind me later and the main button, usually Save and continue. The eyebrow above each step says where you are, for example Step 3 of 10.
| # | Step | What it sets | Can be postponed | Can be marked as not needed |
|---|---|---|---|---|
| 1 | Welcome | Organisation name, app name, logo, accent colour, main menu, language, time zone | no | no |
| 2 | AI | AI provider, default model, the AI Assistant’s name and look | yes | no |
| 3 | Areas | Which parts of nexxus your tenant uses | yes | no |
| 4 | Main menu | Order and groups of the menu, pages in the rail | yes | yes |
| 5 | Focus zones | Zones that bundle areas and single pages under their own name, icon, colour and logo | yes | yes |
| 6 | Outgoing mail server, confirmed with a code | yes | no | |
| 7 | Files | Folders or attributes, extra attributes | yes | no |
| 8 | Roles | Access roles and the default role for new people | yes | no |
| 9 | Microsoft Entra | Sign-in with Microsoft | yes | yes |
| 10 | Invite people | The first invitations | yes | yes |
The left rail also has the button Pause setup: Everything stays saved. The open steps wait on the dashboard.
Step 1: Welcome
Section titled “Step 1: Welcome”The first step asks what your organisation is called and how nexxus looks for everyone. Its title is Welcome to nexxus. What your team uses you choose two steps later under Areas.
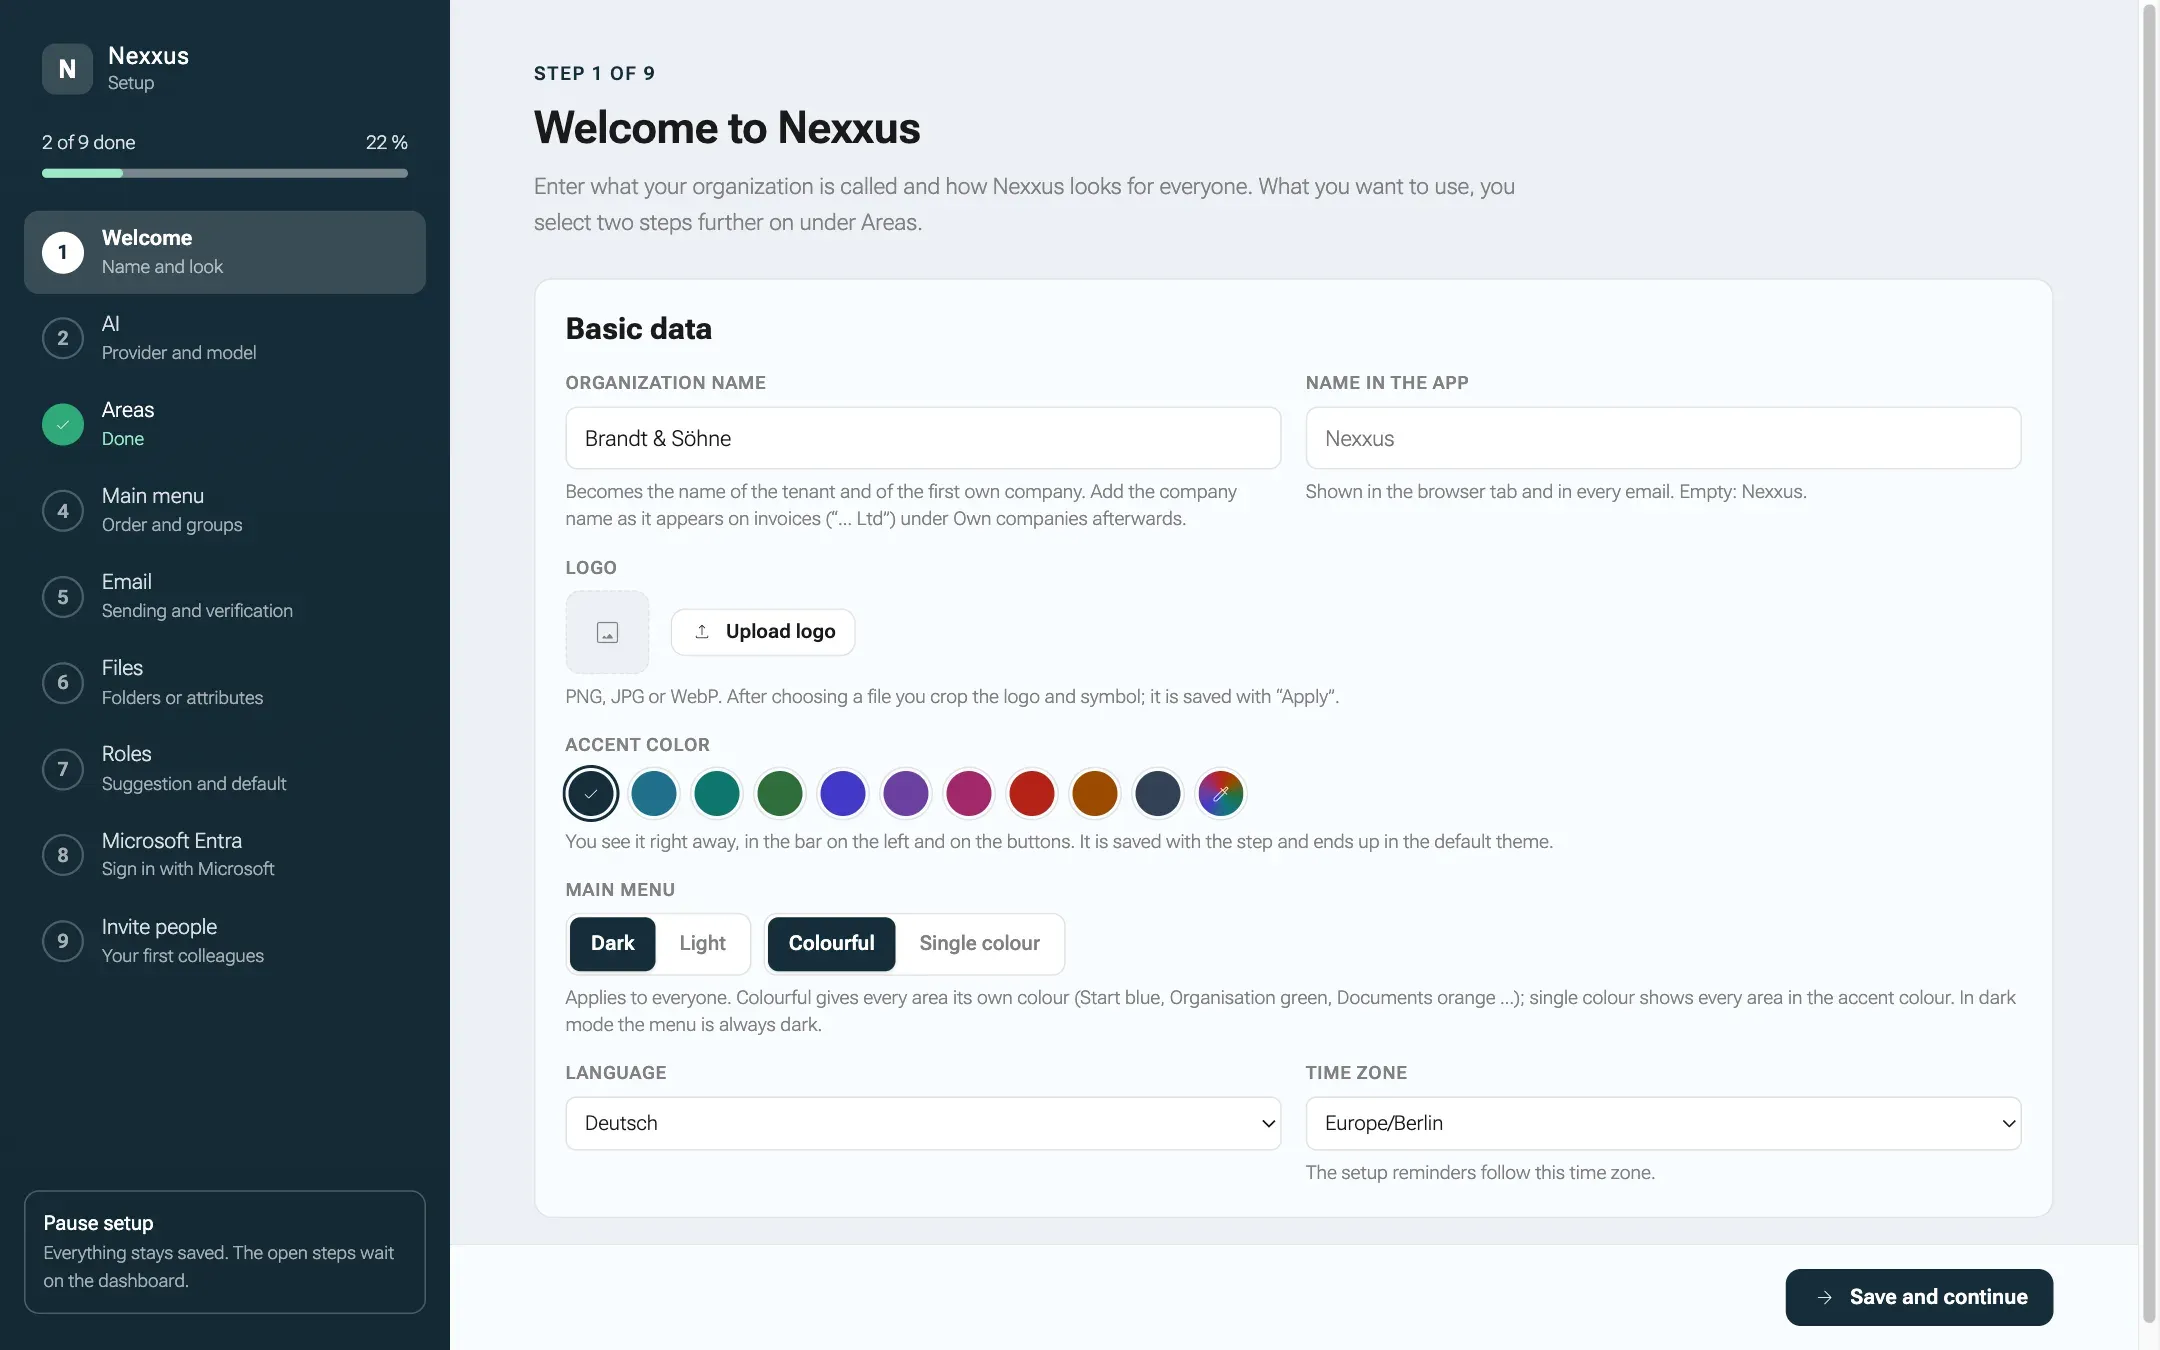
Basic data
Section titled “Basic data”-
Enter the Organization name. It becomes the name of your tenant and of your first own company. The company name as it appears on invoices (”… GmbH”) you add later under AdministrationCompanyCompany structureOwn companies.
-
Optional: enter a Name in the app. It replaces the product name in the browser tab and in every email. Leave it empty to keep the product name.
-
Click Upload logo and choose a PNG, JPG or WebP file. A crop tool opens with two tabs:
- Logo: the whole wordmark without empty margins. It appears in the side bar, on the sign-in page and in emails.
- Symbol: a square section, usually the pictorial mark. It appears in the collapsed menu, in the browser tab and in link previews, for example in Slack or Teams.
Drag the frame, or use Fit to content and Whole image. Two previews show the result (Sidebar, sign-in, email and Collapsed menu). Click Apply to save both; Other file starts again with another image, Cancel keeps the previous logo.
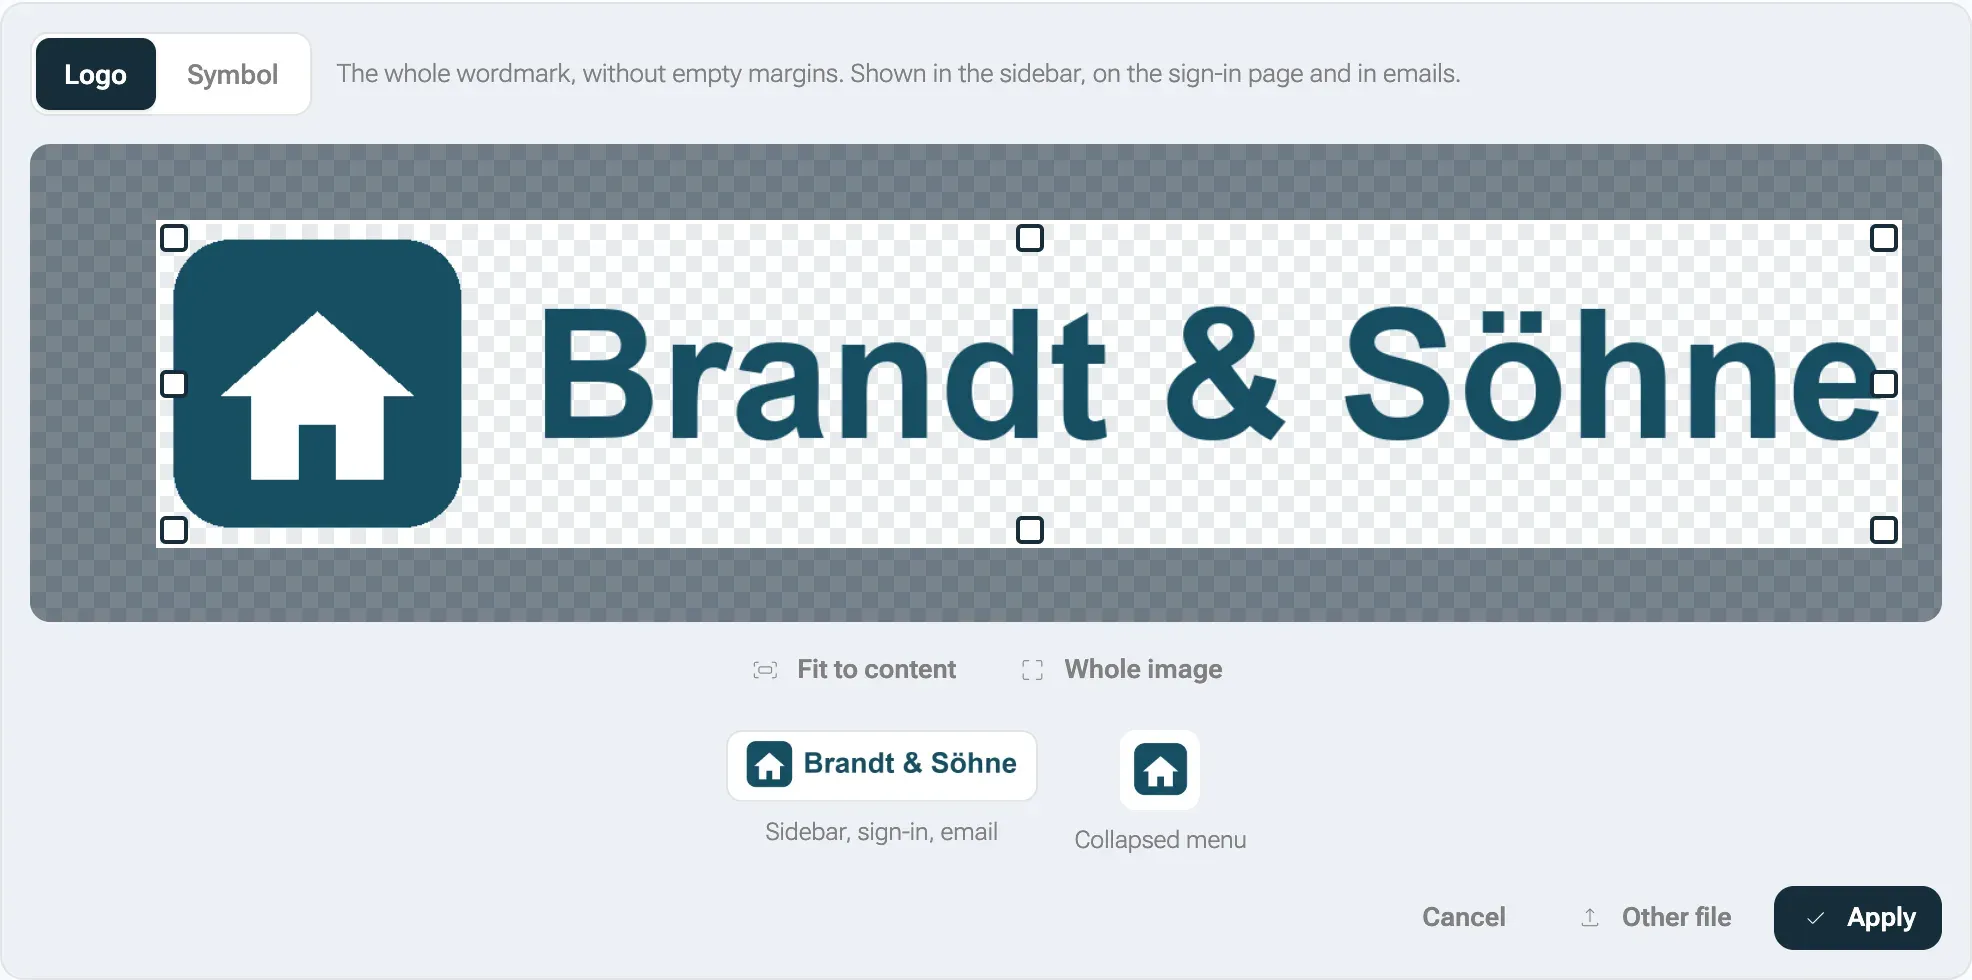
The logo appears in the side bar, on the sign-in page and in emails; the symbol in the collapsed menu. -
Pick an Accent color: Default, Petrol, Turquoise, Green, Indigo, Violet, Berry, Red, Amber, Slate or Custom color. You see it right away in the bar on the left and on the buttons. White text must stay readable on it, so nexxus needs a contrast of at least 3:1.
-
Under Main menu choose Dark or Light, and under Area colours Colourful or Single colour. Colourful gives every area its own colour; single colour shows every area in the accent colour. It applies to everyone; in dark mode the menu is always dark.
-
Choose the Language (Deutsch, English or Polski) and the Time zone. The language is the default of your tenant: the sign-in page and everyone who has not chosen a language on their profile see nexxus in it, newly invited people included. The time zone list offers Europe/Berlin, Europe/Vienna, Europe/Zurich, Europe/London and UTC. The reminders of the setup follow this time zone.
-
Click Save and continue. The message Basic data saved confirms it.
Step 2: AI
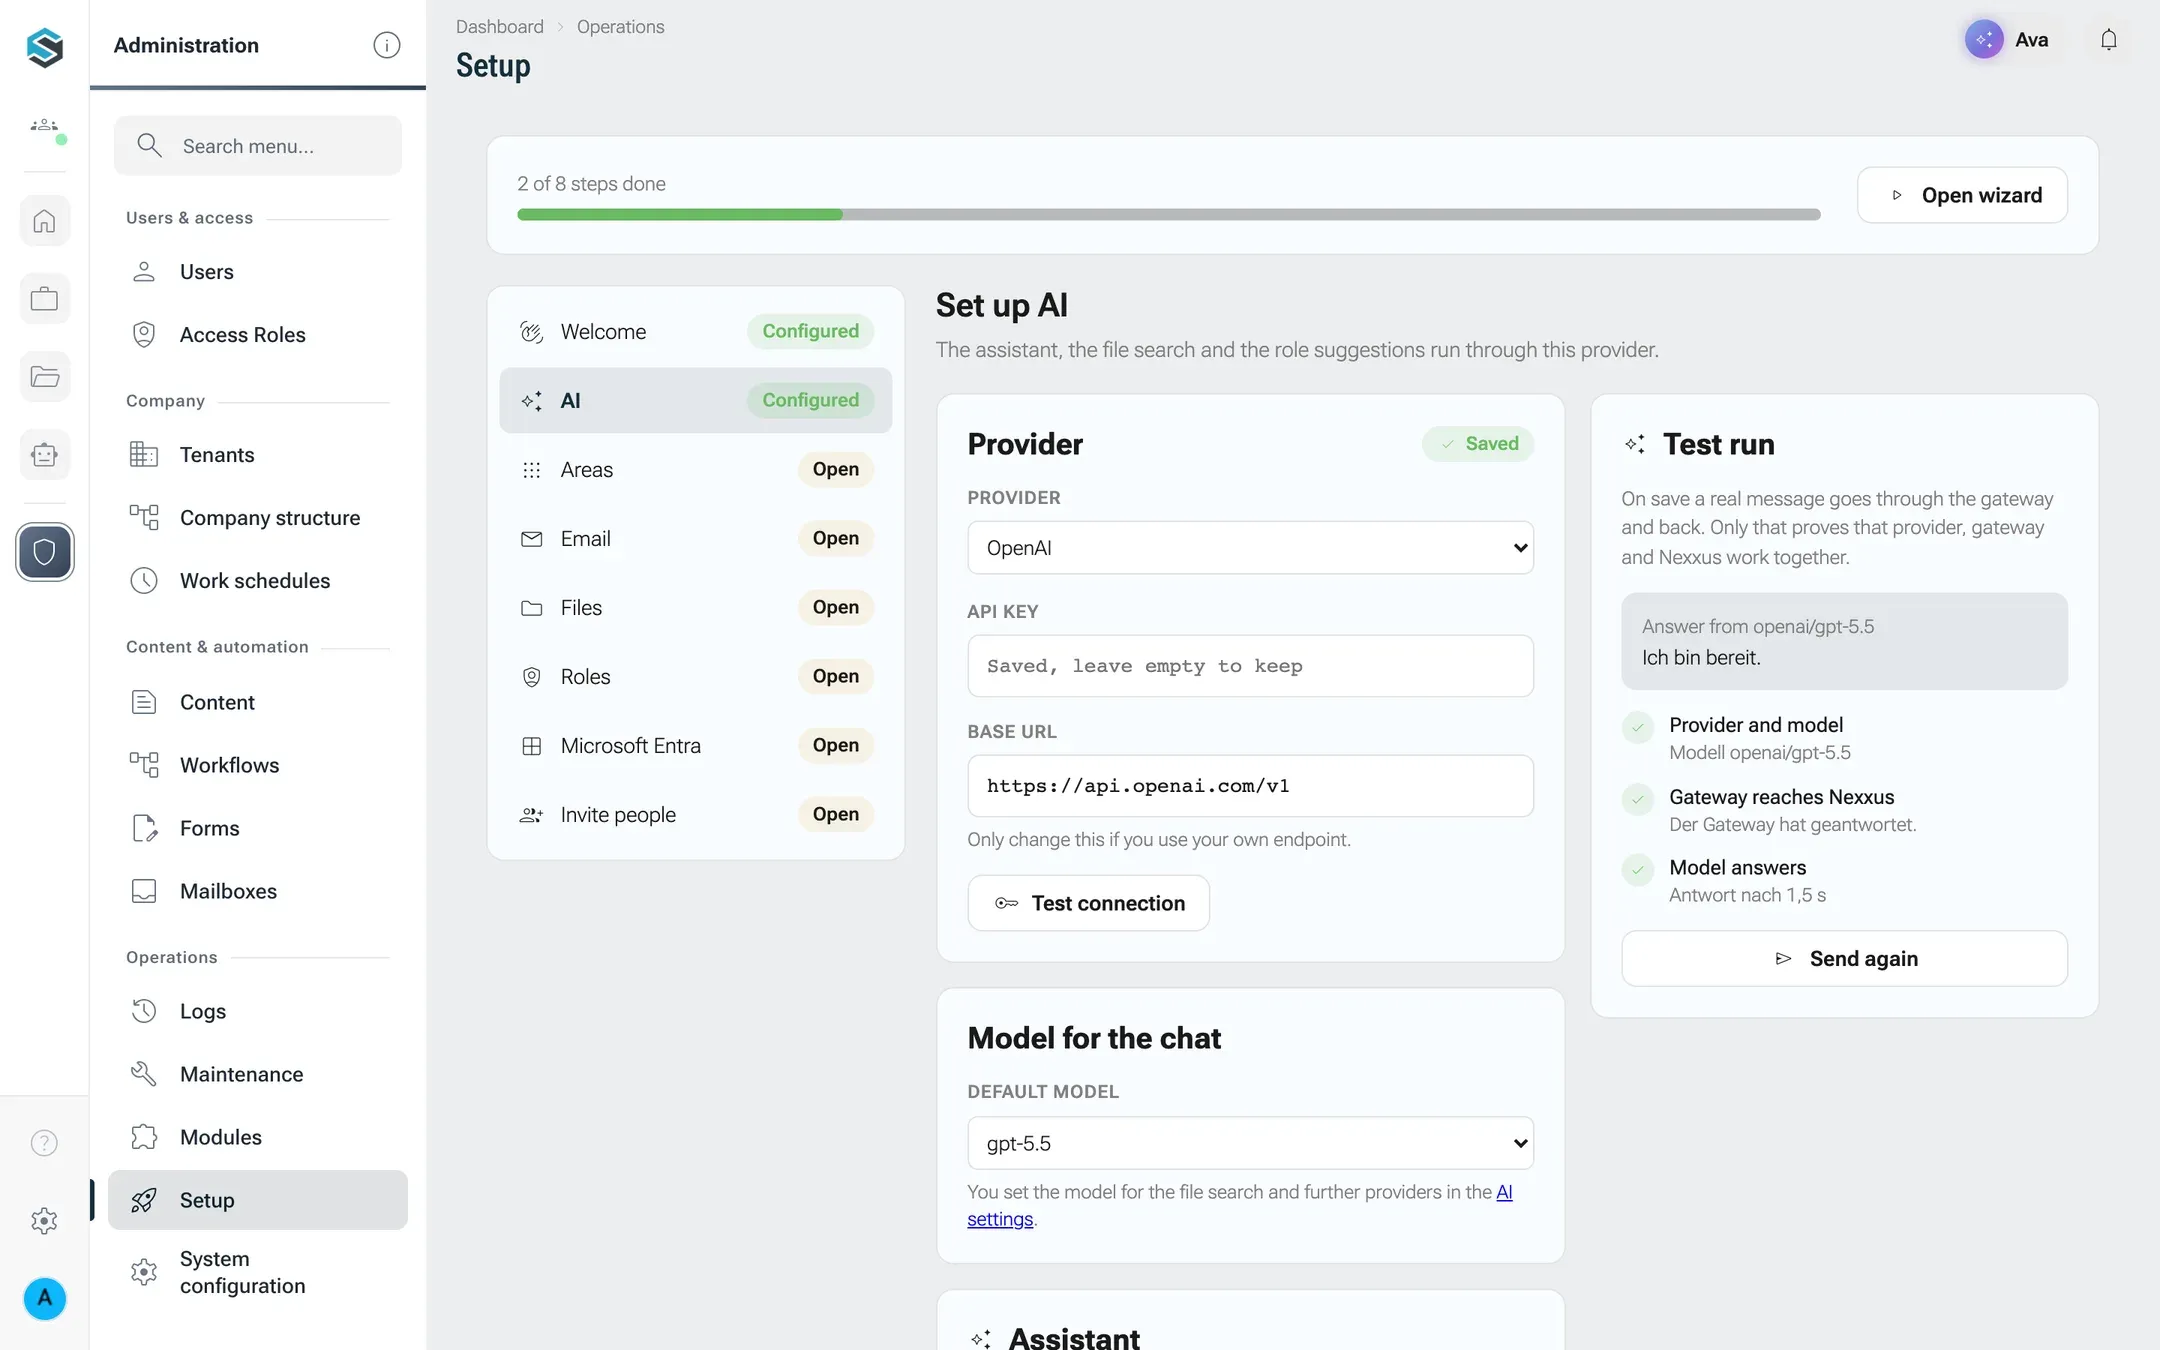
Section titled “Step 2: AI”The assistant, the file search and the role suggestions run through this provider. That is why this step comes second: step 8 already uses the AI to suggest roles.
-
In the card Provider, pick a provider from the list, or Custom endpoint (OpenAI-compatible) … for a model server of your own. For your own endpoint, also enter a Name and the Base URL up to and including
/v1. -
Paste the API key. Click Test connection. A message such as “Connected. 12 models found.” means the key works.
-
In Model for the chat, choose the Default model. If the endpoint returns no model list, type the model ID yourself.
-
Optional: in the card Assistant, rename the AI Assistant (the default is Ava, at most 40 characters) and choose its Appearance (Dark or Light) and Colour (Aurora, Ocean, Forest, Sunset, Graphite). Colour and appearance change at once. The name changes when you click Apply in that card.
-
Click Save and continue. nexxus sends a real message through the AI gateway and back, the Test run. The card on the right shows the answer and three checks: Provider and model, the gateway reaching nexxus, and Model answers. The step only counts as done when all three are green.
This step connects one provider with one chat model. Prices, more models, the search model and voice are set on the AI settings page, described in Connect your AI.
Step 3: Areas
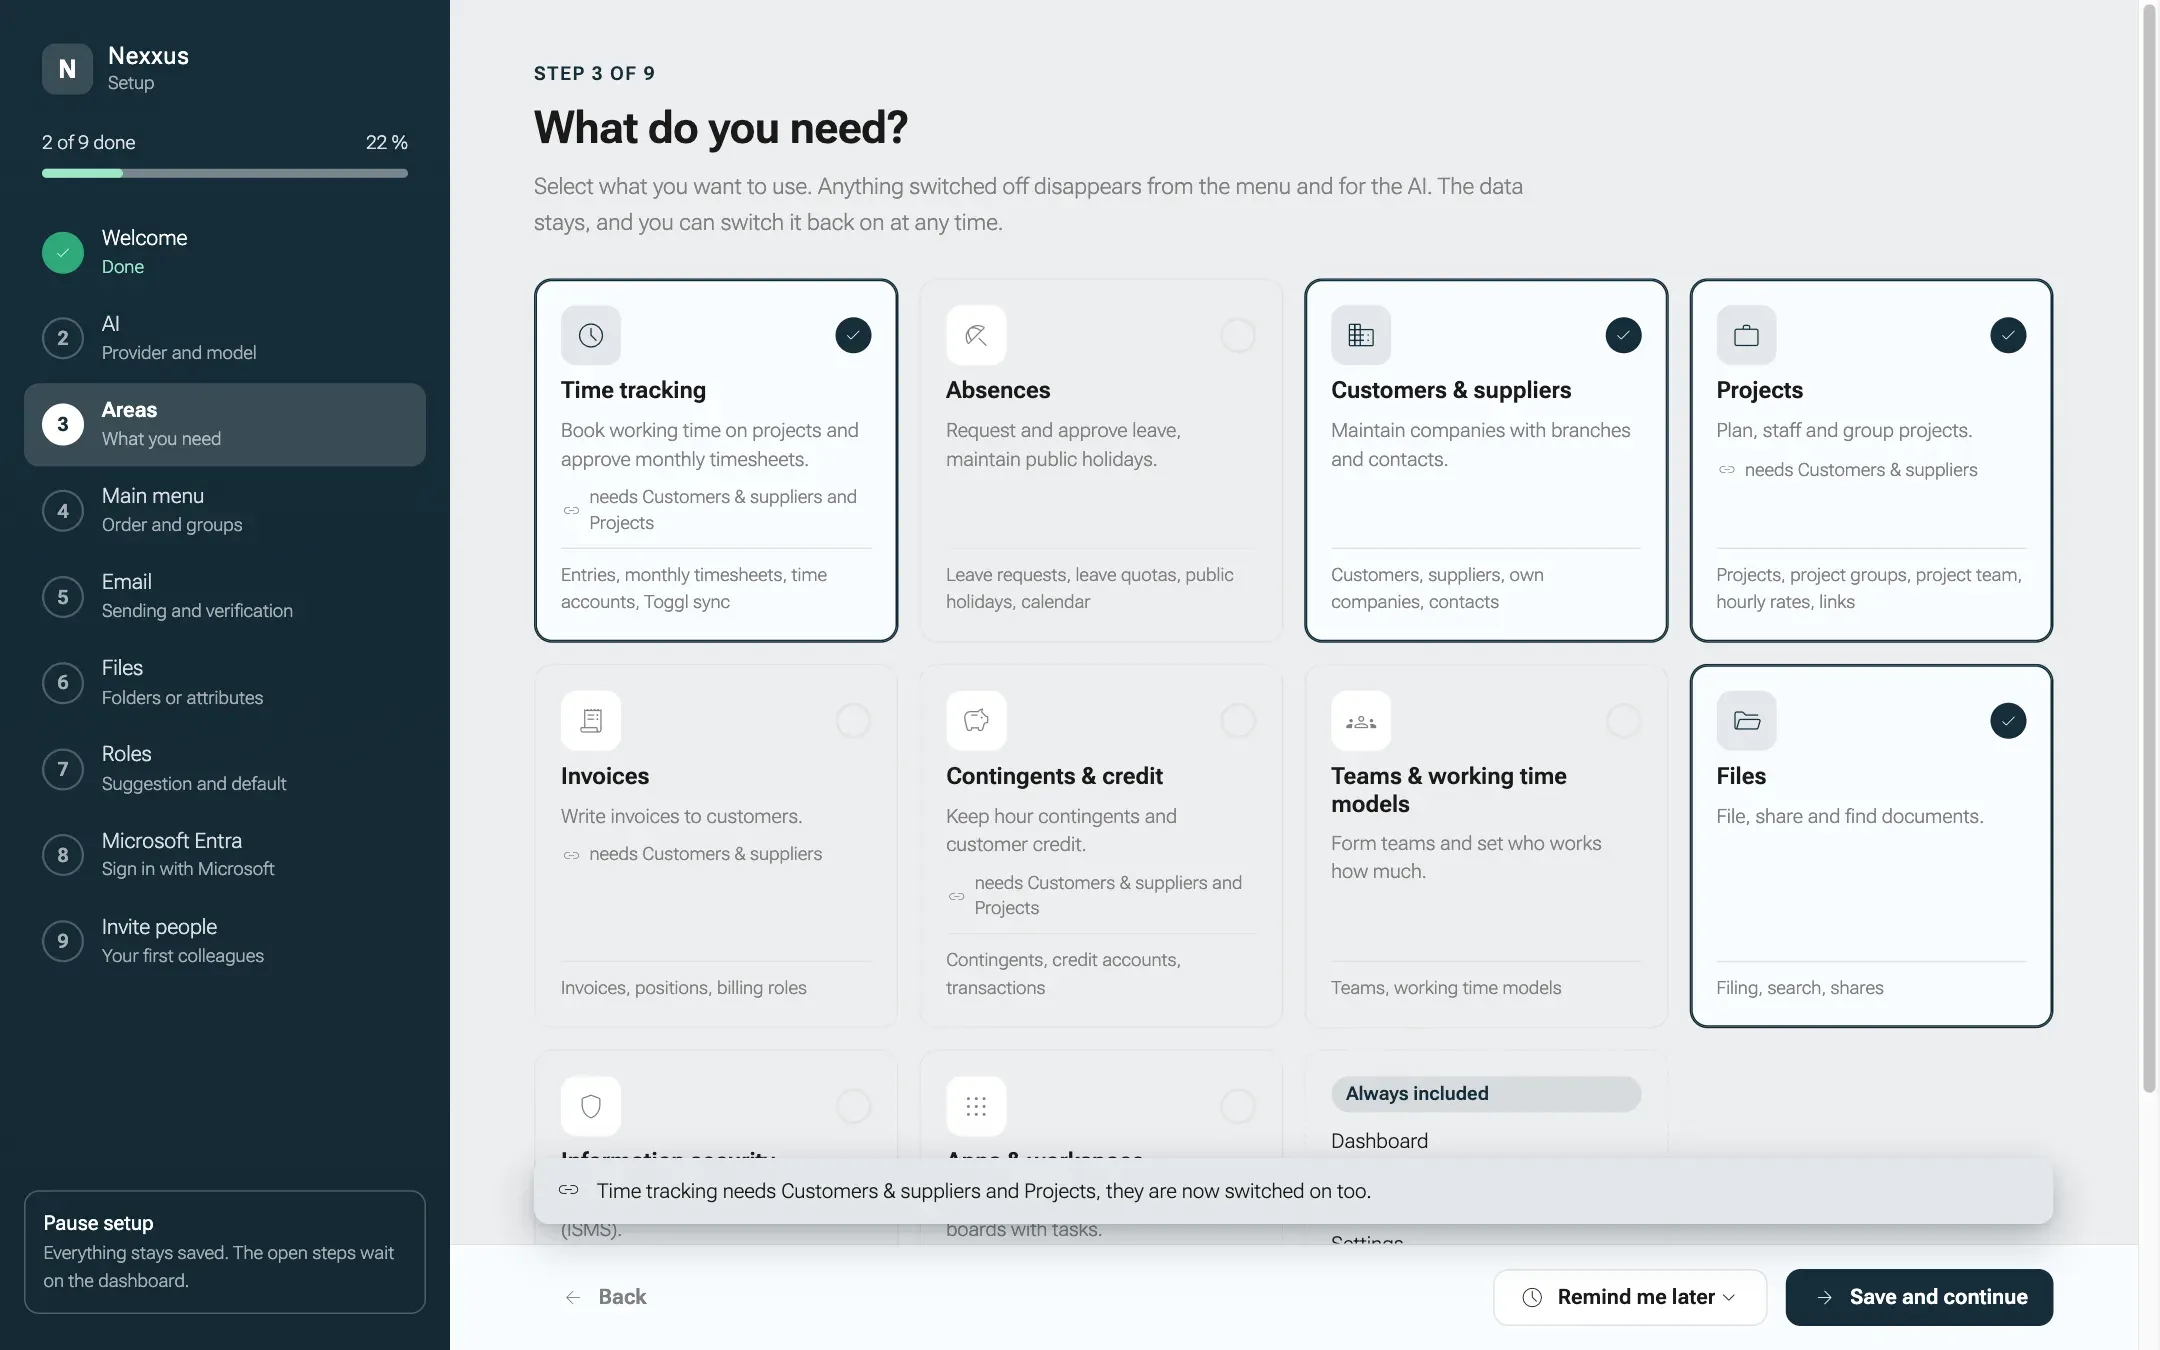
Section titled “Step 3: Areas”Here you decide which parts of nexxus your tenant uses. Its title is What do you need? Each card stands for one group of the menu. An area you switch off disappears from the menu, from the API and for the AI Assistant, for everyone in the tenant. The data stays, and you can switch the area back on at any time. A new tenant starts with Files only; you select everything else.
| Card | What it contains | Needs |
|---|---|---|
| Time tracking | Entries, monthly timesheets, time accounts, Toggl sync | Customers & suppliers, Projects |
| Absences | Leave requests, leave quotas, public holidays, absences in the calendar | |
| Customers & suppliers | Customers, suppliers, own companies, contacts | |
| Projects | Projects, project groups, project team, hourly rates, links | Customers & suppliers |
| Invoices | Invoices, positions, billing roles | Customers & suppliers |
| Contingents & credit | Contingents, credit accounts, transactions | Customers & suppliers, Projects |
| Teams & working time models | Teams, working time models | |
| Files | Filing, search, shares | |
| Information security | Assets, risks, measures, self-declarations | |
| Apps & workspace | Apps, workspace, academy | |
| Chat | Channels, direct messages, threads, mentions | |
| Content | Content, blocks, media, delivery |
What an area needs, nexxus switches on with it and says so, for example Invoices needs Customers & suppliers, it is now switched on too. Switch off an area another one needs, and the other one goes off too: Invoices needs Customers & suppliers and is therefore switched off too. The server refuses a selection in which something is missing.
Pages that are always there show nothing from a switched-off area: without projects a contact does not ask for its project, without time tracking an employee has no Toggl ID and no timesheet approval, without teams & working time models no team and no working time model. Names stay readable: a person’s company can still be picked on the user page while customers & suppliers are off. Figures from a switched-off area are not available through analytics either (see Dashboard).
Six things are Always included and Cannot be switched off.: Dashboard, Calendar, AI assistant, Users & roles, Settings and Notifications. Without the last three nobody could switch an area back on. The AI assistant belongs to every page and is already set up in step 2, before anyone picks areas. If your tenant had switched it off in an earlier version, it is on again.
Click a card to switch it on or off, then Save and continue. Later, on the page Setup, switching an area off asks for confirmation first, because it affects everyone at once.
Step 4: Main menu
Section titled “Step 4: Main menu”Here you arrange the menu for everyone in the tenant, or for a single role. Its title is How should the menu look? If the menu nexxus comes with suits you, choose Not needed under Remind me later.
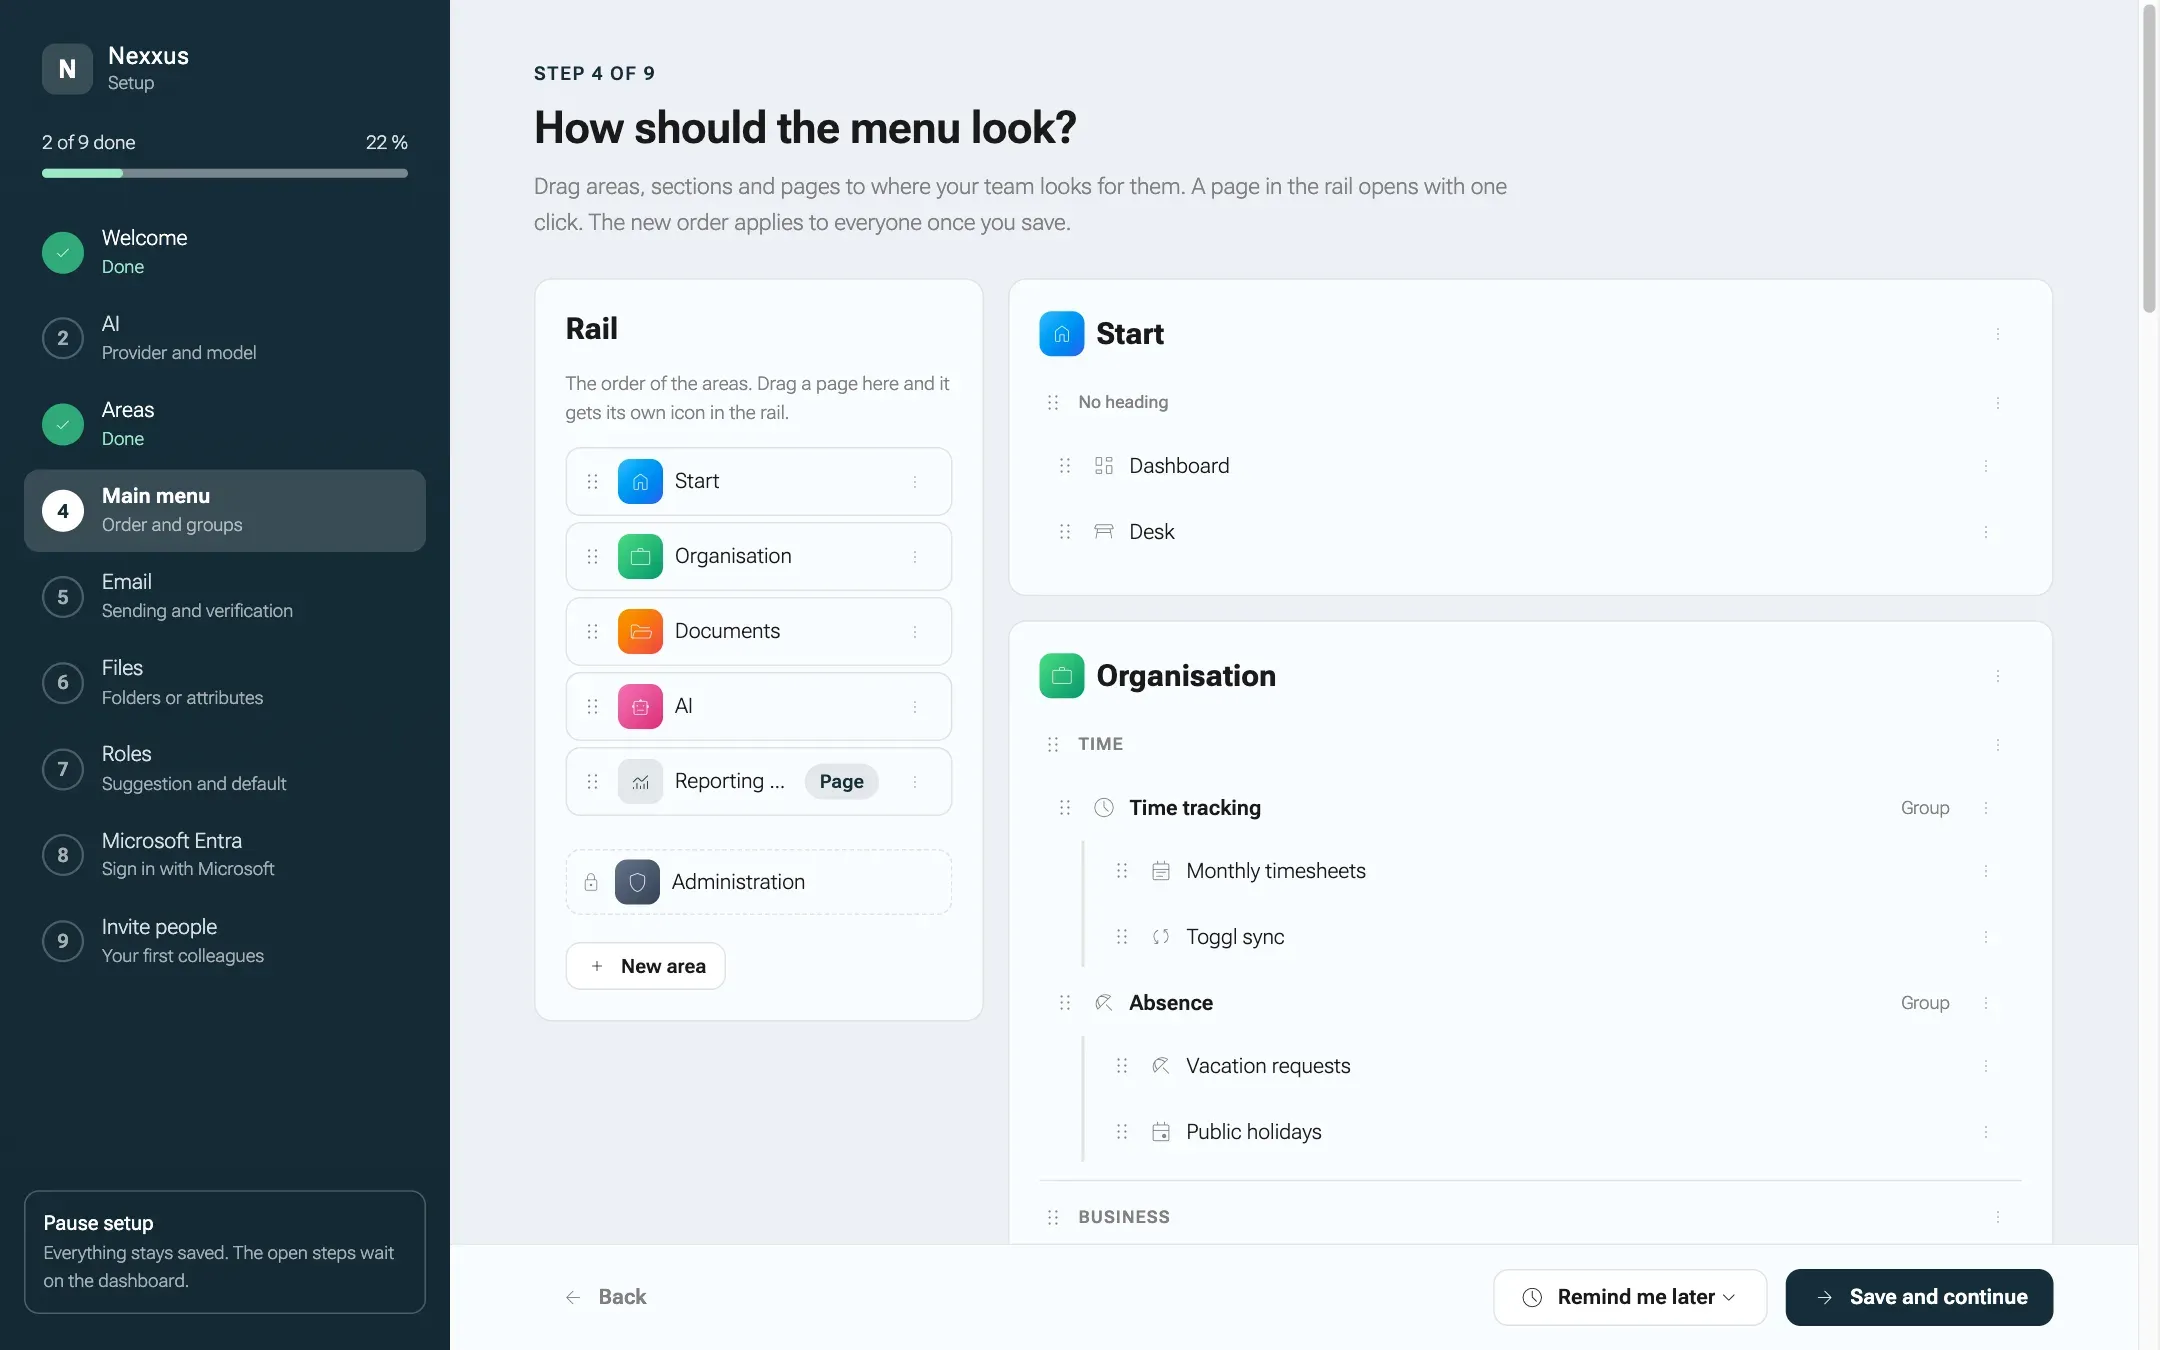
On the left is the Rail with the order of the areas; Administration is always at the bottom. On the right is every area with its sections, groups and pages.
-
Drag a row by its handle to its new place. The menu at the end of the row does the same: Move up, Move down, Into the rail, Into a new group or, for example, Move to “Organisation”.
-
Bring a page your team needs every day to the left with Into the rail. It then has its own icon in the rail, marked Page, and opens with one click.
-
Rename areas, sections and groups with Rename; areas and groups can get a different Icon there too. New area adds an area, Dissolve section and Dissolve group take a level out.
-
Click Save and continue. The new order applies to everyone right away.
On the Setup page, the menu on the left already shows every change before you save: The menu on the left already shows your changes. They are only saved with “Save”. Discard takes them back, Restore default brings back the menu nexxus comes with.
The order grants nobody a right. Everyone still sees only the pages they may open, and only from areas that are switched on. New pages appear in their default place until you move them. Pages of areas that are switched off keep their place for later. The same goes for the pages of a newly installed package. The role editor orders the permissions the same way (see Roles and permissions), and the AI Assistant can read the order and names the page where it is changed.
A menu for one role
Section titled “A menu for one role”A role can have its own menu, for example a lean one for people with only a few tasks. As soon as your tenant has roles, Menu for above the rail picks whose menu you arrange: Everyone or one role. Roles come in step 8, so on the first run through the wizard the field is not there yet; it appears when you come back to the step on the Setup page. A role with its own menu has (own menu) after its name in the list.
Whoever has exactly one role with its own menu sees that menu. Administrators, and people who hold several roles with their own menu, see the menu for everyone. Under the field, the page tells you how many people have the chosen role and names those who still see the menu for everyone, for example admin (admin) or Gina Gastdienst (also Housekeeping). Its own menu grants the role no right either: pages its people may not open stay out of their menu.
On the Setup page, the menu on the left shows the chosen role’s menu for as long as the role is selected, with every page you yourself can see. Use the menu for everyone followed by Save takes the role’s own menu away again. While you have unsaved changes, the field is locked: Save or discard your changes before you choose another menu. The AI Assistant reads the menu that the person asking sees.
Areas, simple or focus zones
Section titled “Areas, simple or focus zones”Style picks how the menu is drawn: Areas, the rail of coloured areas beside a column with the entries of one area, Simple, one column with every page under quiet headings, or Focus zones, the simple column with a badge at the top where everyone switches between the whole menu and single zones (see step 5). The step says: Simple shows one column with headings instead of the rail of areas. It suits roles with only a few pages. The style belongs to the menu you are arranging, the one for everyone or the chosen role’s, and is saved with it. The order stays the same in both styles; in the simple menu the sections of all areas follow one another, area by area, each under its heading. A click on a heading folds its section and opens it again; nexxus remembers that for each person. On the Setup page the menu on the left switches as soon as you click.
Everyone can pick a different Style for themselves under My profile, tab Profile, section Main menu: Areas, Simple, Focus zones, or As set up with the style you save here in brackets, which follows your setting. Pages and permissions stay the same.
Step 5: Focus zones
Section titled “Step 5: Focus zones”A focus zone bundles areas and single pages of the menu under its own name, icon, colour and logo, for example “LIMS” for everything around the lab or “CRM” for sales. Whoever works in a zone sees only its content in the menu. People slice their work differently, so nexxus does not split the menu by itself: everyone starts in Everything, the whole menu, and picks a zone on purpose. The step’s title is Which focus zones should nexxus have? If you need no zones, choose Not needed under Remind me later.
-
Click Add focus zone and enter what the zone is called under Name.
-
Pick the zone’s areas under Areas. An area may belong to several zones.
-
Under Single pages, add pages from other areas with Add page …, for example the desk, the chat or the calendar. The zone holds only what is chosen here or with the areas.
-
Pick an Icon and a Colour; without a colour of its own the zone uses the Installation accent colour. Start page sets the page that opens when someone switches to the zone, otherwise it is the First page of the zone.
-
A Logo replaces icon and colour in the menu, the tab and the tile. You can upload it once the zone is saved.
-
Click Save and continue. The message Focus zones saved confirms it.
The zones only take effect with the style Focus zones in the step Main menu. While another style is chosen there, the step says: The zones only apply once the style “Focus zones” is chosen under Main menu. Until then nobody sees the badge.
How your team works with the zones:
- The badge at the top of the menu shows the zone you are in. A click opens the choice: Everything, your installation’s zones, your own zones and Create own zone. The same choice appears on the dashboard as tiles under Your focus zones.
- In a zone the menu shows exactly its areas and pages, and the menu, the tab title and the icon in the browser tab carry the zone’s name, colour and logo.
- Links never switch the zone. If a link leads to a page outside, the top of the page says not in this focus zone and the menu stays as it is. A search hit outside does switch, to a zone that holds it: the one used last, otherwise Everything. The hit list says so beforehand, and afterwards a notice offers Back to the previous zone.
- Own zones are made by everyone at the badge with Create own zone, from pages of the menu, with pinned pages at the top. Only that person sees them, at most twelve.
- Page lists in the menu: the chat shows its channels and direct messages to the left of the conversation. When the chat belongs to the chosen zone, the menu takes over this list. If the chat is the zone’s only page, the whole menu is the list. Otherwise the chat opens its own level in the menu, and a click on the zone’s name above it leads back.
A zone grants nobody a right: everyone sees only the pages in it they may open. Someone who has exactly one zone and already finds everything they may open in it sees no badge.
Step 6: Email
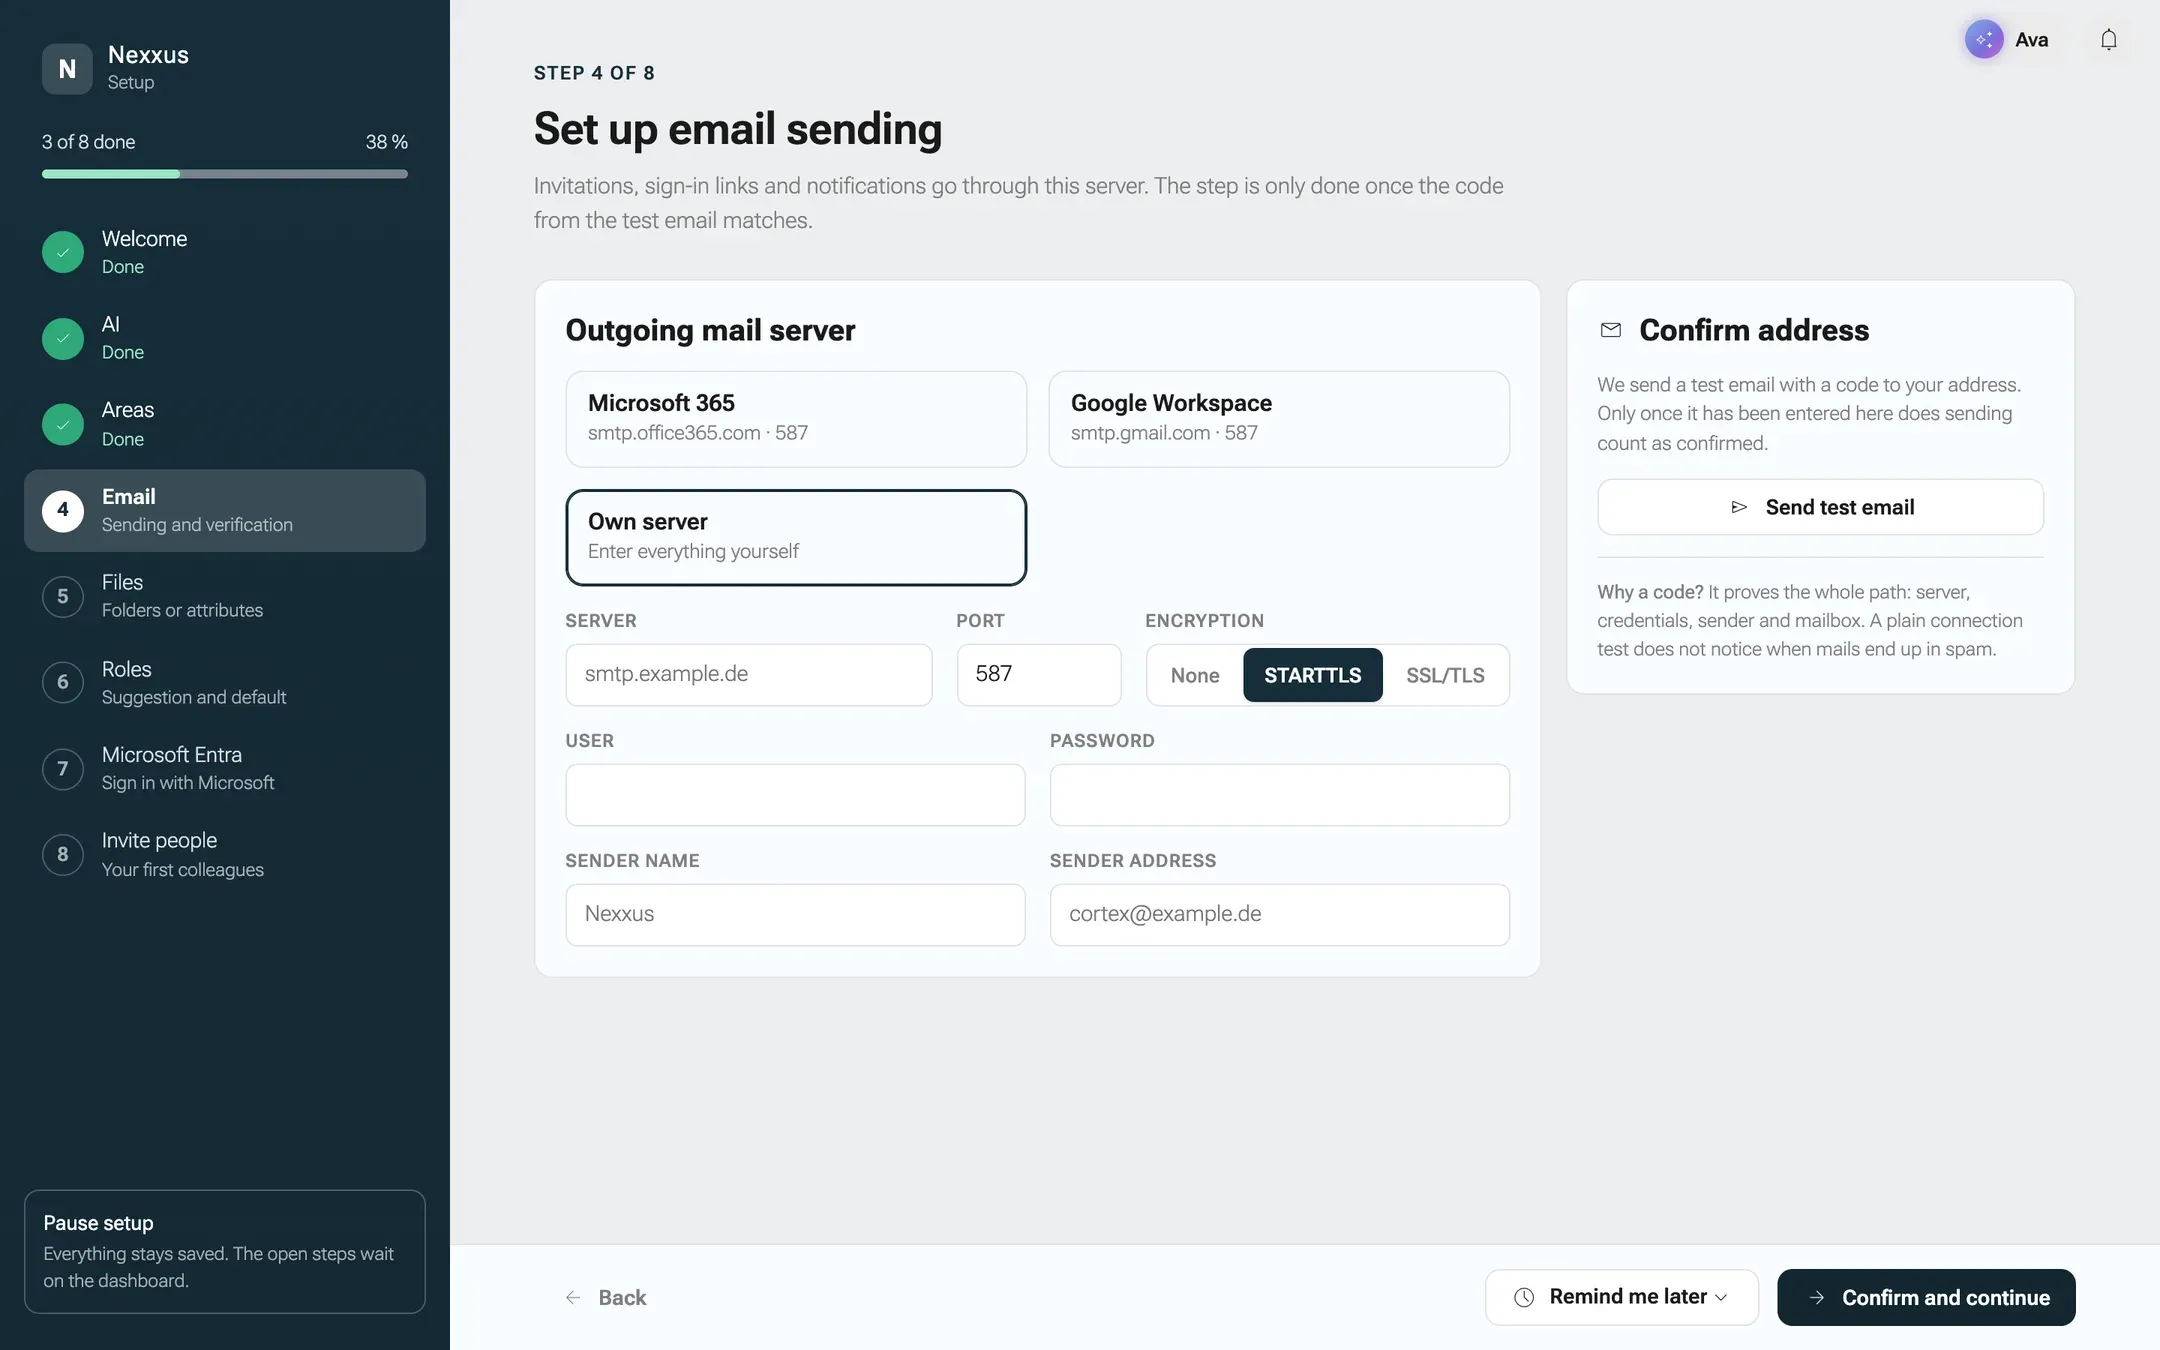
Section titled “Step 6: Email”nexxus sends invitations, sign-in links and notifications by email. This step sets up the server and proves that a mail actually arrives.
-
Pick a preset at the top. The presets fill in the server for Microsoft 365 (
smtp.office365.com, port 587) and Google Workspace (smtp.gmail.com, port 587). Own server lets you enter everything yourself. -
In Outgoing mail server, check Server, Port and Encryption, and enter User, Password, Sender name and Sender address.
-
In Confirm address, click Send test email. nexxus sends a 6-digit code to your address.
-
Type the code into the six boxes. Nothing arrived? Check your spam folder, then use send again.
-
Click Confirm and continue. The card now says Confirmed.
The code is valid for 15 minutes. A plain connection test would not notice when your mails land in spam, which is why nexxus asks for the code. Any later change to the server, the credentials or the sender asks for a new confirmation.
If your operator already configured a mail server for the whole installation, the step says so (Mail currently goes through the server from the operations configuration.) and counts as done. A server you enter here takes precedence.
Step 7: Files
Section titled “Step 7: Files”This step decides how documents are organised in Files, for everyone in the tenant.
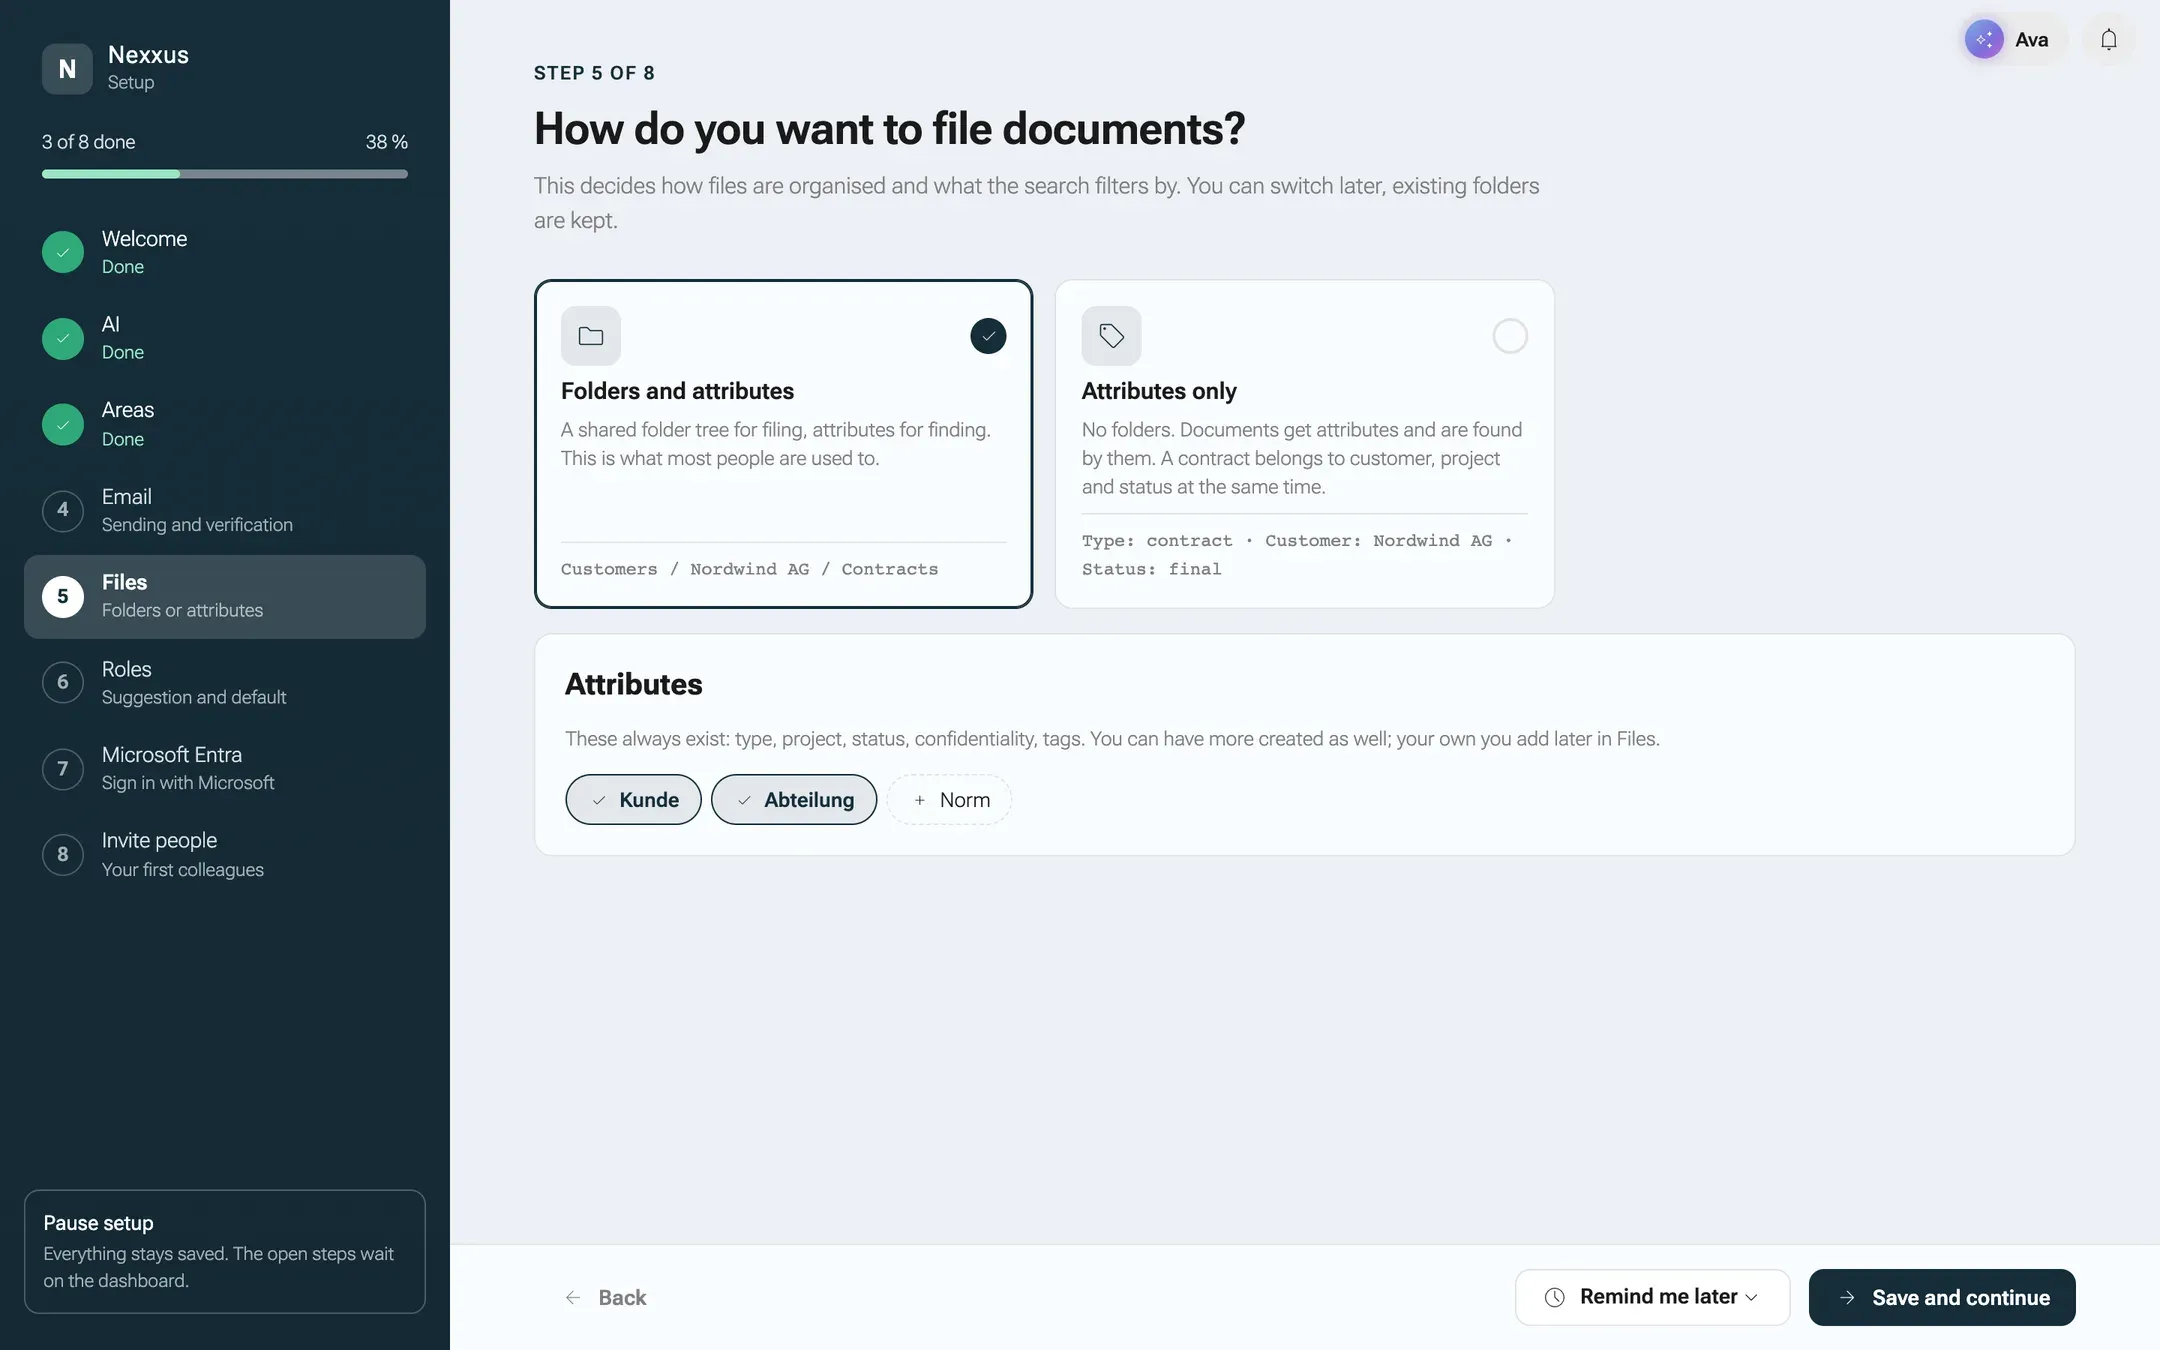
- Folders and attributes: a shared folder tree for filing, attributes for finding, for example Customers / Nordwind AG / Contracts. This is what most people know.
- Attributes only: no folders. Documents get attributes and are found by them, for example Type: contract · Customer: Nordwind AG · Status: final.
Five attributes always exist: type, project, status, confidentiality and tags. Below the two cards you can tick extra attributes: “Kunde” (customer), “Abteilung” (department) and “Norm” (standard). “Abteilung” is always preselected, “Kunde” when customers & suppliers are on, and “Norm” when information security is on. An attribute that already exists stays as it is. You can switch the mode later; existing folders and their shares are kept.
Step 8: Roles
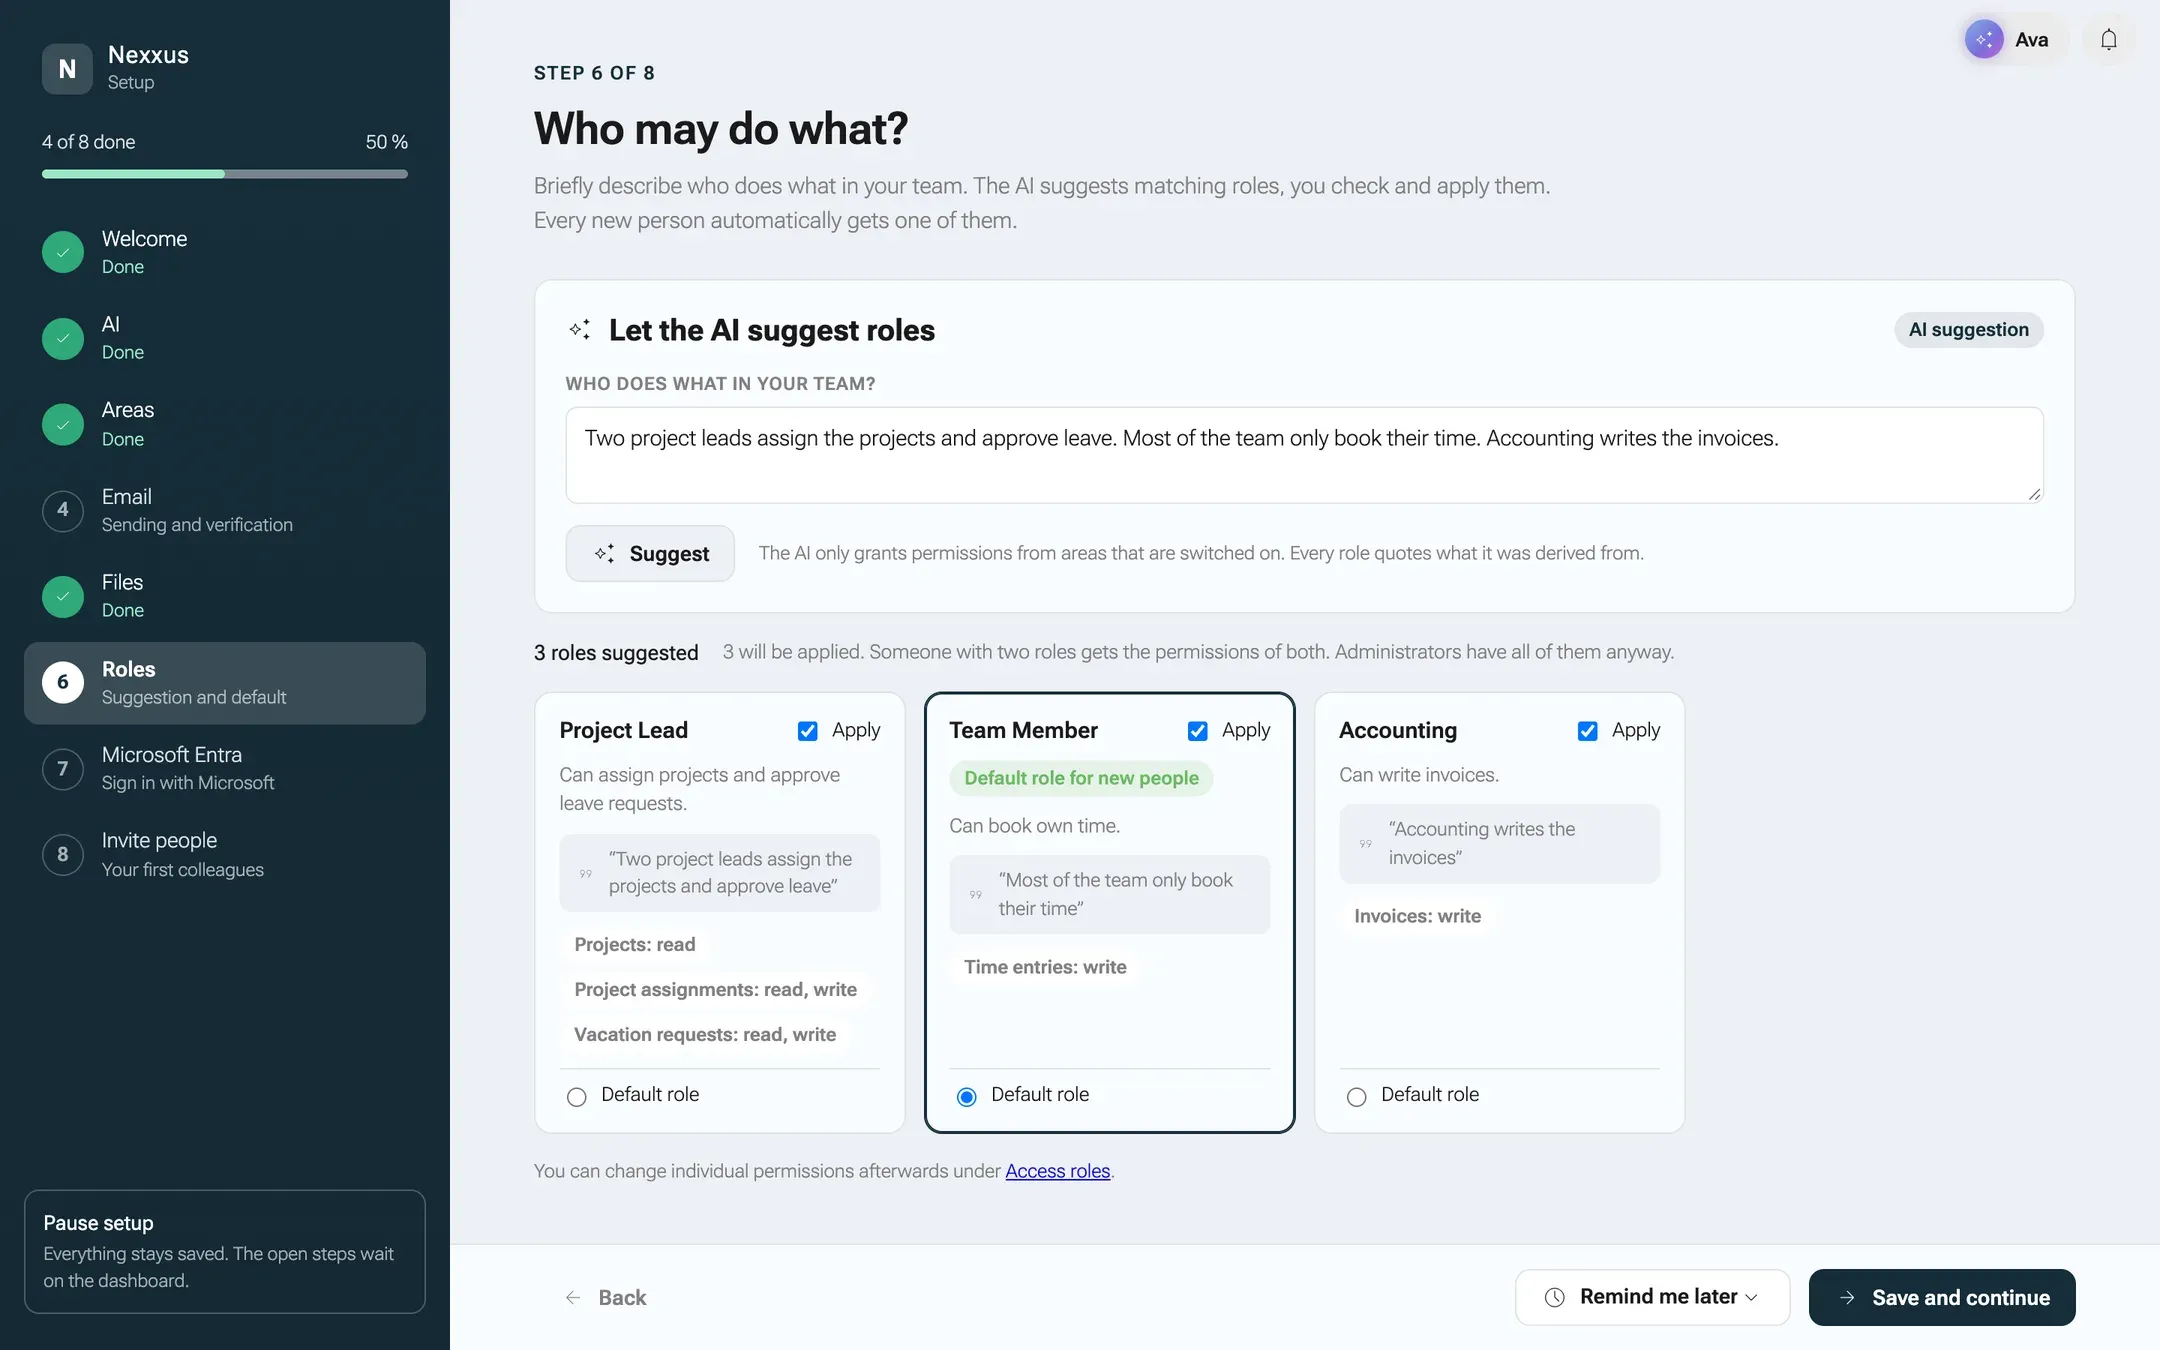
Section titled “Step 8: Roles”Describe in a sentence or two who does what, and the AI proposes access roles that fit.
-
Under Let the AI suggest roles, write in Who does what in your team? something like: “Three team leads assign the projects, most people only book time. Accounting writes invoices.”
-
Click Suggest. The AI proposes up to eight roles. Each role quotes the part of your sentence it comes from and lists its permissions (read, write, select, use). It only grants permissions from areas you switched on.
-
Untick the roles you don’t want, and choose the Default role for new people.
-
Click Save and continue. nexxus creates the ticked roles and sets the default role. (On the page Setup later, the same card has its own button Apply roles.)
If the AI cannot be reached or proposes nothing useful, the step shows role templates instead, with a notice in German: Mitarbeiter:in (employee) as the default role always, plus the templates whose areas are on, such as Teamleitung (team lead) with projects, time tracking or absences and ISMS-Verantwortliche (ISMS officer) with information security. Someone with two roles gets the permissions of both. Administrators have every permission anyway. Single permissions you change afterwards under AdministrationUsers & accessAccess Roles, see Roles and permissions.
Step 9: Microsoft Entra
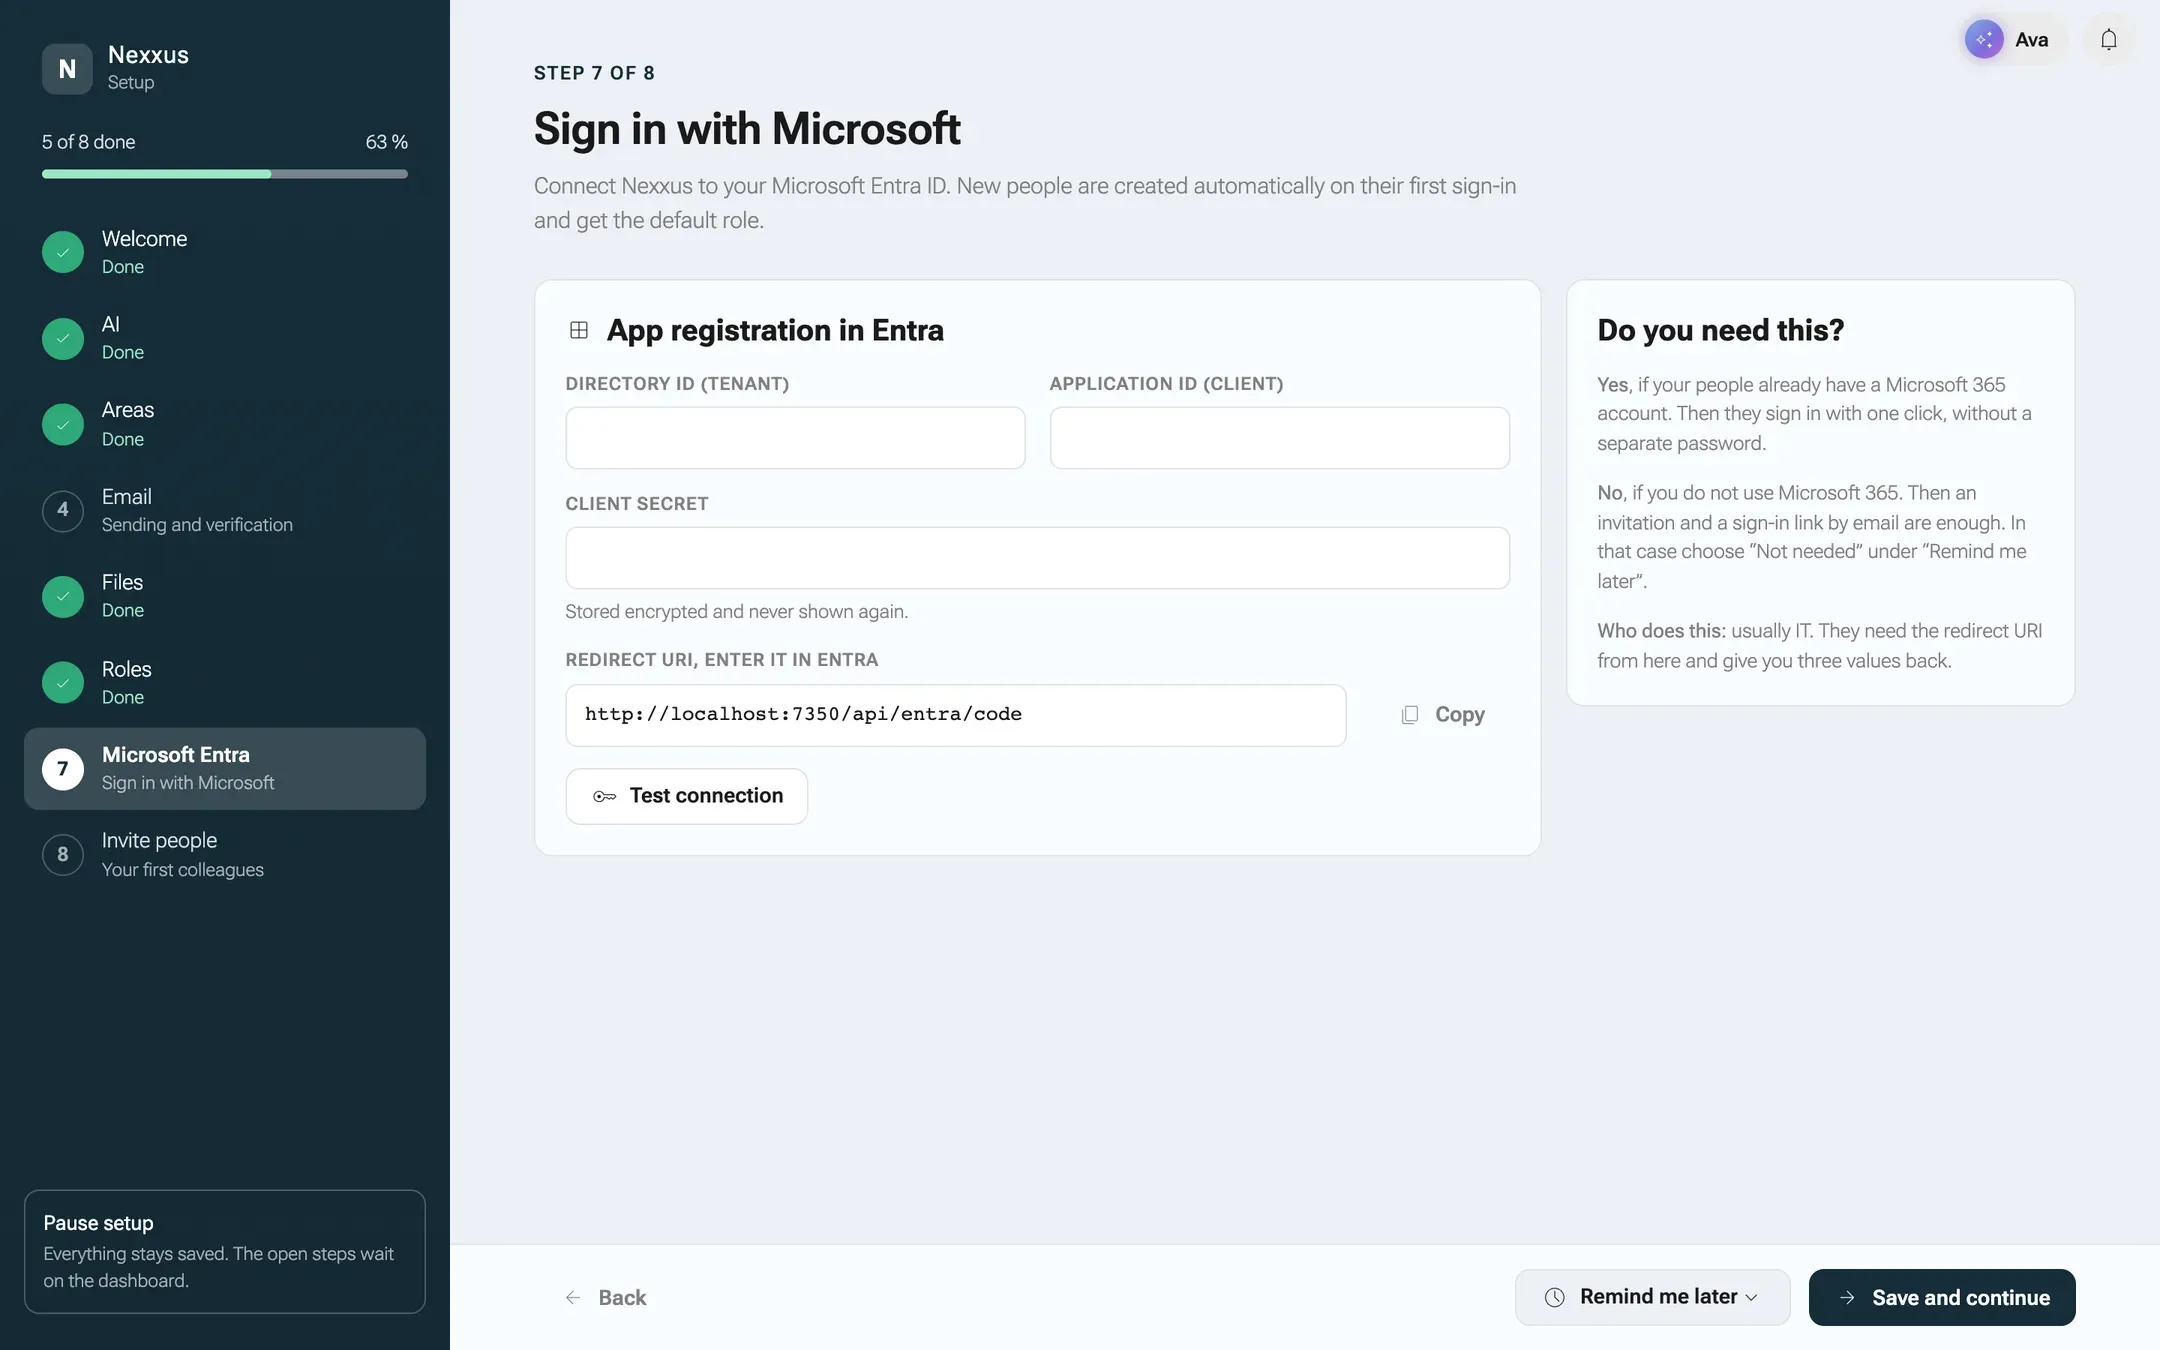
Section titled “Step 9: Microsoft Entra”With sign-in through Microsoft Entra ID, your people sign in with their Microsoft 365 account, without a separate password. nexxus creates their account on the first sign-in and gives them the default role. If you don’t use Microsoft 365, invitations and sign-in links by email are enough: choose Not needed under Remind me later.
-
Copy the value of Redirect URI, enter it in Entra with Copy and send it to your IT department. They create an app registration in Entra and give you three values back.
-
Enter Directory ID (tenant), Application ID (client) and Client secret. The secret is stored encrypted and never shown again.
-
Click Save and continue. nexxus checks the details, the directory and the application with its secret.
All sign-in options, two-factor rules included, are described in Sign-in.
Step 10: Invite people
Section titled “Step 10: Invite people”-
Paste the addresses into Email addresses, one per line or separated by commas. Copying from Outlook or a spreadsheet works too. nexxus derives names from the addresses.
-
Click Check addresses. A table shows each address with Name, Role and Status: New, Already has an account, Address incomplete or Duplicate.
-
Pick a role per person if needed. Without a choice, people get the default role from step 8.
-
Click the send button, for example Send 4 invitations.
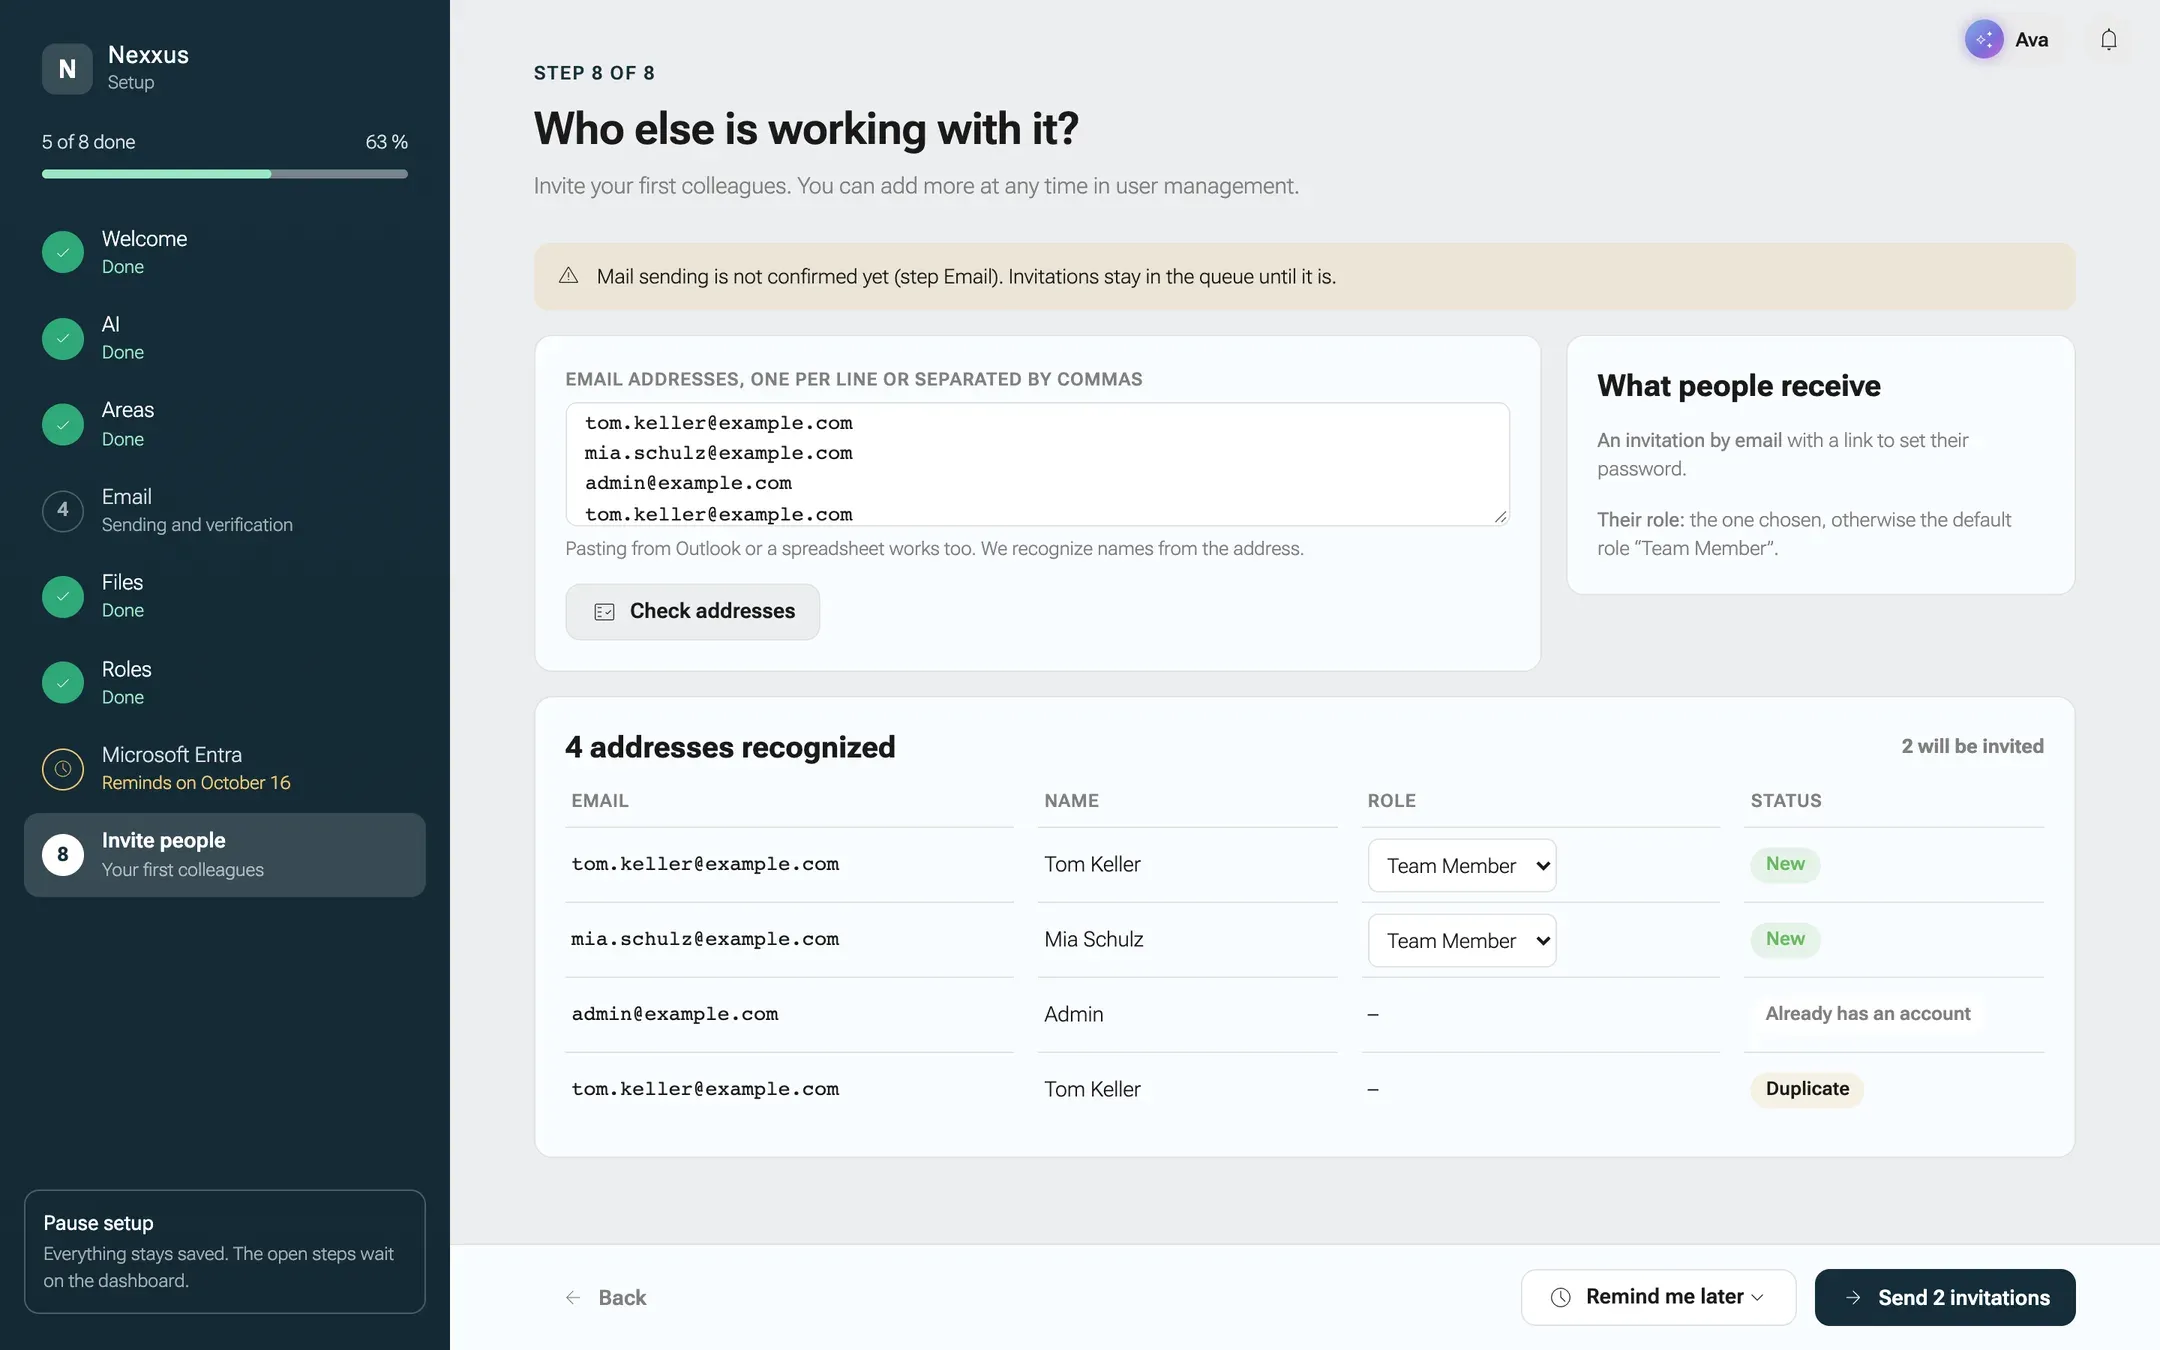
Each person receives an email with a link to set a password. If you have not confirmed the mail server in step 6 yet, the invitations wait in the queue until you do. More on invitations in Invite users.
Postpone a step
Section titled “Postpone a step”Not everything has to happen today. Every step except Welcome has the button Remind me later. It opens the menu Remind:
| Option | When the step comes back |
|---|---|
| Tomorrow morning | Tomorrow at 9 am |
| In a week | In seven days at 9 am |
| At next sign-in | As soon as an admin signs in again |
| Not needed (only Microsoft Entra and Invite people) | Never. The step is hidden. |
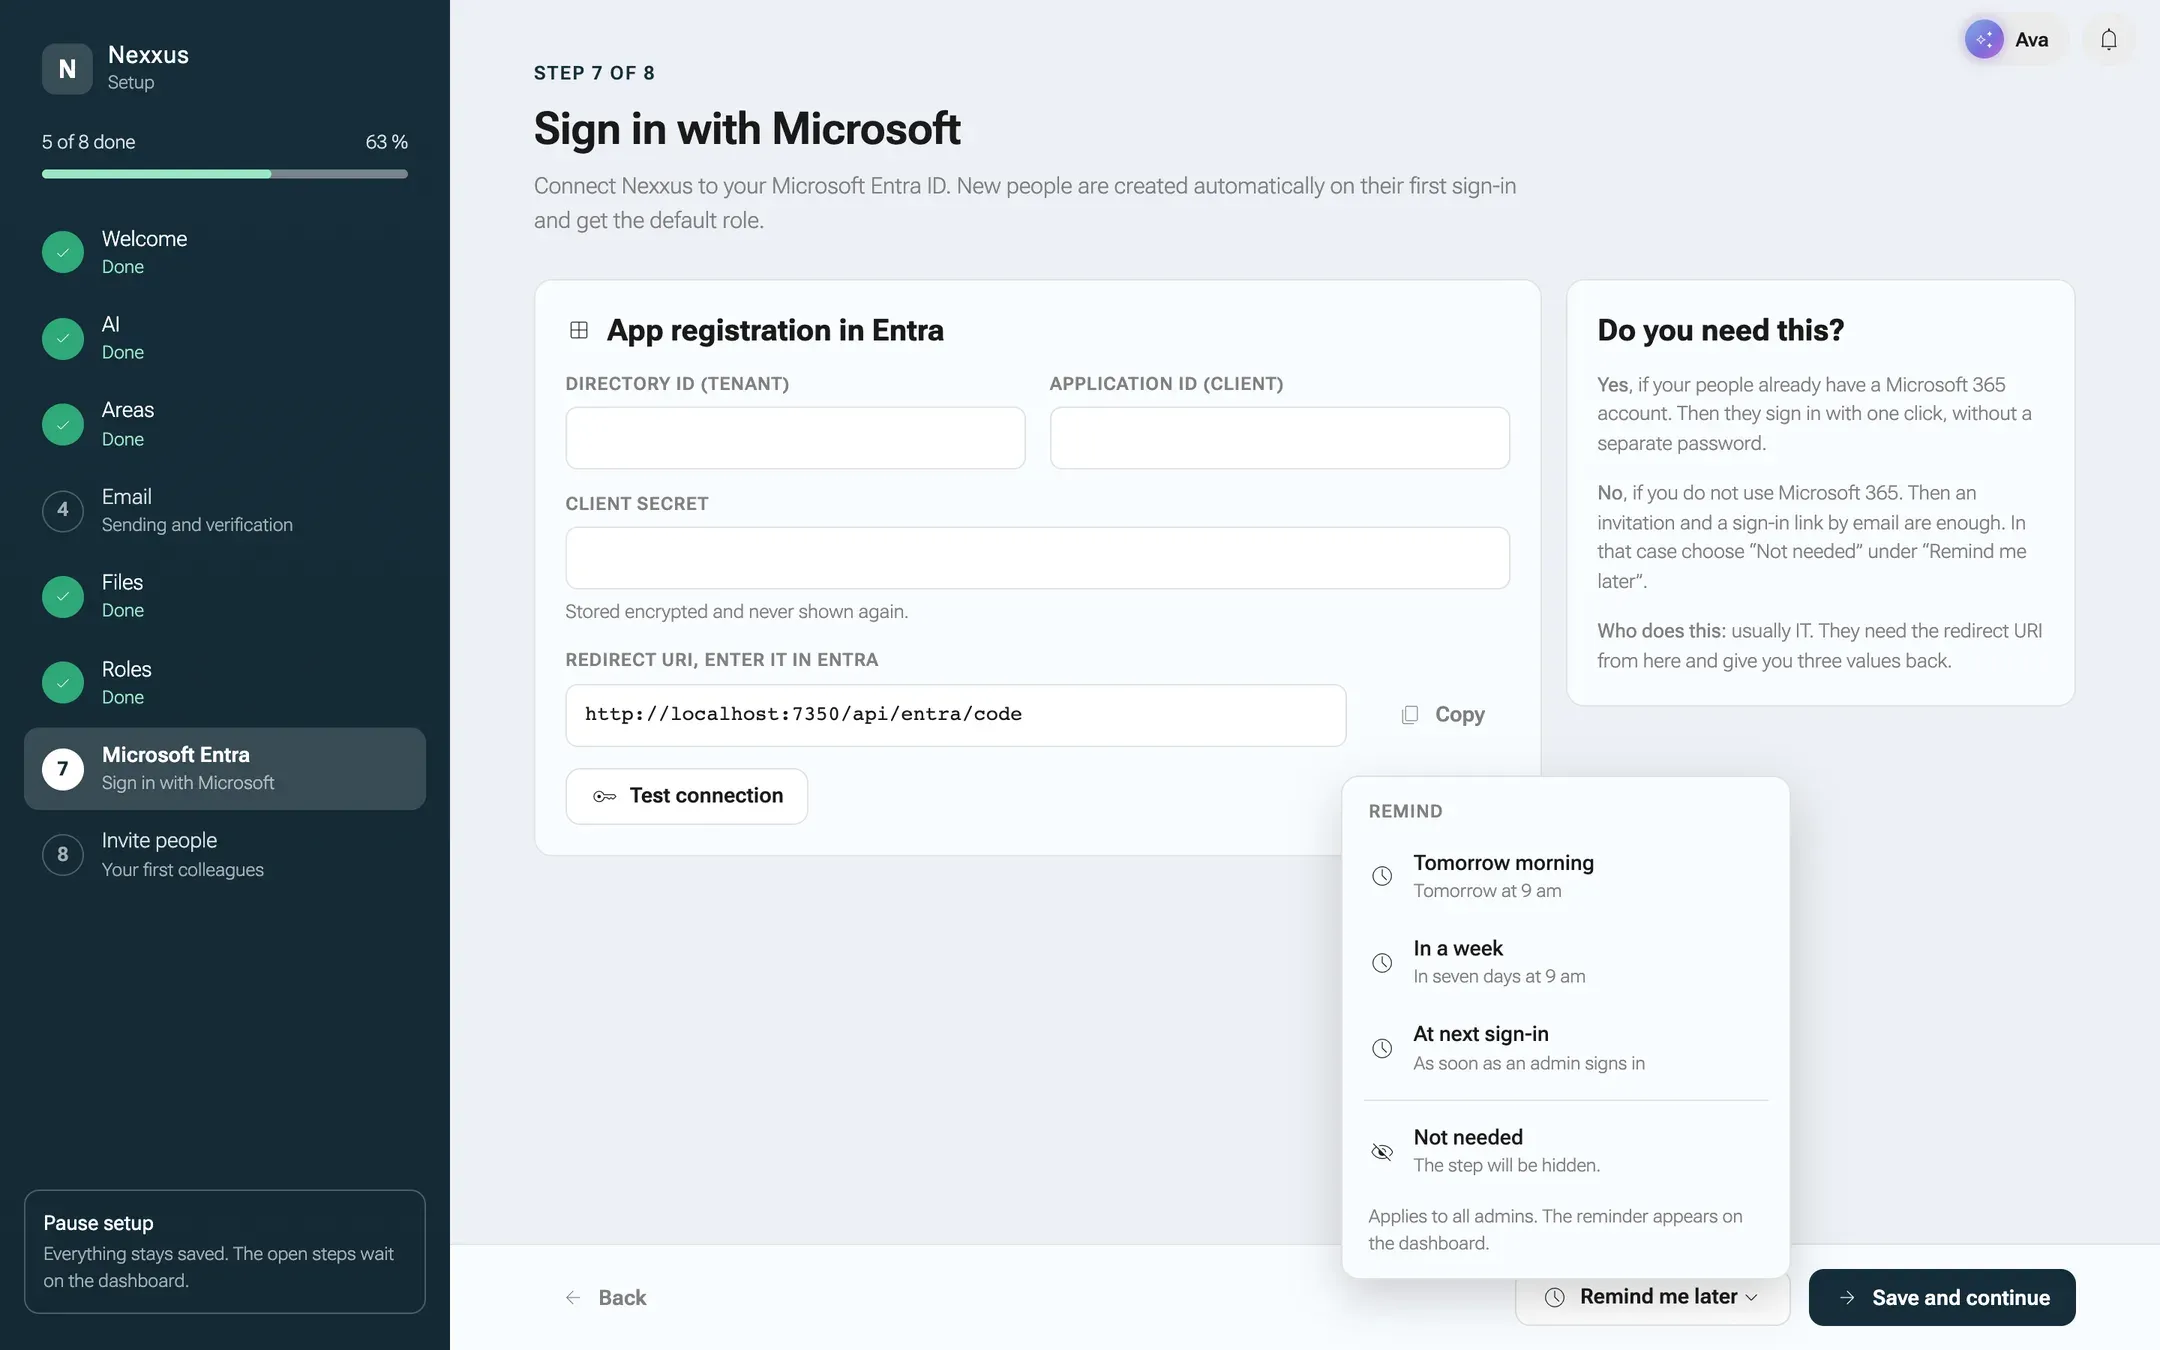
Reminders apply to all admins and use the time zone from step 1. When a reminder is due, the step shows up on the dashboard.
Finish the wizard
Section titled “Finish the wizard”After the last step you see nexxus is ready to go with a list of all steps: done, postponed or open. Open steps have a button Set up now.
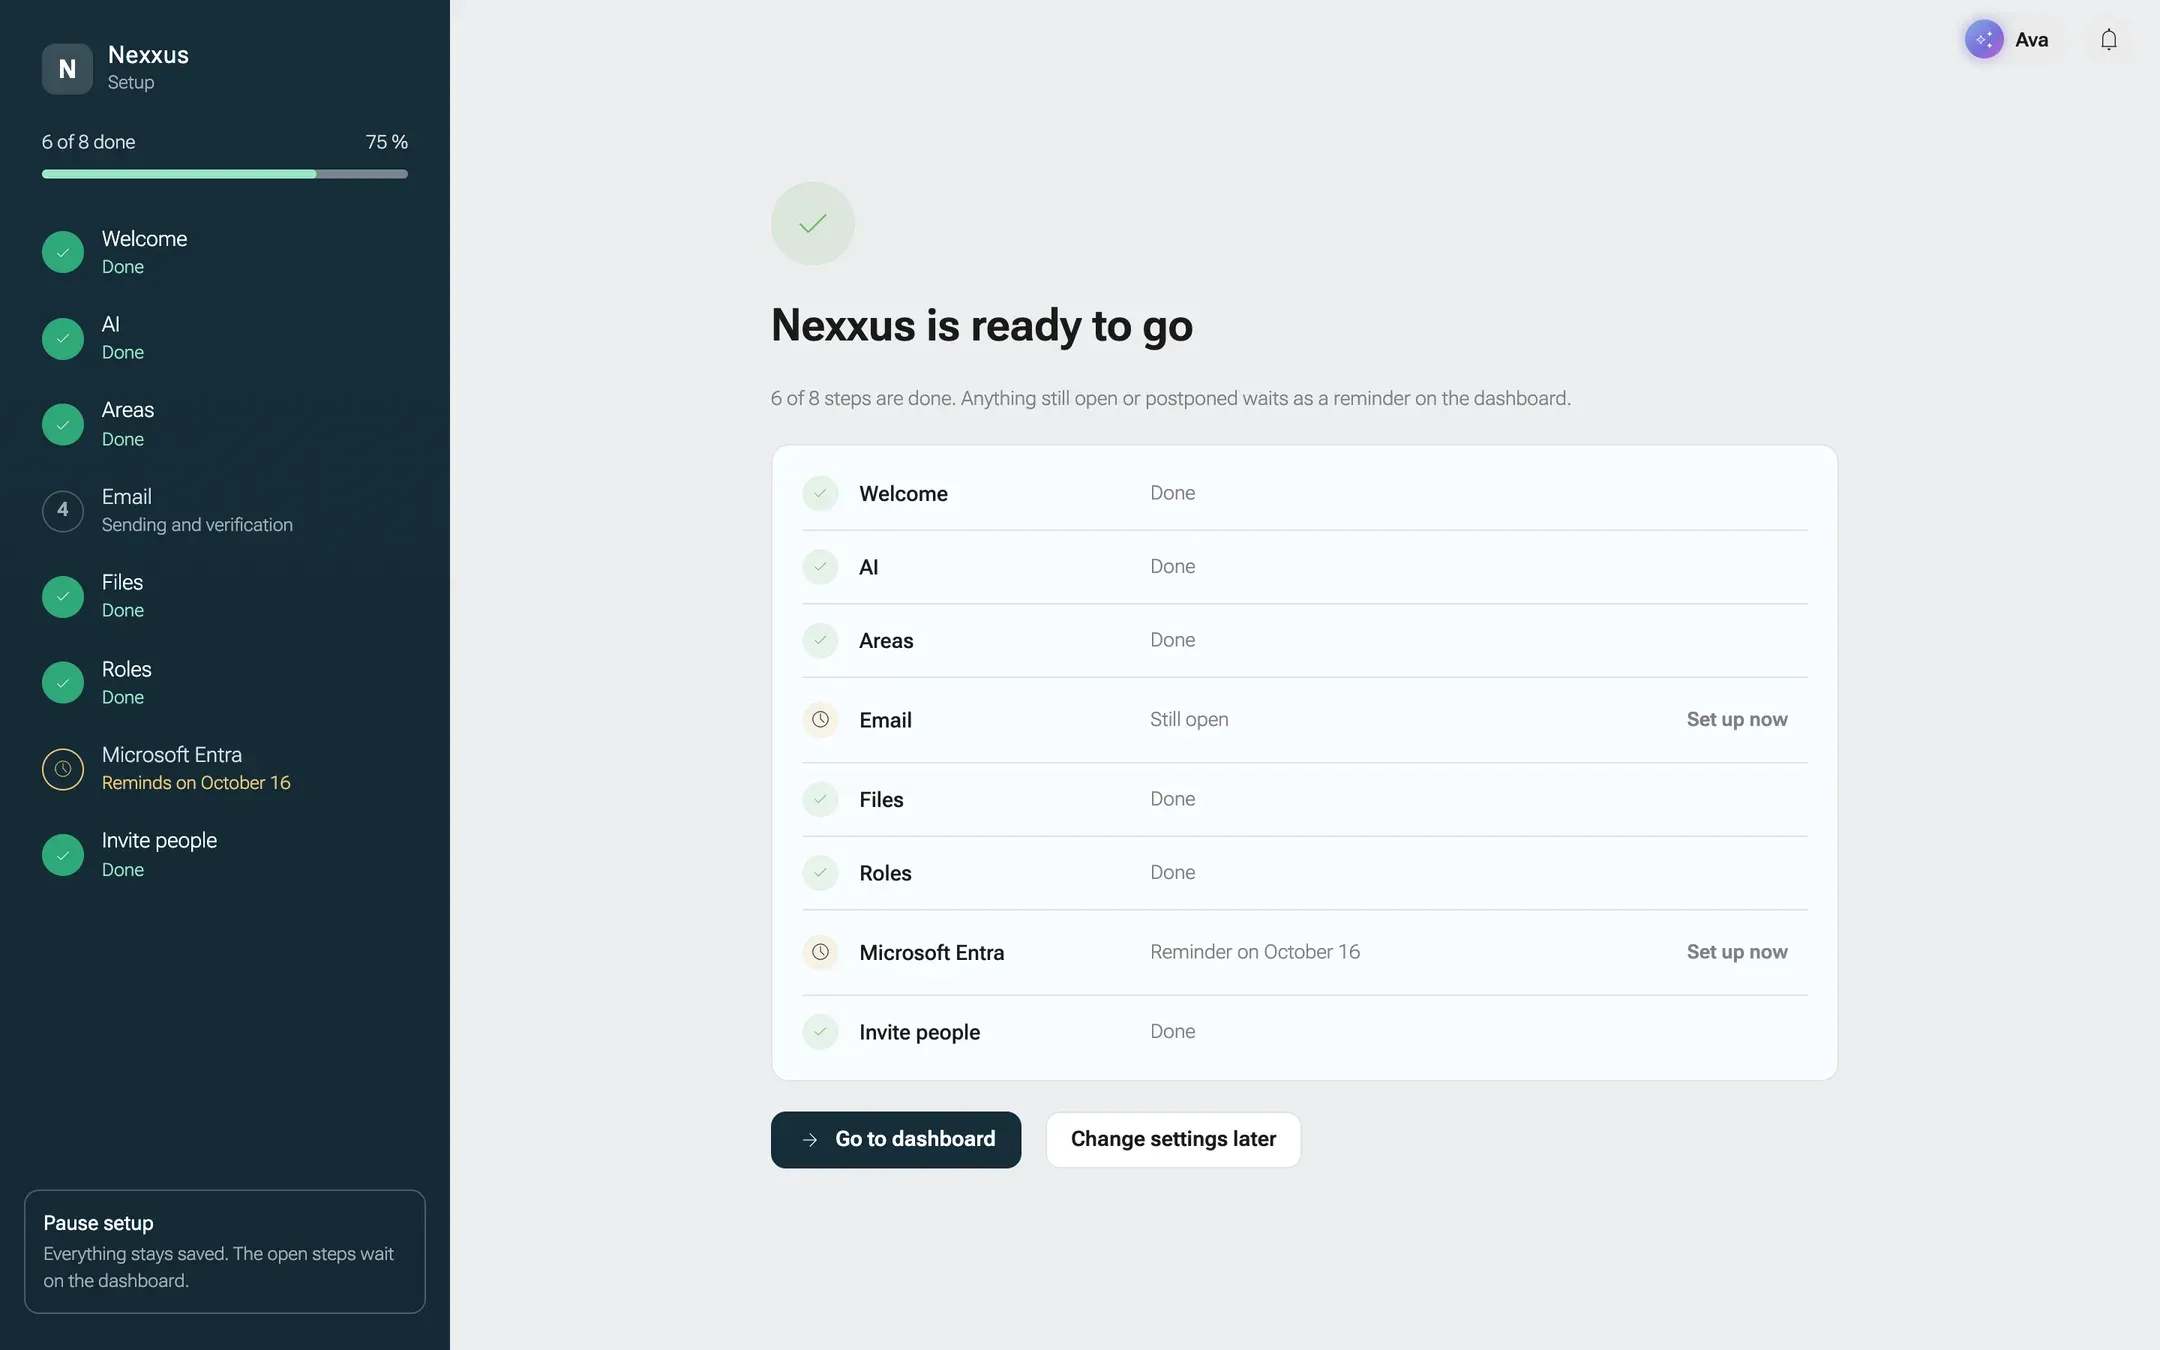
- Go to dashboard ends the wizard and opens the dashboard.
- Change settings later ends the wizard and opens the page Setup.
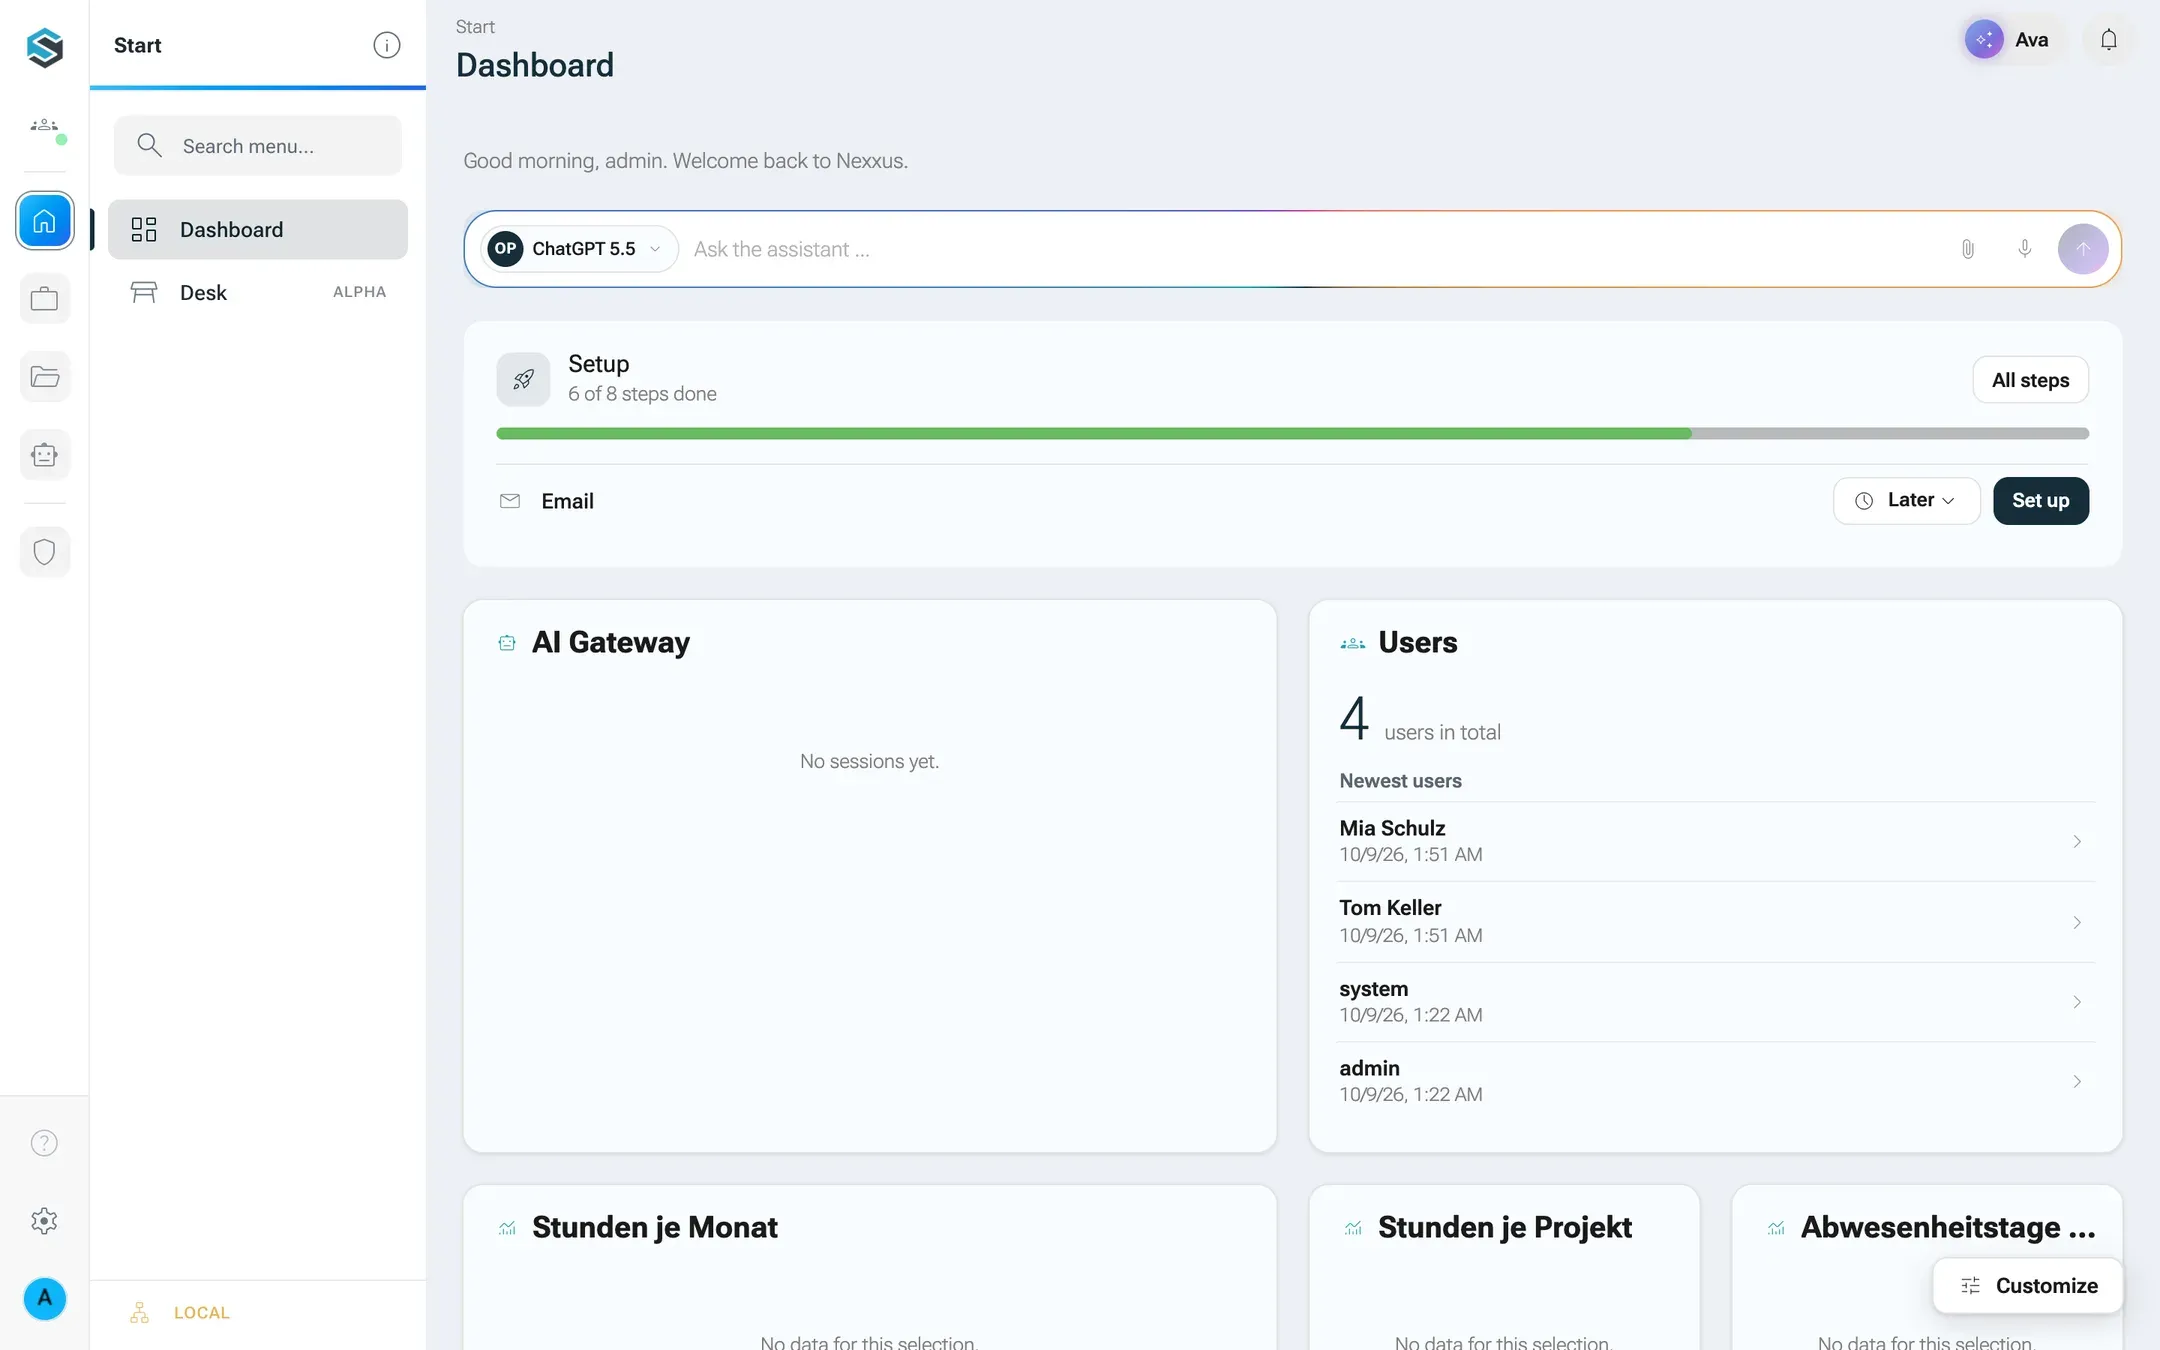
Either way, the wizard no longer opens by itself after sign-in. Open and postponed steps wait on the dashboard in the card Setup: it shows the progress (4 of 10 steps done), marks due reminders with Due and offers Set up and Later per step. All steps opens the page Setup. The card only appears for admins, and only while something is open.
Change the setup later
Section titled “Change the setup later”Every step of the wizard is also a form on the page AdministrationOperationsSetup (route /einrichtung).
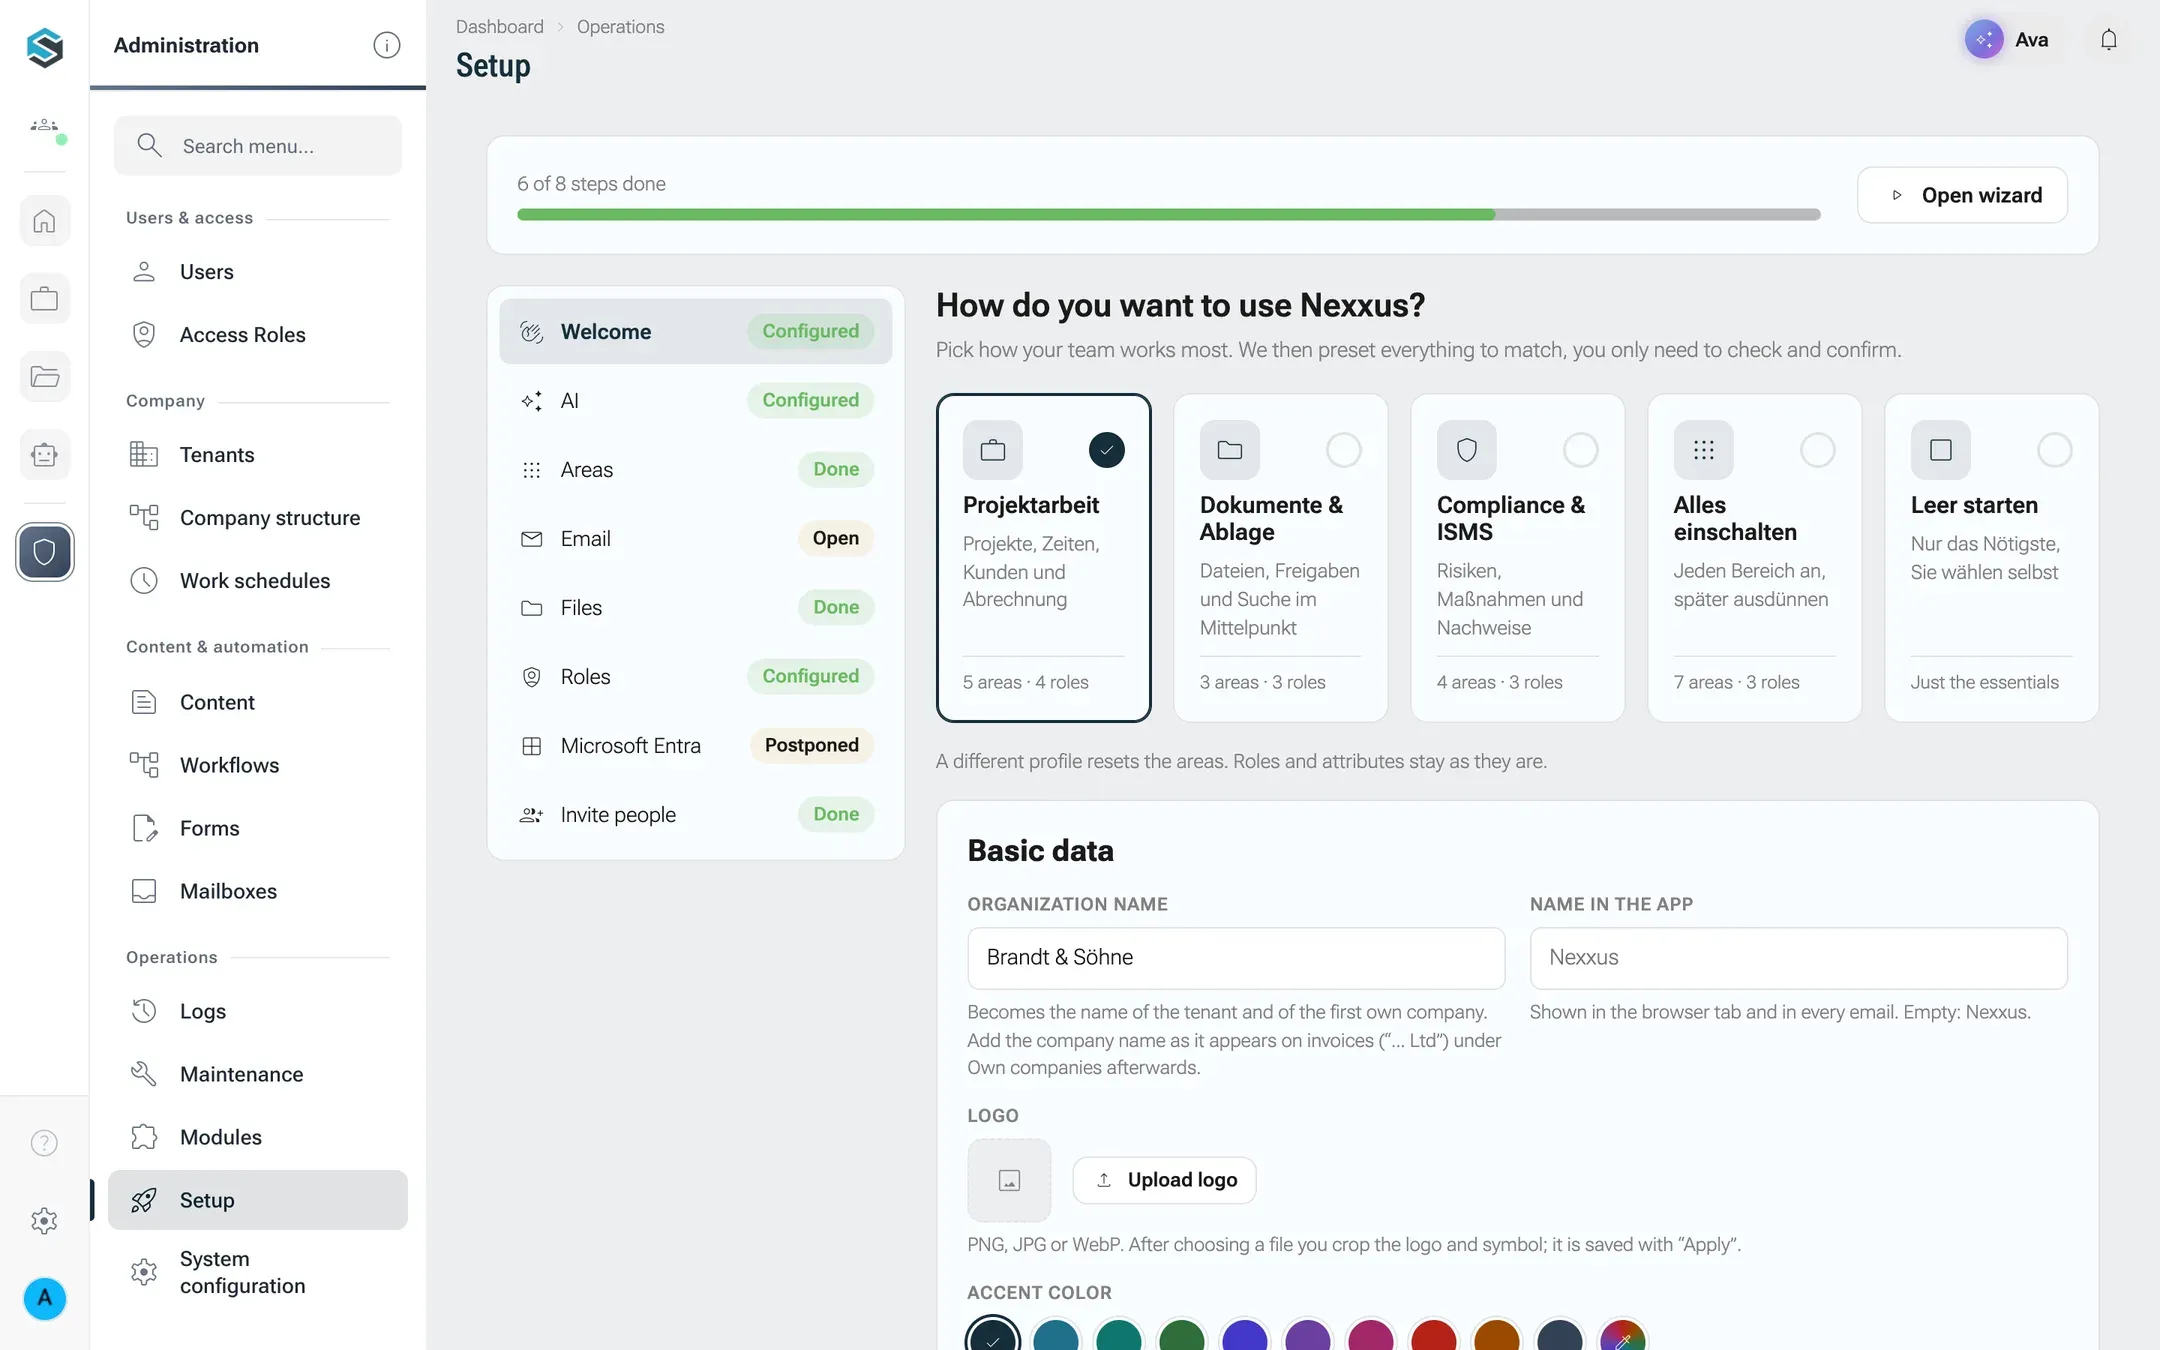
- At the top: the progress and Open wizard, which runs the wizard again.
- On the left: Setup steps, each with its state: Configured, Done, Postponed, Reminder due or Open.
- On the right: the selected step as a form with its own save button. A step marked as not needed offers Needed after all. A postponed step offers Cancel reminder.
Run the whole wizard again
Section titled “Run the whole wizard again”Under AdministrationOperationsSystem configuration, the section Setup has the button Reset setup. After you confirm with Reset, all steps are open again and nexxus opens the wizard right away. Nothing is deleted: settings, roles, users and AI providers stay and already appear in the wizard’s forms.
What happens behind the scenes
Section titled “What happens behind the scenes”- A step counts as done when an admin completed it, or when the configuration already shows it is done. An installation whose mail server has run for months does not start at zero. Specifically: Welcome is done once the tenant has a name of its own; AI once an active provider exists; Email once the address was confirmed or the server configuration provides a mail server; Roles once a default role is set; Microsoft Entra once Entra sign-in is on with directory and application ID; Invite people once at least one person besides the admins has an account. Main menu once an own order is saved; Focus zones once they were saved in the step. Areas and Files only count when saved in the step. After a reset, nexxus ignores the configuration until the steps are done again, so you can replay the flow.
- When the wizard opens by itself: after sign-in, an admin lands in the wizard once per browser session while the setup is neither finished nor paused, something is still open, and the installation is new (no one but admins has signed in yet) or was reset. An existing installation that receives the wizard through an update does not send its admins there. It shows the dashboard card instead.
- The wizard and the page System configuration write the same settings. Changing the file mode or the language in one place changes it in the other.
- The logo is scaled down to at most 512 pixels (the symbol to 256) and is served publicly, because the sign-in page shows it before anyone is signed in.
When something goes wrong
Section titled “When something goes wrong”Messages from the server are only available in German.
| Message | Cause and fix |
|---|---|
| Der Einrichtungscode stimmt nicht. (the setup code is wrong) | Ask whoever runs the server for the current code. Leading and trailing spaces are ignored. |
| Die Ersteinrichtung wurde bereits abgeschlossen. (first setup already done) | An administrator exists. Sign in with that account, or ask that person to invite you. |
| The AI gateway is not responding right now, so the list of providers is missing. | The AI gateway is down or not reachable from the server. Providers you already set up can still be chosen, but the test run only succeeds once the gateway is back. |
| Test run failed | Look at the three checks in the card Test run: a red Provider and model means key or model; a red gateway check means the gateway cannot reach nexxus; a red Model answers means the model did not reply. |
| The base URL must start with http:// or https://, e.g. http://host:11434/v1. | Enter the full address of your endpoint, including /v1. |
| Der Code ist abgelaufen. Schick einen neuen. (the code expired) | Codes are valid for 15 minutes. Click Send a new test email. |
| Der Code stimmt nicht. (the code is wrong) | Check for a newer test mail; only the last code counts. |
| The test email could not be sent | The server rejected the connection or the login. Check server, port, encryption, user and password. |
| Too light for white text: contrast 2.1:1, 3:1 is required. (the number varies) | Pick a darker accent colour. |
| The file is larger than 15 MB. | Export the logo smaller. You crop it in the browser anyway. |
| Directory ID, application ID and secret are required. | All three values from the Entra app registration are needed. |
| Mail sending is not confirmed yet (step Email). Invitations stay in the queue until it is. | Finish step 6. The queued invitations go out afterwards. |
Server settings the page warns about
Section titled “Server settings the page warns about”While no administrator exists, the account page lists server settings that are missing. They do not block you, but they cause problems that are hard to see later. Pass them on to whoever runs the server:
| Setting | What happens without it |
|---|---|
NEXXUS_SECRETS_KEY | A server does not start without it. On a developer machine, two-factor secrets and credentials of AI tools are encrypted with a known development key instead. Marked as critical. |
NEXXUS_REMEMBER_ME_KEY | “Stay signed in” uses a key that changes with every restart, so everyone is signed out after a restart. Marked as critical. |
APP_EMAIL_ENABLED and SPRING_MAIL_HOST | No mail leaves the server. The sign-in link still says “check your inbox”, so nobody notices from outside. |
APP_FRONTEND_BASE_URL | Links in emails point to the wrong address and don’t work for recipients. |
AI_GATEWAY_TOKEN | The AI assistant uses the development token that ships with the software. Replace it per environment. |
For operators
Section titled “For operators”- Set
NEXXUS_SETUP_TOKENto require a setup code on/setup. Without it, the page is open to anyone until the first administrator exists. Both setup endpoints stop working the moment an administrator exists. - The creation of the first administrator is written to the authentication log with the source address.
- Generate the two keys with
openssl rand -base64 32.