
Set up your workspace
Invite users
Bring your colleagues into nexxus. This guide covers every way an account comes about, what the invited person sees, the user list and detail page, removing access, and how an account links to a person and a company.
In nexxus you never hand anyone a password. You invite the person: nexxus creates the account with its roles, sends a link by email, and the person chooses their own password. Until they do, the account exists but nobody can sign in with it.
Take Brandt & Söhne, a 60-person installation company. On the day they start with nexxus, their admin pastes 24 email addresses from Outlook into the setup wizard. Everyone gets the default role „Mitarbeiter:in“ (employee). The two team leads get their own role in a second step, and the bookkeeper is invited on her own with the role „Verwaltung“ (administration). By lunchtime everyone has chosen a password and signed in.
Ways to an account
Section titled “Ways to an account”There are five ways an account comes into existence. Pick the one that fits the person.
| Way | Who starts it | Password | Use it for |
|---|---|---|---|
| Invitation (one person) | An admin, on the user list | The person sets it via the email link | The normal case |
| Invitation (many at once) | An admin, in the setup wizard | Each person sets it via the email link | Onboarding a whole team |
| Account created directly | An admin, on the user list | nexxus generates a temporary password that must be changed at the first sign-in | People without a mailbox, or a password handed over in person |
| First sign-in with Microsoft | The person | None, they sign in with Microsoft | Companies on Microsoft 365, see Sign-in and OAuth |
| First administrator | Whoever sets up a new installation | Chosen on the setup page | Once per installation, see First run |
An invitation goes through four stages:
You invite
Name, email, company and roles. The account is created and locked.
nexxus sends a link
Valid for 7 days, usable once.
The person sets a password
At least 12 characters, checked against known data breaches.
They sign in
With the roles you gave them, from the first click.
Before you start
Section titled “Before you start”- You hold the system role ADMIN. Only administrators may invite people, create accounts and open the user list.
- Mail sending works. Invitations go out through the mail server set up in the step Email of the setup wizard. Until that step is confirmed, invitations wait in the queue.
- There is at least one branch of a company. Every person belongs to a company through one of its branches, and the invitation asks for it. The first own company and its branch are created when you enter Organization name in the setup.
- Your roles exist. The invitation assigns access roles. If you have not set them up yet, read Roles and rights first, or rely on the default role from the setup.
Invite one person
Section titled “Invite one person”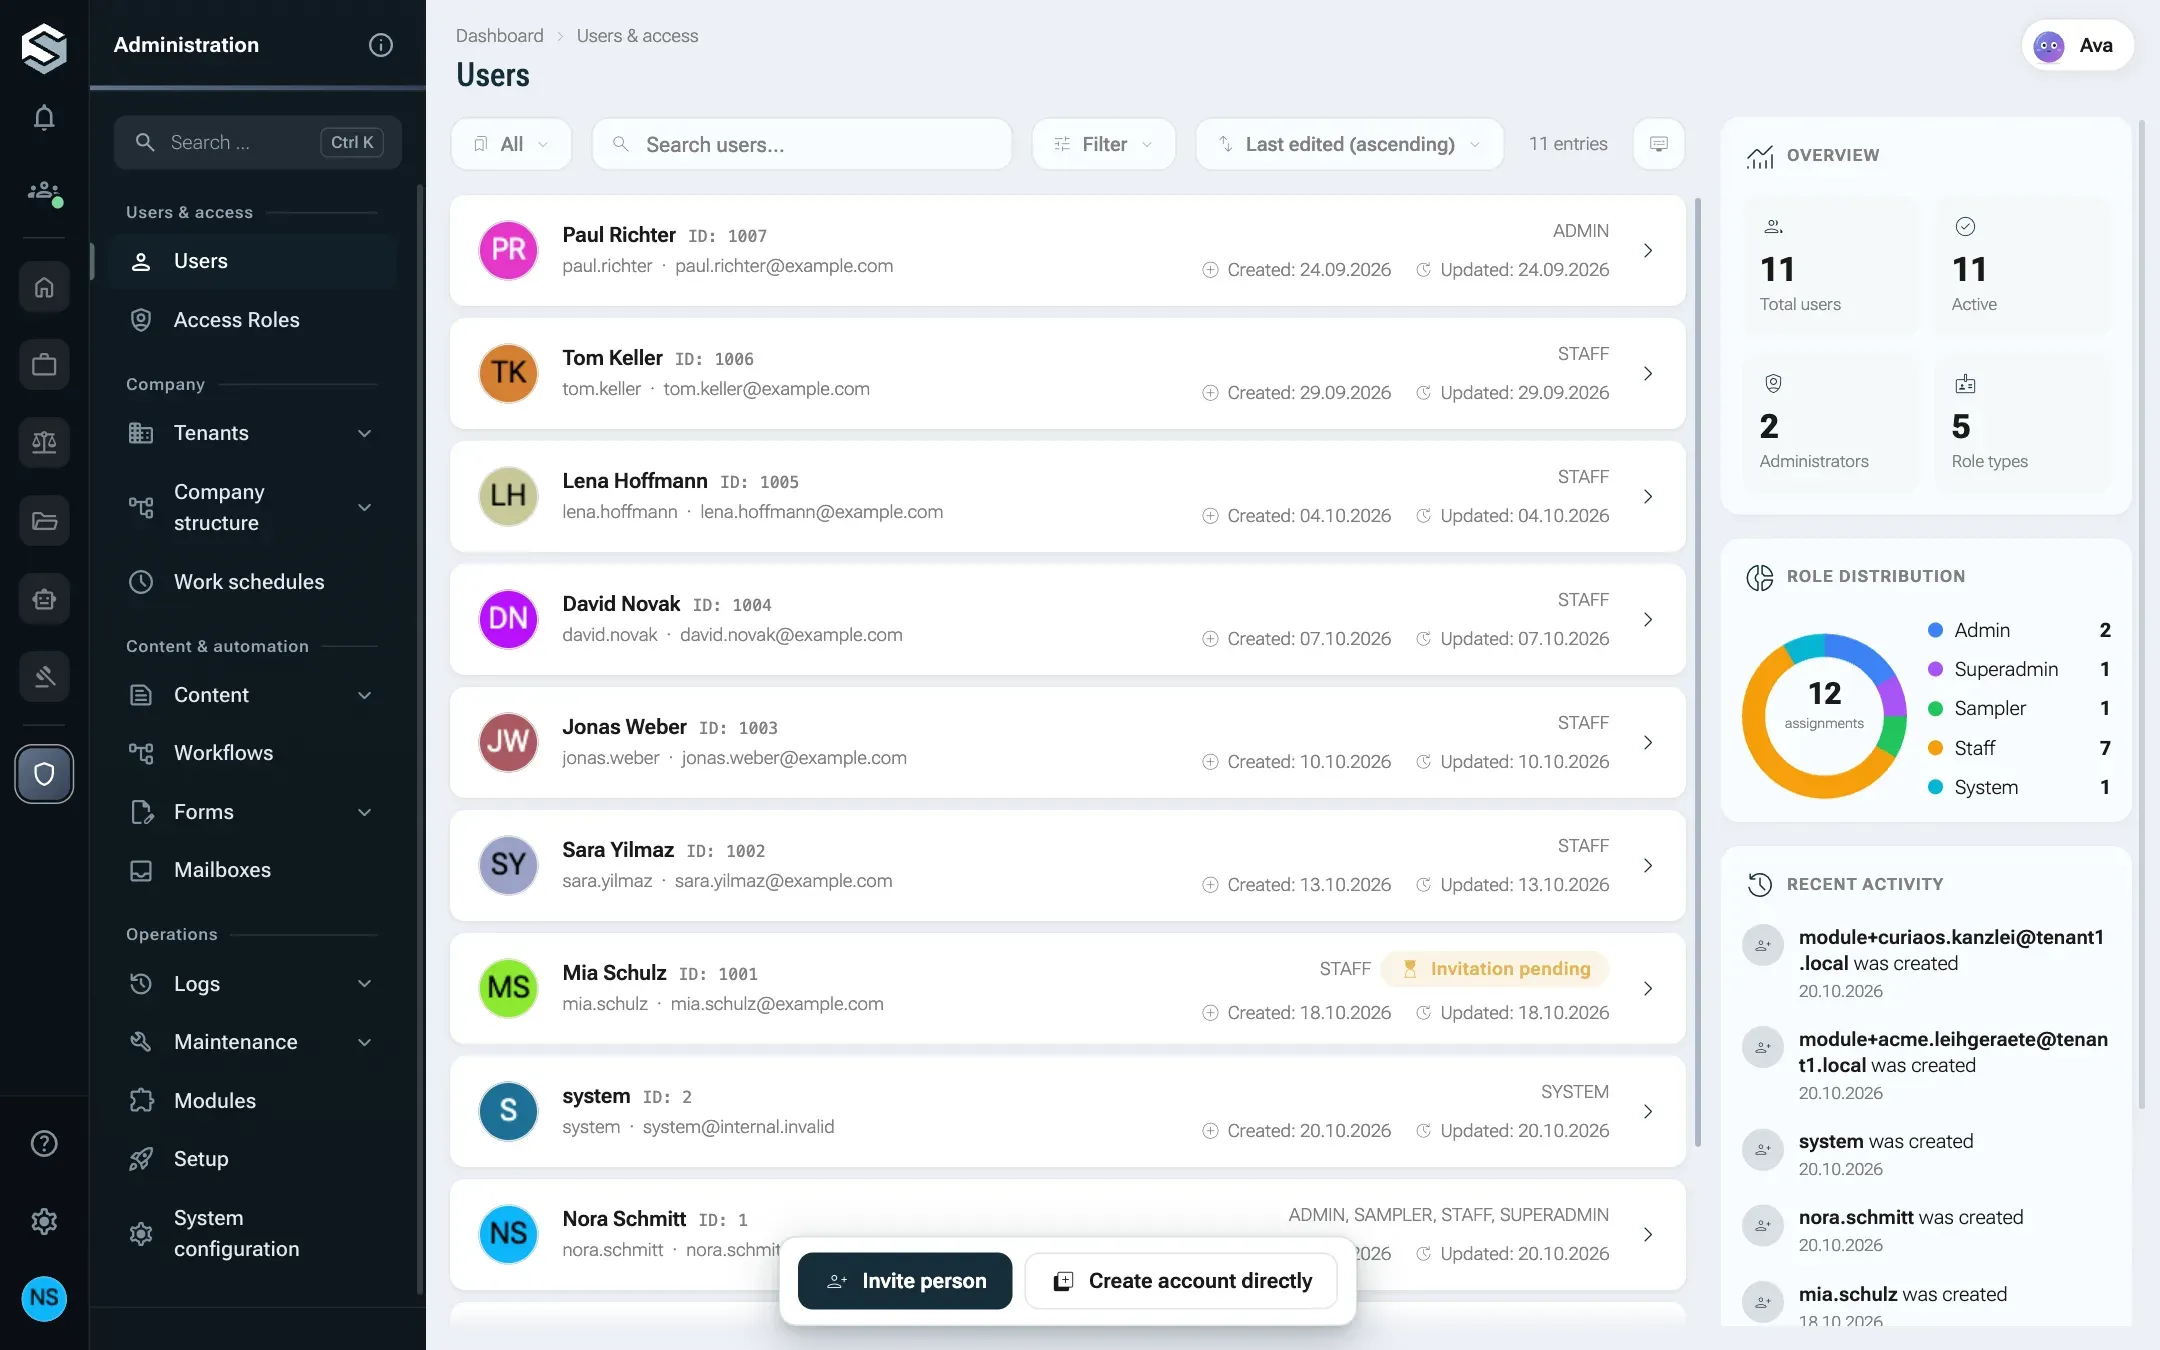
-
Open AdministrationUsers & accessUsers. The page Users lists every account of your workspace.
-
Click Invite person at the bottom of the page. The dialog explains what happens: Sends an invitation link. The account is locked until the invitation is accepted.
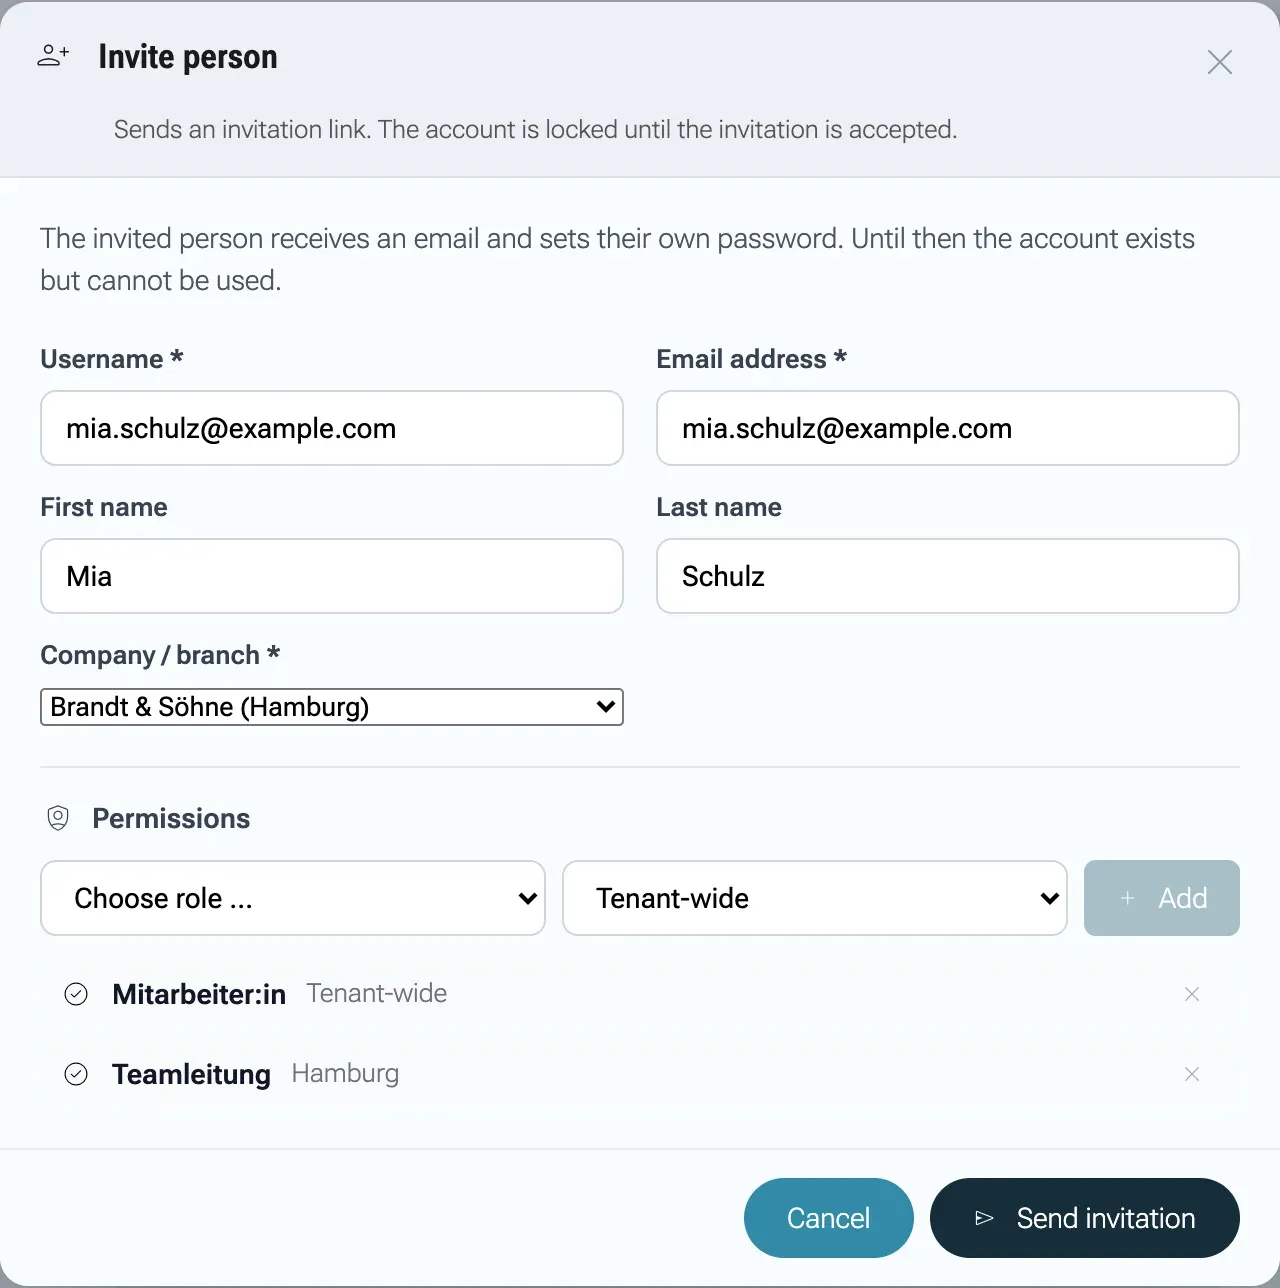
Roles are assigned with the invitation, tenant-wide by default. -
Fill in Username * and Email address *, and optionally First name and Last name. The username is what the person types to sign in. It must be unique across the whole installation, and so must the email address.
-
Choose the branch under Company / branch *. Branches appear as “Name (City)”. A branch of an own company makes the person an employee; a branch of a customer makes them a contact at that customer (see How an account links to a person and a company).
-
Under Permissions, pick an access role and its scope, then click Add. The scope is Tenant-wide by default, which is what you want in most cases. You can add several roles. Each row has a control to remove it again.
If you add no role at all, nexxus warns you that the person can sign in but will see nothing. If you send the invitation anyway, the person gets the default role of your workspace (set in the setup step Roles).
-
Click Send invitation. A message Invitation sent to with the address confirms it, and the person’s card in the list carries the chip Invitation pending.
Invite many people at once
Section titled “Invite many people at once”The setup wizard has a step that takes a whole list of addresses. It is the fastest way to bring in a team, and you can come back to it at any time.
-
Open AdministrationOperationsSetup and choose the step Invite people (during the first setup it is the last step of the wizard).
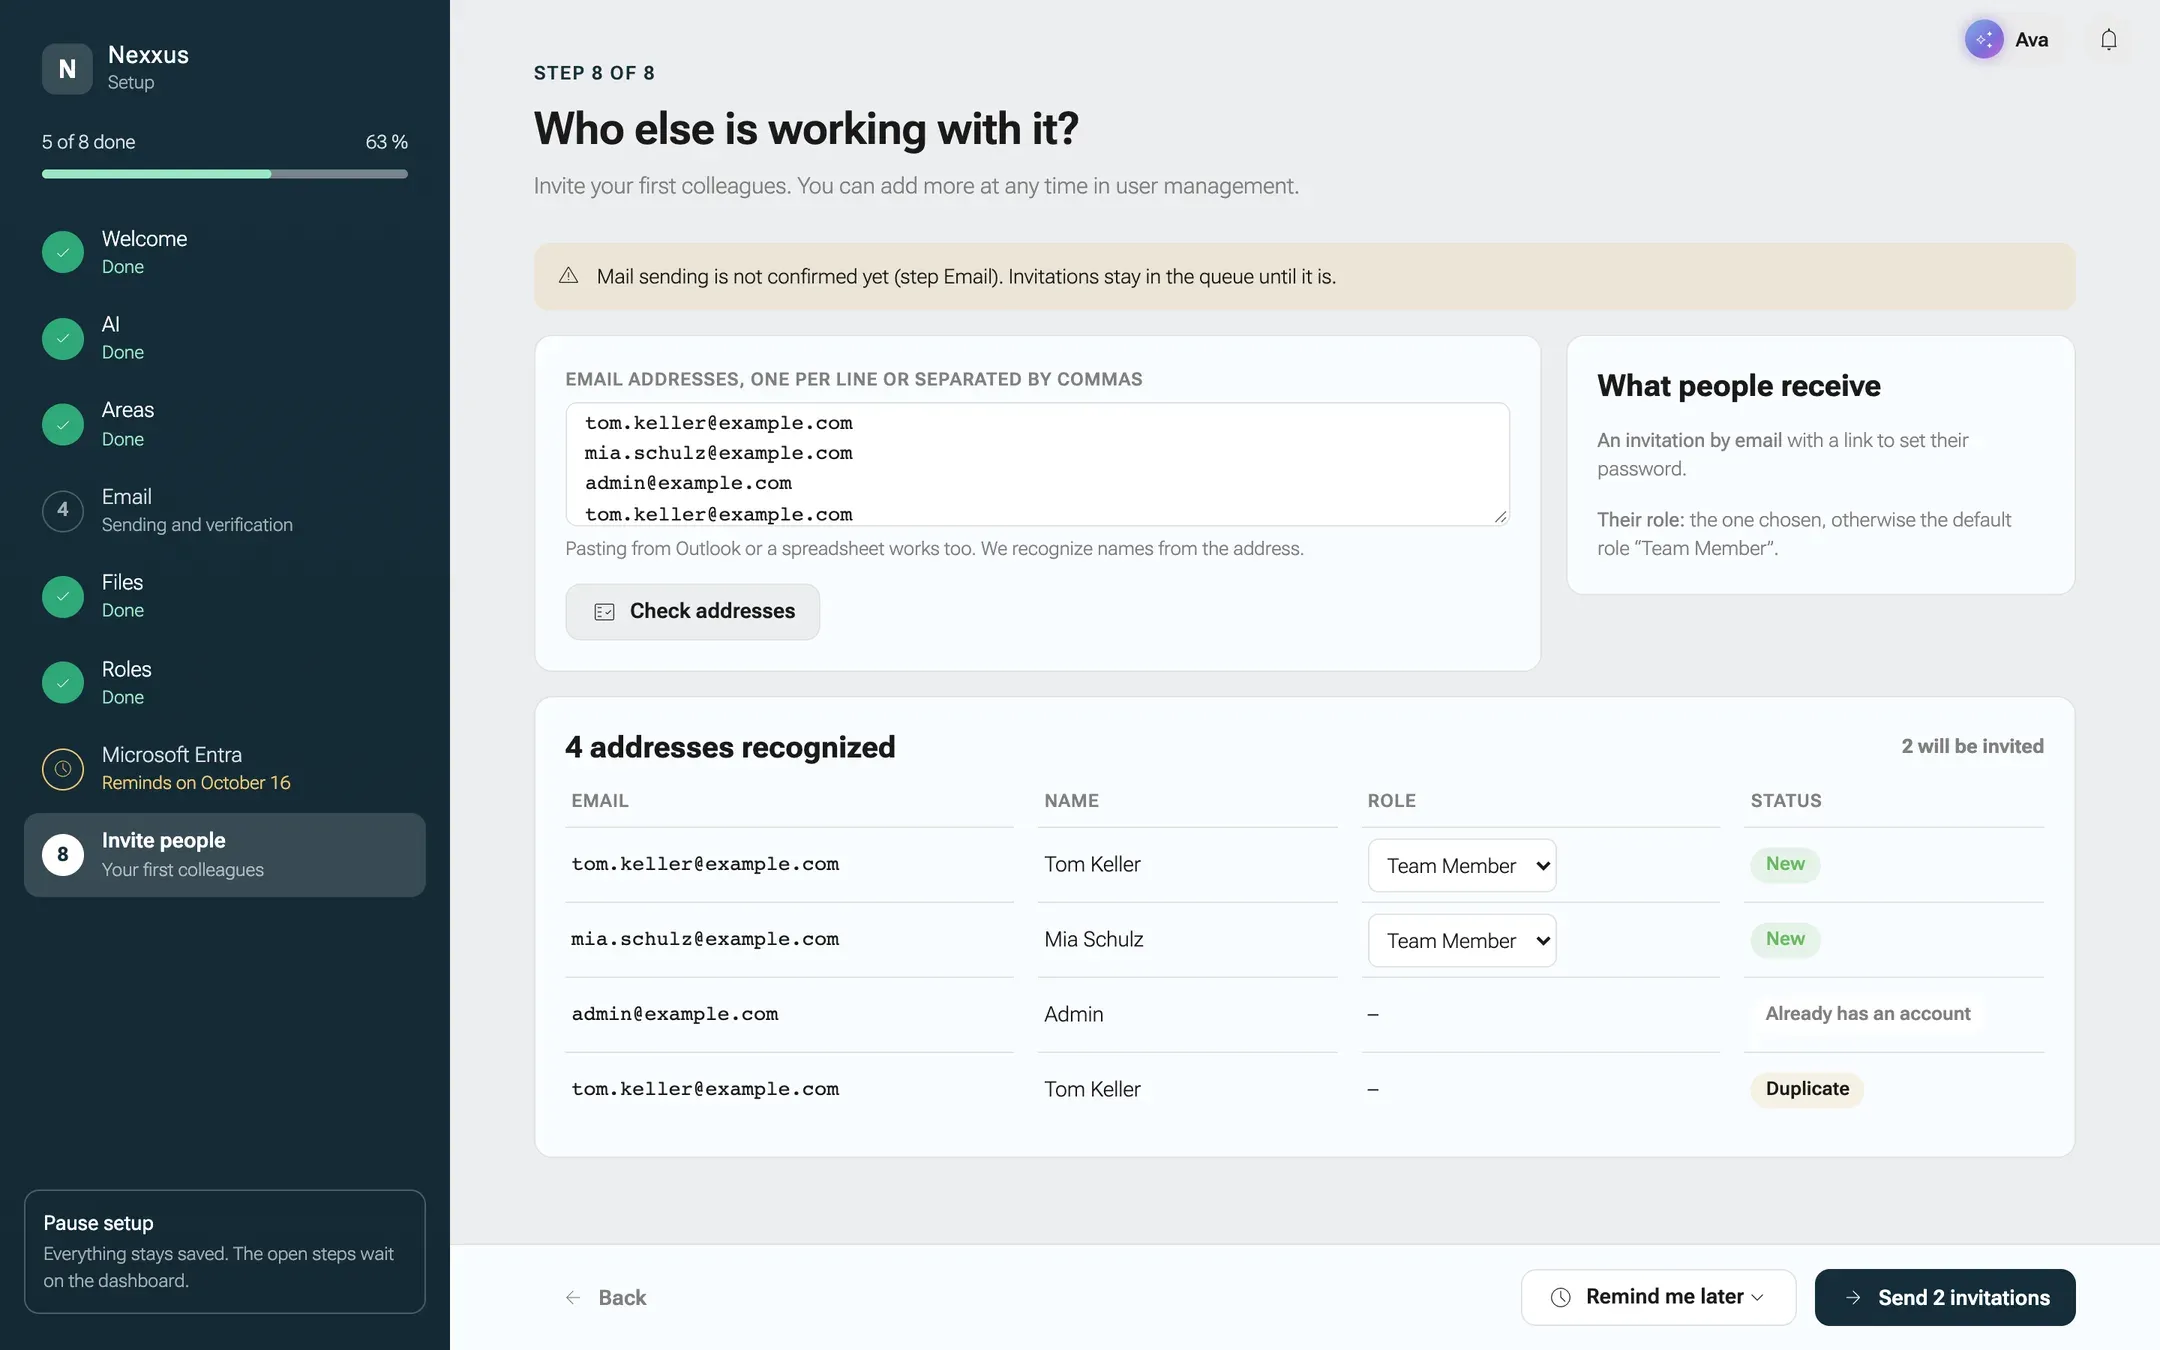
nexxus checks every address before anything is sent. -
Paste the addresses into Email addresses, one per line or separated by commas. Pasting from Outlook or a spreadsheet works. nexxus guesses names from the addresses:
tom.keller@example.combecomes Tom Keller. -
Click Check addresses. nexxus shows a table with the columns Email, Name, Role and Status. The status tells you what will happen to each address:
Status Meaning New Will be invited Invited Has already been invited Already has an account An account with this address exists, nothing is sent Address incomplete Not a usable email address Duplicate Appears twice in your list -
For each new address, choose a role, or No access role. The box What people receive on the right reminds you: an invitation by email with a link to set their password, and the role you chose, otherwise the default role.
-
Click the send button, for example Send 22 invitations.
The username of a person invited this way is their email address in lower case. Bulk invitations do not assign a company. Open each person afterwards and set Company / branch on the tab Master data. You can invite at most 200 addresses at once.
What the invited person sees
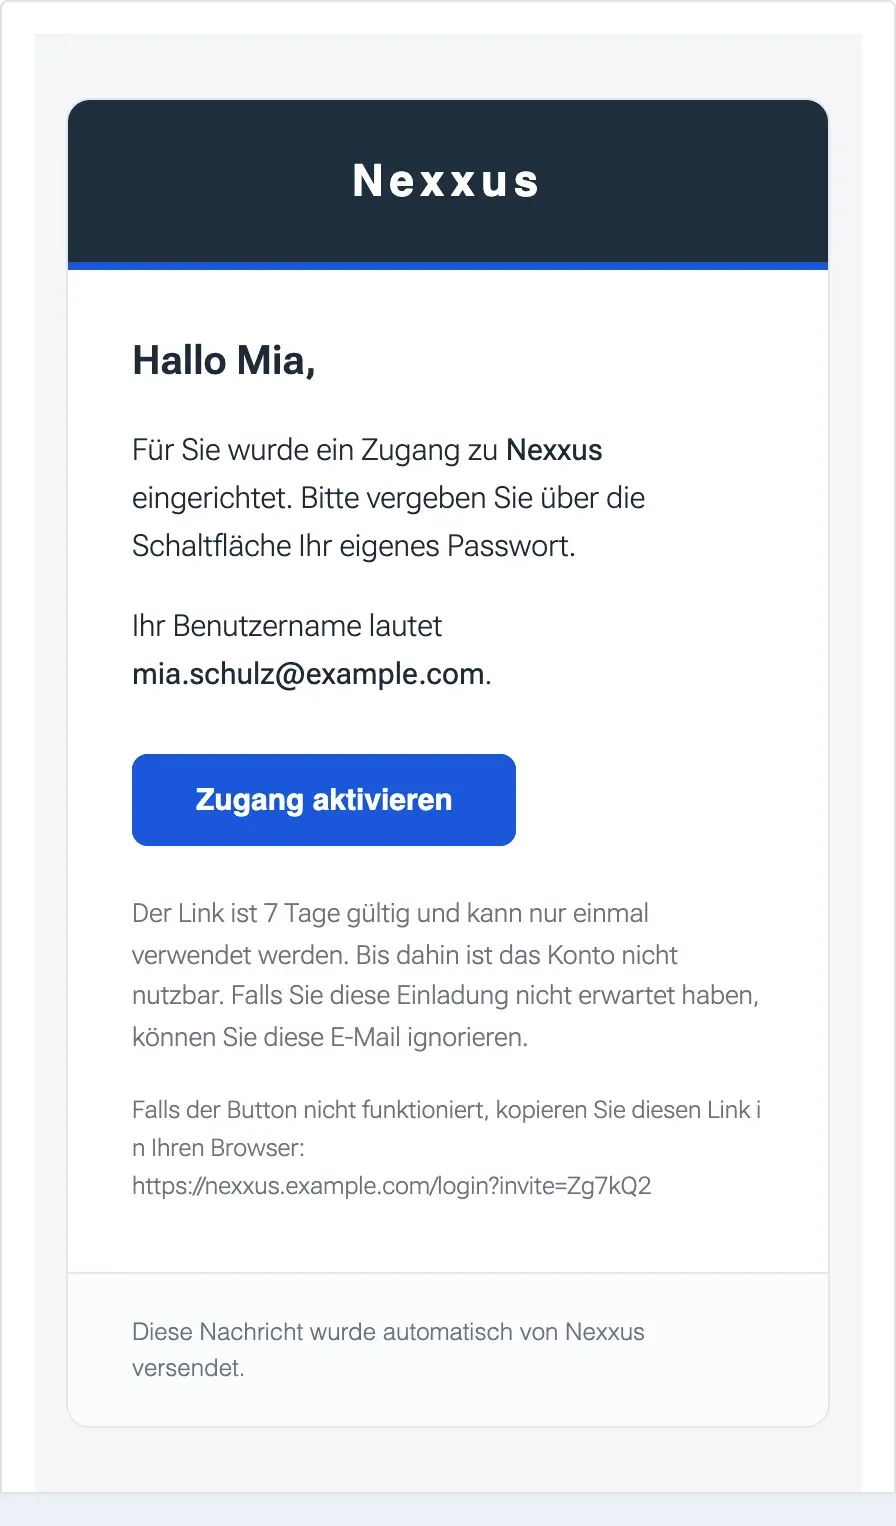
Section titled “What the invited person sees”The invitation arrives as an email from nexxus. Mails from the server are written in German, whatever language the person uses in the app. The subject reads „Ihr Zugang zu“ (your access to) followed by the product name, the email names the username, and the button „Zugang aktivieren“ (activate access) opens the sign-in page. The small print says the link is valid for 7 days and works once.
-
The link opens the sign-in page with the title Activate your access, the person’s name and email address, and the username, which cannot be changed.
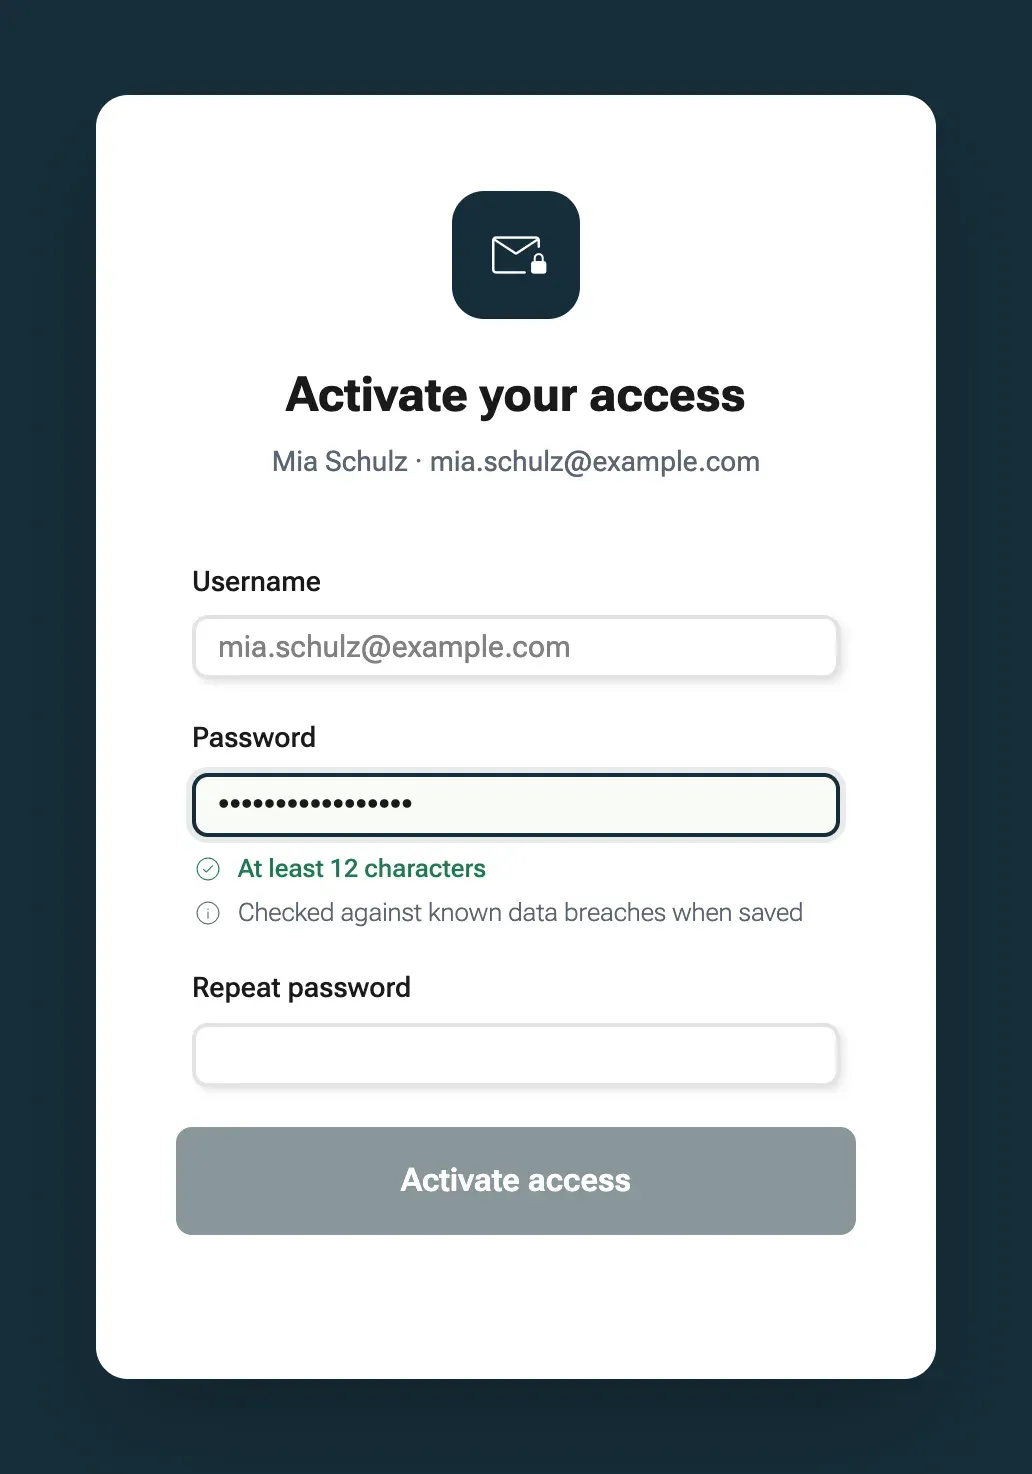
The rules tick while the person types. -
The person types a password into Password and again into Repeat password. Two rules tick as they type: At least 12 characters and Checked against known data breaches when saved.
-
They click Activate access. The page switches to the normal sign-in form with the username filled in, and they sign in with the new password.
nexxus does not sign the person in automatically after they choose the password. The first thing they do is prove that the password they just set works.
The sign-in page and the app are in the default language of your tenant until the person picks their own language on their profile. You set the default under AdministrationOperationsSystem configuration, section Language: Deutsch, English or Polski. The invitation mail itself stays German.
Create an account directly
Section titled “Create an account directly”Some accounts have no mailbox, or you want to hand over the first password in person. For these, nexxus creates the account with a temporary password.
-
On the user list, click Create account directly.
-
The dialog Account created shows a generated password. It is made of four groups of five characters, without letters and digits that are easy to confuse (O and 0, I and 1). Click Copy and pass it on securely. The password is shown only now.
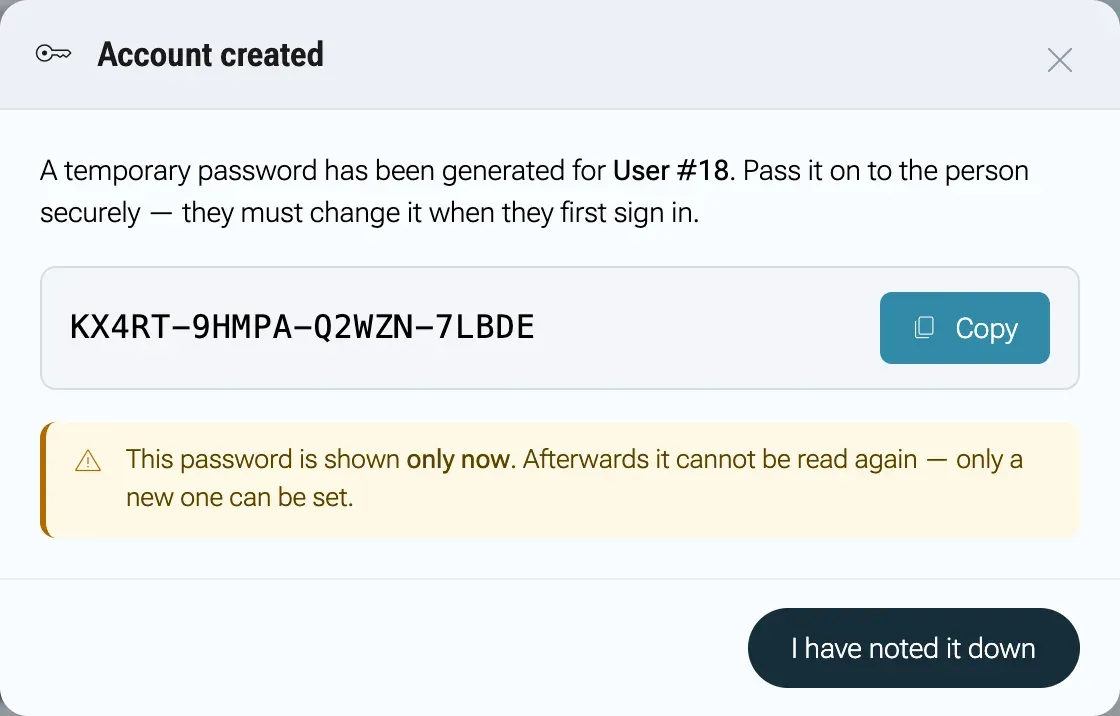
The temporary password is shown only once. -
Click I have noted it down. The dialog does not close any other way, so nobody loses the password by clicking next to it. The new user’s detail page opens: fill in the name, email and company there.
-
At the first sign-in the person sees Password change required and must choose their own password before they can continue.
Resend or withdraw an invitation
Section titled “Resend or withdraw an invitation”An invitation link is valid for 7 days. The app has no button to send it again or to withdraw it. In the app you delete the pending user (see Remove access) and invite again.
For automation, both actions exist in the API and need an administrator:
POST /api/admin/user-invitation/{id}/resend # new link, the old one stops workingDELETE /api/admin/user-invitation/{id} # deletes an account whose invitation was never acceptedA resent invitation invalidates the previous link. Withdrawing fails with „Diese Einladung wurde bereits angenommen.“ (this invitation has already been accepted) once the person has set their password.
The user list
Section titled “The user list”The page Users shows one card per account: picture or initials, name, ID, username and email, the chip Invitation pending where it applies, one chip per system role, and when the account was created and last changed.
- Search in the field above the list. It matches username, first and last name and email.
- Filter by Role (the system roles) and by Last edited.
- Sort by last edited, created or username.
- The panel on the right shows an Overview (Total users, Active, Administrators, Role types), the Role distribution and the Recent activity. Active counts every account that is not deleted, including pending invitations.
- Several accounts at once: select the cards and click Delete in the selection bar.
The user detail page
Section titled “The user detail page”Click a card to open the person. The ⓘ next to the name opens Additional information: the username, when the account was created and last changed, and, where it applies, that the invitation is still pending or that the password must be changed at the next sign-in.
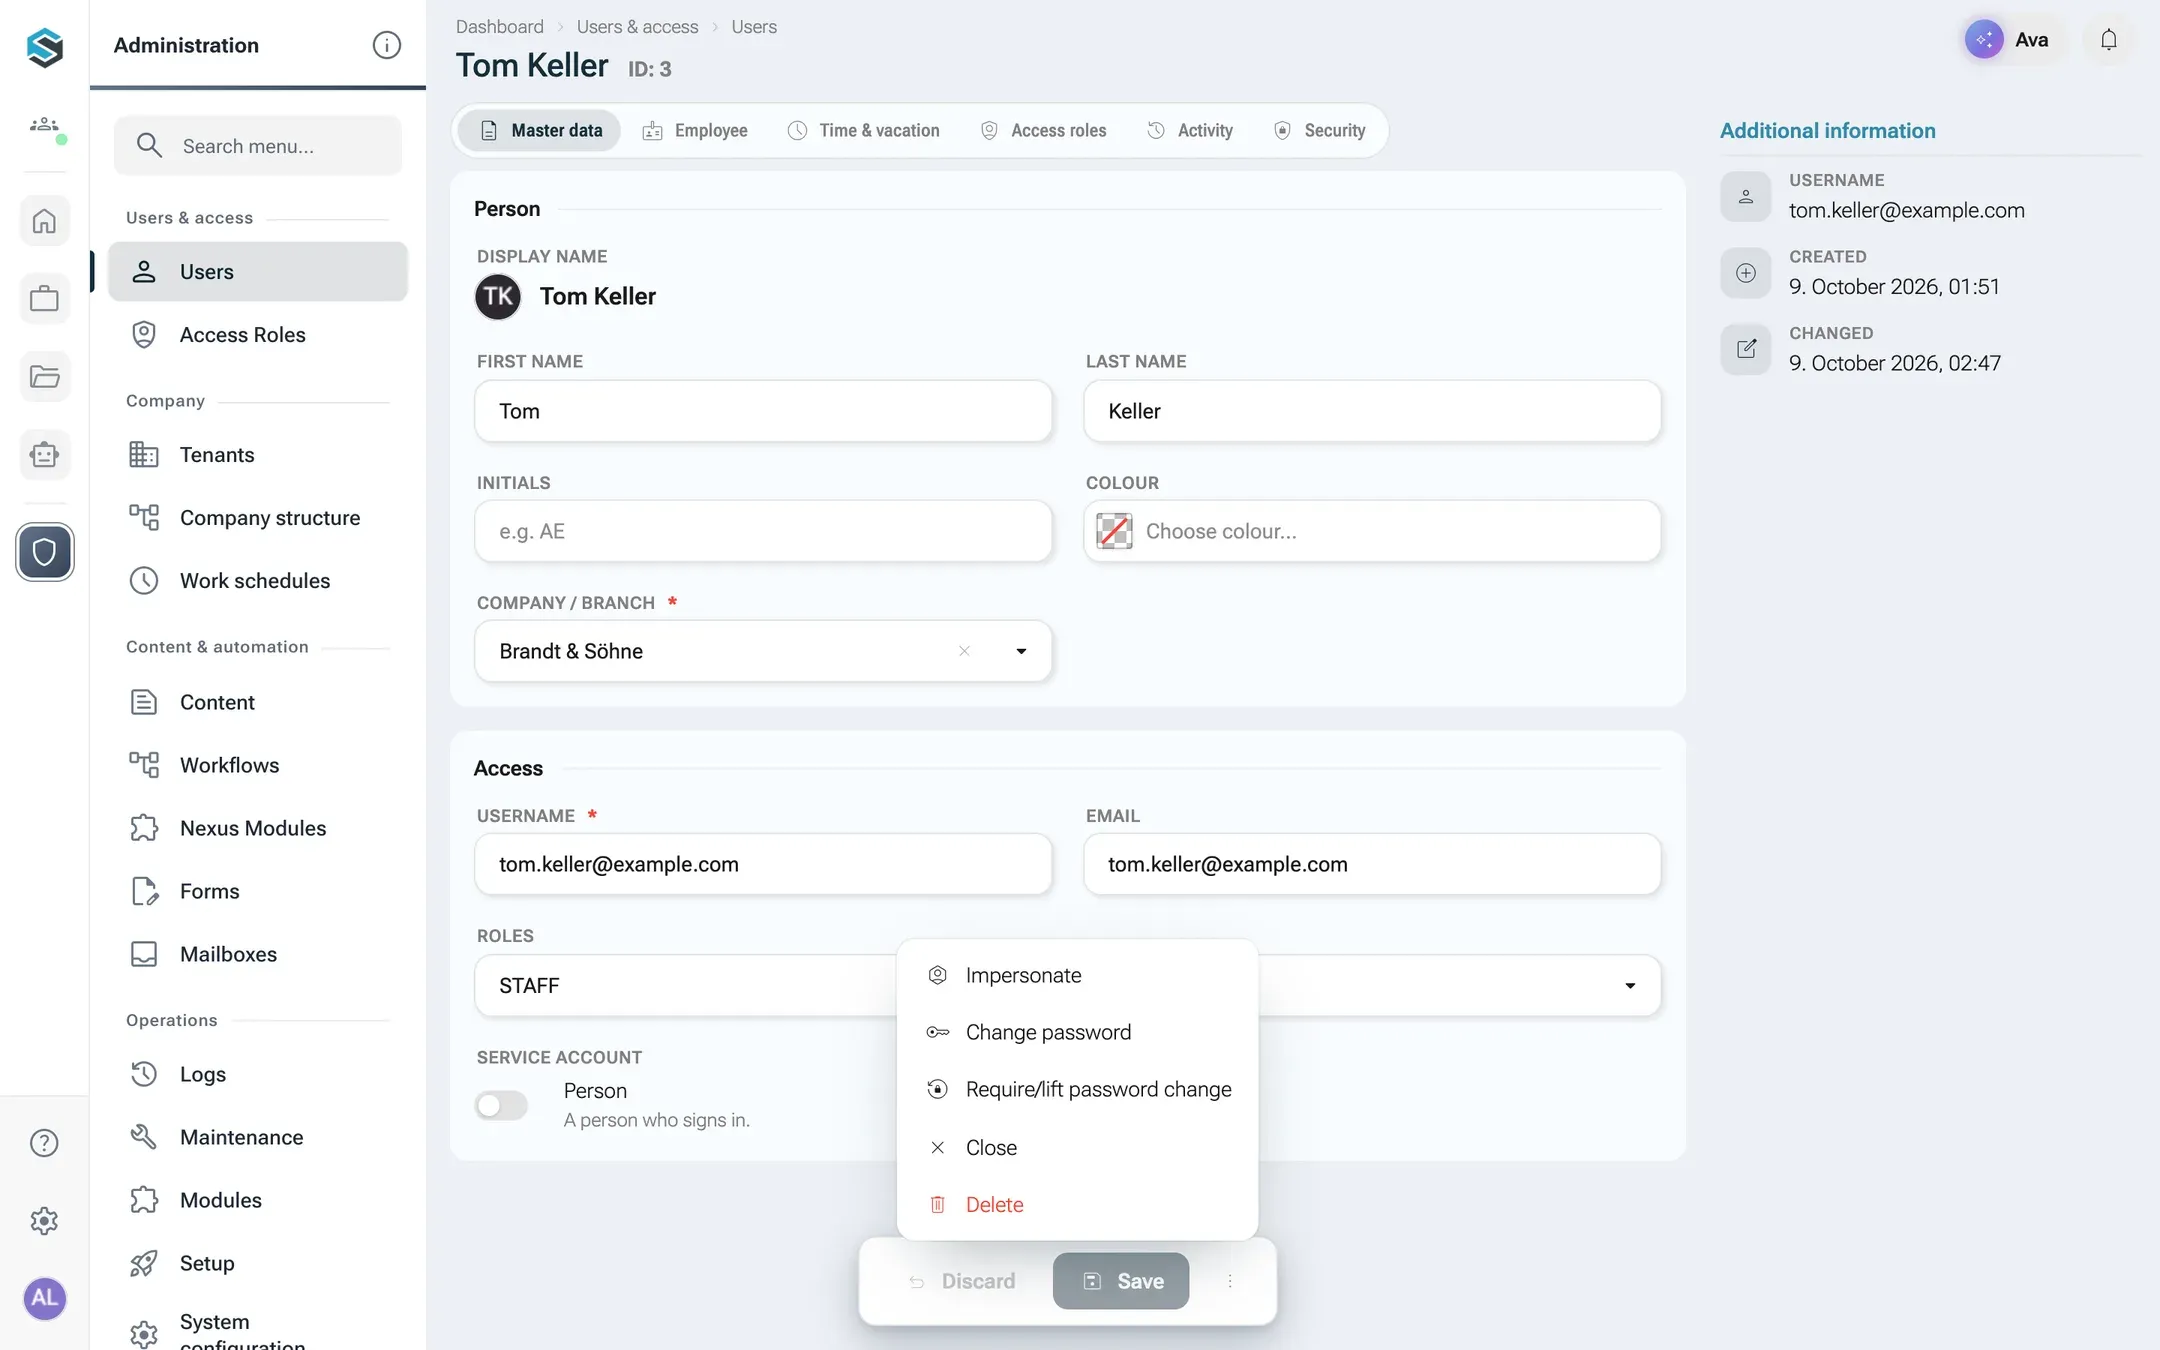
| Tab | Shown when | What you do there |
|---|---|---|
| Master data | Always | Name, initials, colour, Company / branch, username, email, the system roles under Roles, and the switch between Person and Service account |
| Employee | The person’s branch belongs to an own company | The employee profile: team, billing role and level, time tracking, and the assigned work schedules |
| Time & vacation | An employee profile exists | Vacation entitlement, agreements, overtime account, calendar entries |
| Access roles | The user has been saved | Which access roles the person holds, tenant-wide or per business unit. See Roles and rights |
| Activity | You are an administrator | Sign-ins, failed attempts, password changes and data changes of this account |
| Security | Always | Whether a password is set and whether two-factor authentication is active, with Reset 2FA |
The tabs leave out what belongs to a switched-off area: team and working time models without teams & working time models, the billing role without invoices, the time tracking section with Toggl ID and timesheet approval without time tracking, and on the tab Time & vacation the tables of switched-off areas.
The menu More actions (⋮) in the bar at the bottom of the page, next to Save, holds Impersonate, Change password, Require/lift password change, Close and Delete.
- Change password sets a new password for the account: Sets a new password for this account. The old sign-in stops working afterwards. The server applies the same rules as everywhere (at least 12 characters, no known leaked password). Every remembered browser of the person asks for the second factor again, and remembered sign-ins (Stay signed in) are removed on all devices.
- Require/lift password change makes the person choose a new password at their next sign-in, or takes that requirement back.
- Reset 2FA on the tab Security removes the person’s authenticator app when they have lost their phone. Details in Security.
Act as another user
Section titled “Act as another user”When someone reports “I can’t see the invoice”, the quickest way to understand it is to look with their eyes. Impersonate lets an administrator act as another person for a limited time.
-
On the person’s detail page, open More actions (⋮) next to Save and click Impersonate.
-
The dialog Impersonate user asks for a Reason (optional), for example a support ticket number. Click Start impersonation.
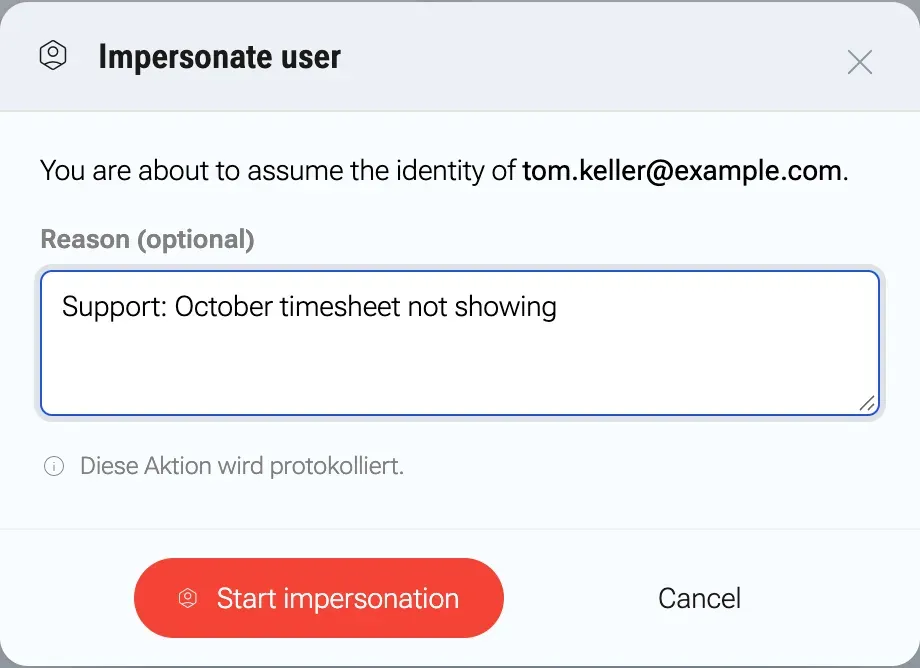
nexxus records the reason with the impersonation. -
At the foot of the menu, a red box now sits above the profile: Signed in as with the person’s name, and Ends in with the time left. A thin red frame runs around the whole window. Everything you do now happens under their identity. To end it, click Back to followed by your own username, for example Back to admin. With the menu collapsed, the profile picture has a red ring, and the box sits at the top of the window that opens when you click the profile picture.
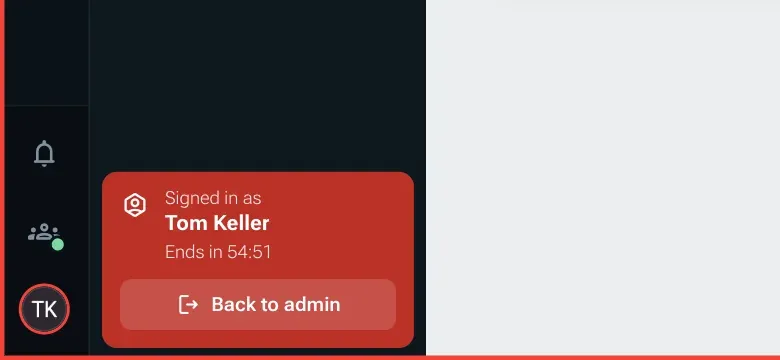
The session ends by itself after 60 minutes. While it runs, nexxus refuses to edit or delete users, change passwords or edit the profile. You cannot impersonate yourself, and an administrator cannot impersonate another administrator. nexxus records who impersonated whom, when, from where and with which reason.
Remove access
Section titled “Remove access”nexxus has no switch to deactivate an account. To take access away, you delete the user: on the detail page via More actions (⋮) and Delete, or for several people from the list. The confirmation reads Do you really want to delete this user?
Deleting is a soft delete. The record stays in the database for the history, so changes made by the person still show who made them. nexxus renames the username in the same step, which frees the name for a new account. The person’s API tokens stop working at once, because nexxus checks the account on every call.
How an account links to a person and a company
Section titled “How an account links to a person and a company”An account in nexxus is more than a login. Through its branch it belongs to a company, and that company decides what kind of person it is.
Account
- UserUsername, email, system roles, access roles
Company / branch
Set on the tab Master data
- Own company
- Customer
Makes the person
- An employeeBranch of an own company: employee profile, time tracking, public holidays of the branch
- A contact at a customerBranch of a customer: no employee profile
- Own company. If the branch belongs to an own company, the person is an employee. The tab Employee appears, and their public holidays follow the federal state of the branch. Without an employee profile they can neither record time nor be billed: create one with Create employee profile.
- Customer. If the branch belongs to a customer, the person is a contact at that customer, for example a client who should see their project documents.
- The company is required for every account except administrators and system accounts. Saving a person without one fails with a message saying that a person belongs to a company.
- A person cannot change their own company. That would let them make themselves an employee.
- Contacts are not accounts. The contacts you keep on a customer record are address data. They have no login and no link to a user.
Service accounts
Section titled “Service accounts”Some work runs without a person at the keyboard: an AI schedule that checks the inbox every morning, a mailbox that files incoming mail. That work needs an identity with its own rights. In nexxus this is a service account.
On the tab Master data, switch the account type from Person to Service account. The hint says what changes: Runs AI schedules; signing in with this account is not possible. Nobody can sign in with a service account, and API tokens do not work for it either. Give it access roles like any other account: they decide what the schedules running under it may do.
Your tenant
Section titled “Your tenant”All accounts, records and settings of your organisation live in one tenant (in German Mandant), a separate data space of the installation. Most installations have exactly one.
The tenant gets its name from Organization name in the setup. To rename it later, open AdministrationCompanyTenants, click the tenant and change Name. The panel also lists the own companies that belong to the tenant; you create and edit them under Own companies. Only a superadmin creates new tenants there (Create tenant). How nexxus keeps tenants apart is described in Security.
What happens behind the scenes
Section titled “What happens behind the scenes”- The account exists before the person accepts. nexxus creates it with a random password nobody knows and marks it as pending. Every invited account also gets the system role STAFF, the basic role for people who work in the app.
- The link is a one-time token. nexxus stores only a hash of it. It is valid for 7 days and used up when the password is set. Opening the link without submitting does not use it up, so reloading the page is safe.
- Roles are written together with the account. If the invitation names no role, nexxus assigns the default role from the setup, tenant-wide.
- The company is saved in a second step. If that fails, the invitation still goes out, and nexxus tells you to add the company in the person’s master data.
- Mail. The invitation is queued and only leaves when mail sending is switched on and the mail server is confirmed.
When something goes wrong
Section titled “When something goes wrong”Messages from the server are in German. The meaning is in brackets.
| Message | Cause and fix |
|---|---|
| „Nur Administratoren dürfen Einladungen verwalten.“ (only administrators may manage invitations) | Your account lacks the system role ADMIN. Ask an administrator. |
| „Der Benutzername … ist bereits vergeben.“ (username already taken) | Usernames are unique across the installation. Choose another one. |
| „Zu dieser E-Mail-Adresse existiert bereits ein Konto.“ (an account with this email exists) | Open the existing account instead. |
| „Bitte eine gültige E-Mail-Adresse angeben.“ (enter a valid email address) | Check the address for typos. |
| The invitation could not be sent. | Check the mail settings in the setup step Email. |
| The person reports Invitation no longer valid | The link is older than 7 days, was already used, or a newer invitation replaced it. Delete the pending user and invite again. |
| „Das Passwort muss mindestens 12 Zeichen lang sein.“ (at least 12 characters) | The password is too short. |
| The person cannot click Activate access | The password is shorter than 12 characters. Once they leave the field, the field and the rule At least 12 characters turn red. A longer password enables the button. |
| „Dieses Passwort taucht in bekannten Datenlecks auf und kann nicht verwendet werden.“ (this password appears in known data breaches) | The person chooses another password. |
| An invited person sees an empty menu | They hold no access role that opens a page. Assign one on the tab Access roles. |